background image

5

REVERSE REFRIGERATOR DOOR     


HARDWARE CONTENTS                   

PREPARATION                           

The direction of the fridge door is reversible. Before reversing the door, make sure all parts 

are present. Compare parts with hardware contents list. If any part is missing or damaged, do 

not attempt to assemble the product. 

Make sure remove all food from the fridge. 

CAUTION:

 Make sure the fridge is turn off (

turn the temperature control inside the fridge 

to "OFF."

), then unplug the power cord. 

Failure to unplug the unit could result in electrical 

shock or personal injury.

Estimated Assembly Time: 30 minutes by two people 

Tools Required for Assembly: Phillips Screwdriver

Содержание BG179B

Страница 1: ...NT READ THIS USER S MANUAL PRIOR TO CONNECTING POWER AND USE IMPORTANT SAVE THESE INSTRUCTIONS FOR FUTURE REFERENCE IF YOU ARE ASSEMBLING THIS UNIT FOR SOMEONE ELSE GIVE THIS MANUAL TO HIM OR HER TO SAVE FOR FUTURE REFERENCE WARNING BEFORE THE REFRIGERATOR IS USED IT MUST BE PROPERLY POSITIONED LEVEL AND INSTALLED AS DESCRIBED IN THIS MANUAL READ THIS MANUAL CAREFULLY Master Forge M Design is a re...

Страница 2: ...TENTS Safety Information 3 Installation Instructions 4 Reverse Refrigerator Door 5 Care and Maintenance 9 Troubleshooting 11 Technical Data and Wiring Diagram 13 Warranty 14 Exploded View 15 Replacement Parts List 15 ...

Страница 3: ... it is specifically recommended in this manual All other servicing should be referred to a qualified technician To ensure proper ventilation for your refrigerator the front of the unit must be completely unobstructed Choose a well ventilated area with temperatures above 40 F 5 C and below 105 F 40 C This unit must be installed in an area protected from the elements The refrigerator should not be l...

Страница 4: ...gged has lost power or is turned off you must wait 3 to 5 minutes before restarting the unit If you attempt to restart before this time delay the unit will not start Food Storage Wrap food in plastic wrap before storing Place food evenly on wire rack Let hot food cool down before putting into this refrigerator for saving energy Don t open door frequently Keep space between foods inside refrigerato...

Страница 5: ...any part is missing or damaged do not attempt to assemble the product Make sure remove all food from the fridge CAUTION Make sure the fridge is turn off turn the temperature control inside the fridge to OFF then unplug the power cord Failure to unplug the unit could result in electrical shock or personal injury Estimated Assembly Time 30 minutes by two people Tools Required for Assembly Phillips S...

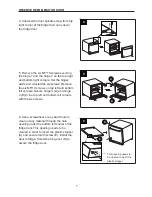
Страница 6: ...e the drawers and set aside 2 Remove the four M4 8 screws securing fridge clamp panel to the left and right side panels Take out the fridge clamp panel out 3 Remove the two M6 12 screws on rear panel and two M6 16 screws on base panel securing the fridge Carefully take the fridge out Note Make sure lift up the fridge to avoid scratching the base panel ...

Страница 7: ... top left and bottom left corners Secure hinge 3 A and hinge 4 B to the top left and bottom left corners with the six screws 6 Use a screwdriver or any hard tools to clear out any material through the hole opening under the bottom left corner of the fridge door This opening needs to be cleared in order to insert the plastic stopper C and secure it with screw E Install the door to fridge Screw the ...

Страница 8: ...8 REVERSE REFRIGERATOR DOOR 7 Reinstall the fridge and secure it to the unit with two M6 12 screws through rear panel and two M6 16 screws through base panel ...

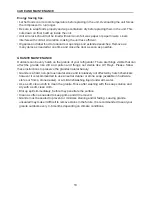
Страница 9: ...arranty We recommend using a plastic scraper to remove any frost build up CAUTION Failure to unplug the unit could result in electrical shock or personal injury Installing You Unit Most power failures are corrected within a few hours and should not affect the temperature of your unit if you minimize the number of times the door is opened If the power is going to be off for a longer period of time ...

Страница 10: ...ings visible that can affect the granite like dirt and pollen and things not visible like UV Rays Please follow these instructions to preserve the granites natural beauty Granite is a hard non porous natural stone and is relatively not affected by harsh chemicals however it is recommended to use a neutral cleaner or stone soap available in hardware stores or from a stone dealer or a mild dishwashi...

Страница 11: ...ST Friday PROBLEM POSSIBLE CAUSE CORRECTIVE ACTION Unit does not operate 1 Not plugged in 2 The circuit breaker tripped or a blown fuse 3 The unit temperature control is set at O position 1 Firmly plug the cord into a live outlet with proper voltage 2 Reset the circuit breaker or replace the fuse 3 Refer to the Setting the Temperature Control section on page 4 Turn on and off frequently 1 The ambi...

Страница 12: ...t level 2 The gasket is dirty or bent 3 The food are out of position 1 Check to assure that the unit is level 2 Clean gaskets and the surface that they touch Rub a thin paraffin wax on the gaskets after cleaning 3 Check for anything blocking the door Remove any food that may be preventing the door from closing ...

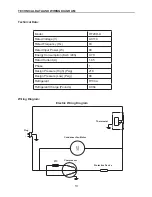
Страница 13: ...Hz 60 Rated Input Power W 80 Energy Consumption Kw h 24h 0 70 Rated Current A 1 45 Phase 1 Design Pressure High Psig 218 Design Pressure Low Psig 88 Refrigerant R134a Refrigerant Charge Pounds 0 064 Wiring Diagram Compressor PTC Protective Device Condenser Fan Motor Thermostat Plug Electric Wiring Diagram ...

Страница 14: ...cover failures due to misuse of improper installation or maintenance This warranty is for replacement of defective parts only We are not responsible for incidental or consequential damages or labor costs This warranty does not cover corrosion or discoloration after the product is used or lack of maintenance hostile environment accidents alterations abuse or neglect This warranty does not cover dam...

Страница 15: ...A Granite Countertop 1 K Top Crossbeam 1 B Drawer Base Panel 1 L Bottom Crossbeam 1 C Glide 2 M Fridge 1 D Rear panel 1 N Fridge Rear Bracket 2 E Fridge Clamp Panel 1 O Base Panel Assembly 1 F Right Side Panel Assembly 1 P Castor 2 G Locking Castor 2 Q Door Reverse Kit 1 H Cover 1 R Product Cover 1 I Door Handle Bracket 4 S Fridge Handle 1 J Left Side Panel Assembly 1 A B D E C F G H I J K L M N O...

Отзывы: