background image

10

3.4 Einbau in Loks ohne Schnitt-

stelle

Generell lässt sich der Dekoder in Loks 

ohne Schnittstelle besonders einfach 

einbauen. Dabei wird der Dekoder mit 

Hilfe der mitgelieferten Kabel direkt am 

Getriebe angeschlossen. Der Aufbau des 

Getriebes kann abhängig vom Hersteller 

unterschiedlich sein.  

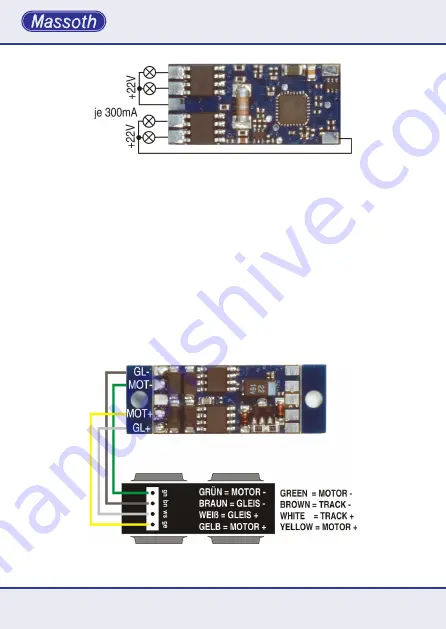
3.4 Installation without interface 

Installation in a locomotive without 

interface is pretty simple. The decoder 

must be connected to the 4 leads of the 

motor block utilizing the color coded 

wires provided. The design of the motor 

block may vary with the manufacturer.

Abbildung 4: Anschluss am LGB

®

 Getriebe

Illustration 4 : Hook-up at LGB

®

 motor block

Abbildung 3: Verschaltung der Licht- und Funktionsausgänge (Glühbirnensymbol 

steht für allgemeinen Verbraucher)

Illustration 3: Connection of the light- and function outputs (the bulb symbol stands 

for all regular loads)

Содержание 8154501

Страница 1: ...eMOTION M Anschlussanleitung eMOTION M Connection Manual Art Nr Item No 8154501 Version 2 3 ...

Страница 2: ...ktionsausgänge das die Spannung entsprechend der CV Liste richtig ein gestellt ist Für Schäden durch Nicht beachtung dieses Hinweises überneh men wir keine Haftung Introduction Dear customer we highly recommend to read both product manuals and especially the warning notes thoroughly before operation This manual describes the installation of the eMOTION M decoder Note concerning the function output...

Страница 3: ...nittstelle Anschluss SUSI Massoth Bus Technische Daten Garantie Reparatur Kundendienst Hotline Table of Contents General Information Summary of Functions Scope of Supply Hook Up Motor and track connection Installation Advanced settings Terminals on the upper side Terminals on the lower side Light and function outputs Installation without interface Using the SUSI Massoth bus Technical Data Warranty...

Страница 4: ...gänge alle mit konfigurierbaren Sonderfunktionen 2 x 0 3A A1 2 2 x 0 05A A5 6 und 1 x 0 01A 5V A3 1 General Information We recommend to read this manual carefully before the decoder is installed and operated Some functions require the latest firm ware for availability Please update the decoder with the latest firmware 1 1 Summary of Functions 14 28 and 128 speed steps 256 internal speed steps 1023...

Страница 5: ...ION M Dekoder mit Getriebean schlusskabel Klebepad Anschlussanleitung Konfigurationsanleitung Light and function outputs may be dimmed and activated in analog mode Programmable blinking light short time function and pulse generator function Switching speed with free function mapping Easy to use function mapping Free command allocation of all function outputs F1 F16 Maximum total load 1 8 Amps moto...

Страница 6: ...ss des Getriebes Verbinden Sie das gelbe Motor und grüne Motor Kabel mit dem Motor im Getriebe 2 Hook Up Install your decoder in compliance with the connecting diagram in this manual The decoder is protected against shorts and excessive loads However in case of a connection error e g a short between a light and the motor this safety feature cannot work and the decoder will be destroyed subsequentl...

Страница 7: ... zusätzlichen Funkti onen des Dekoders 3 1 Anschlüsse auf der Oberseite 2 2 Installation You may mount the decoder with either the supplied double sided tape or with two screws using the mounting holes Caution Make sure that there is no short circuit caused by the mounting screws Use a small soldering iron to prevent short circuits with other electronic components or solder pads Do not mix up the ...

Страница 8: ...m Getriebeanschluss MOT Motor Gelbes Kabel zum Getriebeanschluss LV front light LH rear light Dek Common terminal for light and function outputs A1 function output 1 some flashing functions pulse A2 function output 2 some flashing functions pulse alternate flashing GND GND e g for a power buffer 3 2 Terminals on the lower side GL track brown wire to the motor block GL track white wire to the motor...

Страница 9: ...ür alle Funkti onsausgänge der Minuspol wird einzeln für jede Funktion durch das Digitalsys tem geschaltet GND GND e g for a power buffer A3 function output 3 output for RC servo control A5 function output 5 control output for power buffer BC A6 function output 6 output for pulse simulation chuff TxD bus terminal Data Out for Massoth bus or SuSi clock RxD bus terminal Data In for Massoth bus or Su...

Страница 10: ...ace Installation in a locomotive without interface is pretty simple The decoder must be connected to the 4 leads of the motor block utilizing the color coded wires provided The design of the motor block may vary with the manufacturer Abbildung 4 Anschluss am LGB Getriebe Illustration 4 Hook up at LGB motor block Abbildung 3 Verschaltung der Licht und Funktionsausgänge Glühbirnensymbol steht für al...

Страница 11: ... Die nötige CV Programmierung entneh men Sie Bitte der CV Liste 3 5 Using the SUSI Massoth bus The hook up of SuSi bus components requires soldering four wires to the decoder black GND SuSi red Dec SuSi grey RxD SuSi Data blue TxD SuSi clock Please check the CV list for the required CV settings Abbildung 5 Anschluss am Feldbahn Getriebe Illustration 5 Hook up at small diesel loco motor block ...

Страница 12: ...eheizten Raum kommt Die Eigenwärme des Fahrbetriebs reicht aus um Kondenswasserbildung zu verhindern 4 Technical Data Power supply 0 24 V DC DCC momentary max 27V Total load Max 2A Motor output Max 1 2A 70Hz 16KHz load controlled digital and analog Light outputs Max 0 3A each 22V dimmable Function outputs 1 2 Max 0 3A each 22V dimmable Function output 3 Max 0 01A 5V Function outputs 5 6 Max 0 05A ...

Страница 13: ... Internetseite finden Sie die jeweils aktuellen Broschüren Produktinformationen Dokumentation und Softwareprodukte rund um MASSOTH Produkte 4 1 Warranty Service Support MASSOTH warrants this product against defects in materials and workmanship for one year from the original date of purchase Other countries might have different legal warranty situations Normal wear and tear consumer modifications a...

Страница 14: ...4 hotline massoth de 4 2 Hotline For technical support contact Massoth Elektronik GmbH Germany Mo 2 00 5 30 p m Thu 8 00 12 00 a m FON 49 0 6151 35077 38 FAX 49 0 6151 35077 44 hotline massoth de Massoth Electronics USA 6585 Remington Dr Suite 200 Cumming GA 30040 9 00 a m to 4 00 p m EST Mo thru Fr Ph 1 770 886 6670 Fax 1 770 889 6837 hotline massoth com ...

Страница 15: ...rei hergestellt und damit RoHS konform This unit is manufactured according to the latest EG Standards for lead free manufacturing conforming to RoHS Standard Entsorgen Sie das Produkt nicht im Hausmüll Nutzen Sie bitte den dafür vorgesehenen Elektroschrott Please dispose of according to your State regulations Werfen Sie das Produkt nicht in offenes Feuer oder durch Hitze entflammbare Brennstoffe D...

Страница 16: ...MADE IN GERMANY Massoth Elektronik GmbH Frankensteiner Str 28 D 64342 Seeheim Germany FON 49 0 6151 35077 0 FAX 49 0 6151 35077 44 eMail info massoth de www massoth de 8154501_0510_ML ...

Отзывы: