5
5
Safety Warnings and Installation in Brief
(English)
WARNING!
• Hazardous voltages exist inside—do not remove
cover.
• Refer servicing to a qualified technician.
• To prevent fire or shock hazard, do not expose
this module to moisture.
• Unplug subwoofer should any abnormal condi-
tions occur.
• Turn amplifier off and unplug subwoofer should
any abnormal conditions occur.
• The power cord should not be installed, removed,
or left detached from the speaker while the other
end is connected to an AC power source.
• Use only with a grounded electrical outlet.
• No candles or other sources of open flame
should be placed on the speaker.
• No liquids either in glasses or vases should be
placed on speaker.
• Speaker should not be exposed to dripping or
splashing liquids.
• The terminals marked with the lightning bolt sym-
bol should be connected by an instructed person
or by way of ready made terminals
We know you are eager to hear your new MartinLogan
subwoofer, so this section is provided to allow fast and easy set
up. Once you have your subwoofer operational, please take the
time to read, in depth, the rest of the information in the enclosed
manual. It will give you perspective on how to attain the greatest
possible performance from this most exacting woofer system.
If you should experience any difficulties in the setup or opera-
tion of your MartinLogan subwoofer, please refer to the Room
Acoustics, Placement or Operation sections of the enclosed
owner’s manual. Should you encounter a persistent problem that
cannot be resolved, please contact your authorized MartinLogan
dealer. They will provide you with the appropriate technical
analysis to alleviate the situation.
Step 1: Unpacking
Remove your new subwoofer from its packing.
Step 2: Placement
Place the subwoofer in a corner near the front of the room.
Please see the Placement section of the enclosed manual for
more details.
Step 3: Signal Connection
Use the best interconnect cables you can. High quality cable,
available from your specialty dealer, is recommended and will
give you superior performance.
Attach your preamplifier/processor outputs through cables to
the signal input area located on the subwoofer. Please see the
Connections and Control Settings section of the enclosed manual
for more details.
Step 4: Power Connection (AC) (see warning)
Set the level knob to 0. Plug the subwoofer into a wall outlet.
Please see the Connections and Control Settings section of the
enclosed manual for more details.
Step 5: Setting the Controls
Set the level knob to a medium volume position. Set the power
switch to ‘Auto’. If your subwoofer is equipped with a 25Hz
level knob set it to 0.
Step 6: Listen and Enjoy.
Sikkerhedsanvisninger og gode råd om instal-
lationen (Dansk)
ADVARSEL!
• Farlig højspænding inden i. Undgå at fjerne cov-
eret.
• Overlad alle former for service og reparation til
en kvalificeret tekniker.
• For at undgå elektriske stød og risiko for ildeb-
rand bør dette produkt ikke udsættes for fugt.
• Tag højttaleren skal eventuelle unormale tilstande
opstår.
• Sluk forstærkeren og fjern straks tilslutningerne til
subwooferen hvis ikke produktet virker efter hen-
sigten.
• Lysnetkablet bør ikke tilsluttes, fjernes eller efter-
lades på gulvet, hvis stikket i den anden ende er
tilsluttet en lysnetkontakt.
• Anvend kun Subwooferen hvis den kan tilsluttes til
en lysnetkontakt med indbygget jordforbindelse.
• Undgå brugen af åben ild og stearinlys på eller i
nærheden af højttalerne.
• Undgå konsekvent at stille væskefyldte vaser og
glas på højttalerne.
• Højttalerne bør under ingen omstændigheder
udsættes for fugt eller stænk med væsker.
• Terminalerne der er markeret med lyn-symbolet
bør kun tilsluttes af en faglært installatør eller ved
brug af præfabrikerede kabler monteret med de
helt rigtige stik.
Vi ved, du er ivrig efter at tage din MartinLogan subwoofer i
brug, så denne kortfattede manual er skabt til at sikre dig en
hurtig og effektiv ibrugtagning. Så snart subwooferen er tilsluttet
og spiller, bør du tage dig tid til grundig gennemlæsning af den
medfølgende brugermanual. Den vil give dig indsigt i, hvordan
Содержание Dynamo 1500X
Страница 1: ...Dynamo tm 1500X u s e r s m a n u a l m a n u e l d e l u t i l i s a t e u r...
Страница 14: ...14...
Страница 15: ...15...
Страница 16: ...16...
Страница 17: ...17...
Страница 18: ...18...
Страница 19: ...19...
Страница 20: ...20...
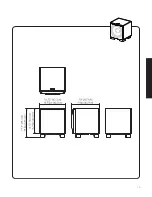
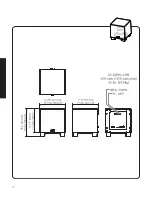
Страница 32: ...32 Dimensional Drawings Dimensional Drawings English...


