background image


29 

Display Tab 


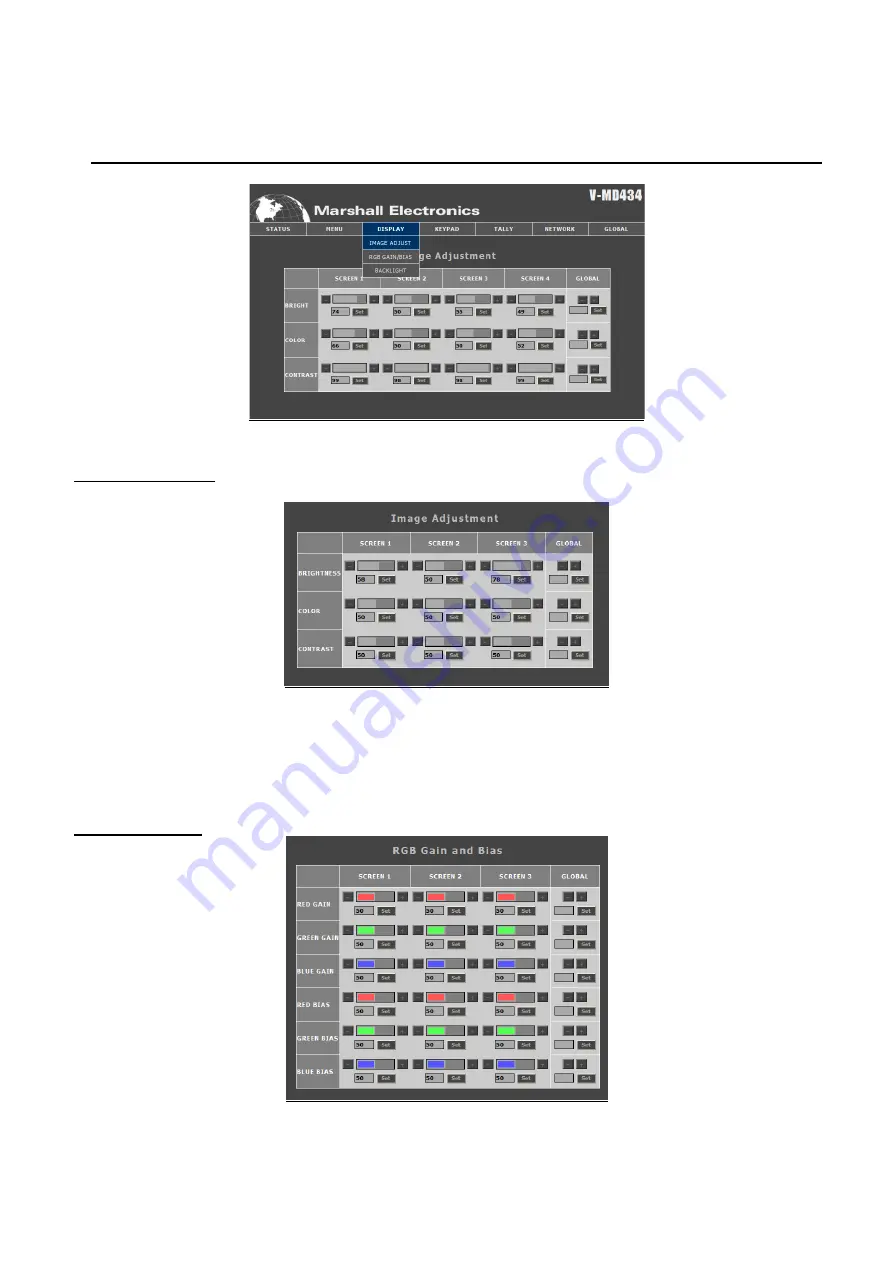
Image Adjustment 


  BRIGHTNESS, COLOR, CONTRAST 

Use this section to adjust the Brightness, Color and Contrast of each individual panel, or to adjust these values 
globally.  To enter a value manually, type in a number from 0-100 in the dialogue box and press Set.  The value 
selected on this page will show up on the monitor screen in real time.   


RGB Gain / Bias 


Содержание V-MD434

Страница 1: ...Marshall Electronics Model No V MD503 Model No V MD434 Triple 5 Rack Mount Monitor Quad 4 3 Rack Mount Monitor Operating Instructions...

Страница 2: ...2...

Страница 3: ...nu 10 Marker Configuration Submenu 13 Filter Configuration Submenu 16 System Configuration Submenu 17 Function Presets Submenu 18 IMD Tally Configuration 19 System Information Submenu 20 Network Confi...

Страница 4: ...4 This page intentionally left blank...

Страница 5: ...input modules Multi Format Compatibility Accepted formats include 480i 576i 720p 1035i 1080i 3G HD SDI HDMI DVI I Optical inputs available as optional Input Modules Please contact Marshall Electronic...

Страница 6: ...3 V MD434 Monitor V PS12 5V 1 Twist Lock Connector Operating Instructions Inspect the unit for any physical damage that may have occurred during shipping Should there be any damage immediately call Ma...

Страница 7: ...ons The status of each image adjustment parameter is shown on the top left of the screen with values ranging from 0 to 100 Pressing a button once displays the current value Pressing a button twice res...

Страница 8: ...onjunction with the Service Connector serves to control which monitor to Service Please contact Marshall Electronics before any attempted service to this monitor Power Input Connect the 12 VDC input t...

Страница 9: ...9 97 25 1080i 60 59 94 50 1080p 30 29 97 25 24 24sF 23 98 23 98sF 3G SDI YCbCr 4 2 2 10 Bit Level A and B 1080p 60 59 94 50 YCbCr RGB 4 4 4 10 Bit Level A and B 1080i 60 59 94 50 1080p 30 29 97 29 97s...

Страница 10: ...submenu or select a menu item by pressing SELECT Return to the previous menu by pressing MENU Exit the main menu by pressing MENU The menu will automatically time out after 15 seconds Only unit scree...

Страница 11: ...uttons to select each individual bias or gain control Press SELECT to begin adjusting the control Use the and buttons to increase or decrease the value Alternately the image adjustment buttons Brightn...

Страница 12: ...00 x 480 RGB pixels incoming images are automatically scaled to fit the screen In Full Screen mode images are scaled to fill the entire screen 800 x 480 In 4 3 mode images are scaled to fill the cente...

Страница 13: ...the picture cropped For example 1080i formats will both be cropped to 800 x 480 and displayed full screen Note Pixel to Pixel mode disables aspect ratio control and H V Delay Marker Configuration Sub...

Страница 14: ...0 Safe Area 4 3 Marker Examples Marker Background Use this setting to choose how selected markers are displayed on the screen 0 The marker is superimposed on the complete image 25 Image area beyond th...

Страница 15: ...15 0 Background 100 Background...

Страница 16: ...ople it is common practice to set exposure of faces to the equivalent of approximately 56 IRE The false color filter will show this area as the color PINK on the monitor Therefore as you increase expo...

Страница 17: ...This curtain color is what you see when there is no signal input to the monitor Splash Screen Use this option to enable or disable the Marshall Electronics Inc splash screen seen when the monitor is f...

Страница 18: ...ettings to the factory default configuration Function Presets Submenu User Definable Function Buttons Use the Function on F1 F2 menu items to define each function button on the front panel of the moni...

Страница 19: ...background behind the text in the Text String field A value of 0 will cause the background to appear black A value of 100 will make the background invisible Text Alignment Use this field to change the...

Страница 20: ...ystem Information Submenu System This shows the System firmware version of your monitor Power Module This shows the Power Module firmware version of your monitor Input Module This shows your module ve...

Страница 21: ...Mask assigned by your network Default Gateway When using a Manual Configuration Mode use this field to assign a specific Default Gateway for your monitor When in DHCP Configuration Mode this field wil...

Страница 22: ...r Use this row to determine the Power status for each of the screens on the unit A green ON box indicates that the screen is currently on A red OFF box indicates that the unit is off Press the box to...

Страница 23: ...al screen on your monitor Power Module This shows the Power Module firmware version of your monitor Input Module This text field determines the input format currently being displayed on a particular m...

Страница 24: ...d on an individual screen The drop down menu in this row can also be used to enable a Check Field color type on the individual screen level or the global level under the GLOBAL column Aspect Ratio Use...

Страница 25: ...arkers Use this row to determine the current status of the Full Screen markers on each individual panel The drop down menus in this row can also be used to select Full Screen markers on the individual...

Страница 26: ...rmat OSD Use this row to turn determine the Input Format OSD state Use the drop down menu to choose from the available options This can also be changed on the global level under the GLOBAL column Curt...

Страница 27: ...on each individual panel or on the global level When selecting from the GLOBAL column each individual panel will save its own individual settings For example if you select User 3 from the GLOBAL colum...

Страница 28: ...the IMD Text String s background transparency This can be changed for each individual panel or globally in the GLOBAL column Text Alignment Use this row to select the alignment of the IMD text This ca...

Страница 29: ...just the Brightness Color and Contrast of each individual panel or to adjust these values globally To enter a value manually type in a number from 0 100 in the dialogue box and press Set The value sel...

Страница 30: ...ght Backlight Use this section to adjust the Backlight value for each panel This can be done for each individual screen or globally To enter a value manually type in a number from 0 100 in the dialogu...

Страница 31: ...ally on the V MD434 and V Md503 monitors The Tally can be controlled individually for each tally set above each panel The radio buttons allow for customization of tally lights to be used by the monito...

Страница 32: ...mode you will be able to enter Subnet Mask address manually in this field If you have selected DHCP the box will have Subnet Mask already entered This is not changeable when in DHCP mode Default Gate...

Страница 33: ...the Cancel button Navigator The Network Control page s Navigator allows you to scan your network for other V MD434 or V MD503 monitors or any other Marshall Electronics Web Enabled MD monitors From th...

Страница 34: ...orted by category by pressing the Host Name IP Address or Model bar at the top of the control panel box The Identify button next to each monitor allows you to identify any monitor listed in the Contro...

Страница 35: ...iminate the retained image Modular Inputs Marshall Electronics Type B Input Modules CONNECTORS Power Input 2 Pin Twist Lock Connector Tally Hardware Interface HD 15 Female RJ45 Ethernet Port 8P8C Fema...

Страница 36: ...36 Dimensions V MD503 V MD434...

Страница 37: ...container for a period of one year from the purchase date This warranty is extended to the first consumer only and proof of purchase is necessary to honor the warranty If there is no proof of purchas...

Страница 38: ...38 This page intentionally left blank...

Страница 39: ...39 This page intentionally left blank...

Страница 40: ...40 Marshall Electronics Inc 1910 East Maple Ave El Segundo CA 90245 Tel 800 800 6608 310 333 0606 Fax 310 333 0688 www LCDRacks com sales lcdracks com 2010 1122...

Отзывы: