Main menu
Select
menu
Sub menu
Summary
SETUP MENU 1/2
SCENE
SELECT
CUSTOM, INDOOR,
OUTDOOR, BACKLIGHT,
ITS
Refer to 'ADVANCED MENU'
BRIGHTNESS
000 255(128)
Set screen brightness
CONTRAST
00 63(32)
Set screen contrast
SHARPNES
00 15(08)
Set screen sharpness
HUE
000 127(064)
Adjust hue
PICT ADJUST
COLOR GAIN
000 255(128)
Adjust color gain
OFF
Deactivates E-ZOOM
MAG : 000~255(000)
Select Digital zoom magnification
PAN : 000~1023(512)
Pan screen
EZOOM
ON
↲
TILT : 000~511(256)
Tilt screen
OFF
Deactivate Digital Image Stabilizer
DIS
ON
↲
Activates Digital Image Stabilizer(You can't use
the E-Zoom function when DIS is on)
PRIVACY MASK
Adjust the settings of privacy
15 areas with 8 colors(Enable mosaic)
OFF
Deactivates motion detection function
MOTION DET
ON
↲
Detect sense, Detect
interval Block DISP,
MASK area, Monitor
area
Select motion detection zone up to 4 areas
(When motion is detected, message or digital output
will be displayed.)
1.SYNC MODE
INT
Internal Sync with 12V DC power
L.L
↲
(automatically detected)
External Sync with 24V AC power
(You can't use 12V DC. Dual power only)
2.LENS
Type : DC/Video
Mode : Auto/Open/Close
AUTO
↲
Speed : 000~255(031)
Select Auto Iris lens
MANUAL
Select Manual Iris lens
3.FLIP
FLIP
OFF/V/H/HV
Activates Image mirror
4.LCD/CRT
CRT
Select CRT Monitor
LCD
Select LCD Monitor
5. COMMUNICATION(Auto Detect Pelco-D protocol)
ADDRESS
Address : 001~255
BAUDRATE
2,400~115,200bps
PARITY
OFF/ODD/EVEN
Select PARITY BIT
6.CAMERA ID
OFF
No title displays on the screen
SYS SETTING
ON
↲
(26 letters & 2 lines)
Display camera ID on screen
SETUP MENU 2/2
LANGUAGE
English, Espanol, Pyccknn, Portugues,
Deutsch, Francais, Japanese
Select language
W.PIX MASK
↲
AUTO/MANUAL/CLE
Blemish Compensation
MAINTENANCE
CAMERA
RESET
↲
Restore all settings to default values
SAVE
Save values and exit menu (The current settings are saved in the flash
ROM)
NOT SAVE
Retain values and exit menu (The current settings are not saved in the flash
ROM)
CANCEL
Escape menu without save
EXIT
BACK
Move back to previous menu
Main menu
Select
menu
Sub menu
Summary
1.SHUTTER/AGC
AE LEVEL : 1~250
AGC MAX :
6/12/18/24/30/36/42/44.8DB
AUTO
SENS UP : AUTO/OFF
Auto exposure setting
Shutter : 256, 128, 64, 32.
16, 8, 4 ,2 FLD, 1/60(1/50),
1/120(1/100), 1/250, 1/500,
1/1000, 1/2000, 1/4000,
1/10000
MANUAL
AGC MAX :
6/12/18/24/30/36/42/44.8DB
Manual exposure setting
Shutter : 256, 128, 64, 32.
16, 8, 4 ,2 FLD, 1/60(1/50),
1/120(1/100), 1/250, 1/500,
1/1000, 1/2000, 1/4000,
1/10000
FIX
AGC MAX:
6/12/18/24/30/36/42/44.8DB
Fixed exposure setting
2.WHITE BAL
Speed : 0 255(127)
Delay CNT : 0 255(001)
ATW Frame : 0 255(125)
ATW
Environment : Indoor, Outdoor
Auto trace white balance setting
(1,800°k~ 10,500°k)
PUSH
Automatically adjust the white balance under all
conditions
USER1
B-Gain, R-Gain
The gain values for the outdoor fixed mode
(Adjust the Red or Blue values)
USER2
B-Gain, R-Gain
The gain values for the fluorescent light fixed
mode(Adjust the Red or Blue values)
MANUAL
Manual white balance
PUSH LOCK
Move the camera lens toward white paper,
press set button to find the optimal white
balance for current environment
3. HLC/BLC
OFF
Deactivate function
HLC
High Compensation
BLC
Back Light Compensation
4. WDR/ATR-EX
OFF
Deactivate WDR function
Contrast : LOW/MID/HIGH
WDR
Clear Face : LOW/MID/HIGH
Wide Dynamic Range
Contrast : LOW/MID/HIGH
ATR-EX
Clear Face : LOW/MID/HIGH
Auto Tone Reproduction(=DWDR)
5.DNR(=3DNR)
DNR
Level : 0 6
Set 3D-Noise Reduction
6.DAY/NIGHT
Burst : OFF/ON
CNTL SIGNAL : INT/EXT1/EXT2
Delay CNT : 000~255(005)
Day
→
Night : 000~255(004)
AUTO
Night
→
Day : 000~255(016)
Day : Color
↔
Night : B/W (Switching
time & speed adjustable)
DAY
Fixed at color
NIGHT
Burst : OFF/ON
Fixed at B/W
7.IR OPTIMIZER
ON
Activate IR OPTIMIZER function
ADVANCED
MENU(1/2)
OFF
Deactivate IR OPTIMIZER function
1.LENS SHD COMP
OFF
Deactivate Lens Shade compensation
ON
Activate Lens Shade compensation
2.DEFOG
OFF
Deactivate defog function
ON
↲
Level : LOW/MID/HIGH
Activates defog function
3.FLK LESS
OFF
Deactivate Flicker less function
AUTO
Flicker is automatically detected and
compensated.
4.ANTI CR
OFF
Deactivate Anti color rolling function
ON
Activate Anti color rolling function
ADVANCED
MENU(2/2)
AUTO
Color rolling is automatically detected and
compensated.
Advanced menu: (
●
:adjustable, ×:inalterable)
SCENE
CUSTOM
INDOOR
OUTDOOR
BACKLIGHT
ITS
SHUTTER/AGC
●
●
●
●
●
WHITE BAL
●
×
×
×
×
HLC/BLC
●
●
●
●
●
WDR/ATR-EX
●
×
×
×
×
DNR(=3RNR)
●
●
●
●
●
DAY/NIGHT
●
●
●
●
●
IR OPTIMIZER
●
×
×
×
×
LENS SHD COMP
●
●
●
●
●
DEFOG
●
×
×
×
×
FLK LESS
●
●
●
●
●
ANTI CR
●
●
●
●
●
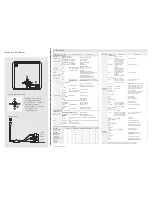
OSD MENU
Using jog lever & Cable array
1
2
1. Using jog lever for OSD
• ENTER (E) : Used to access
U
menu and confirm selection.
• UP (U), DOWN (D) : Used to
L R
move cursor up or down.
E
• LEFT (L), RIGHT (R) : Used to
D
move cursor left / right
and change value.
2. Cable array
AUDIO
(option)
VIDEO
12V DC
- +
•The '
↲
' icon appeared with desired function, press the set button to move sub menu.
•The '- - -' icon appeared with function that is unavailable according to function setting.
Specifications subject to change.


