background image

16

Module Installation (continued)

DOLBY Module Installation

IMPORTANT:

The following procedure involves exposing and handling bare electronic components. Proper anti-static

precaution must be taken before opening the AR-DM1 Audio Monitor to avoid damage during installation. This includes
working on a static-free surface and wearing a grounded wrist-strap or another type of grounding device.

Opening the

AR-DM1 Audio Monitor without proper anti-static precaution may void the warranty.

For further information, contact

Marshall Electronics.

Use the following instructions to install the ARDM-D552 module in the AR-DM1 Audio Monitor.

1. Ensure that power is disconnected from the audio monitor.

2. Disconnect all inputs and outputs.

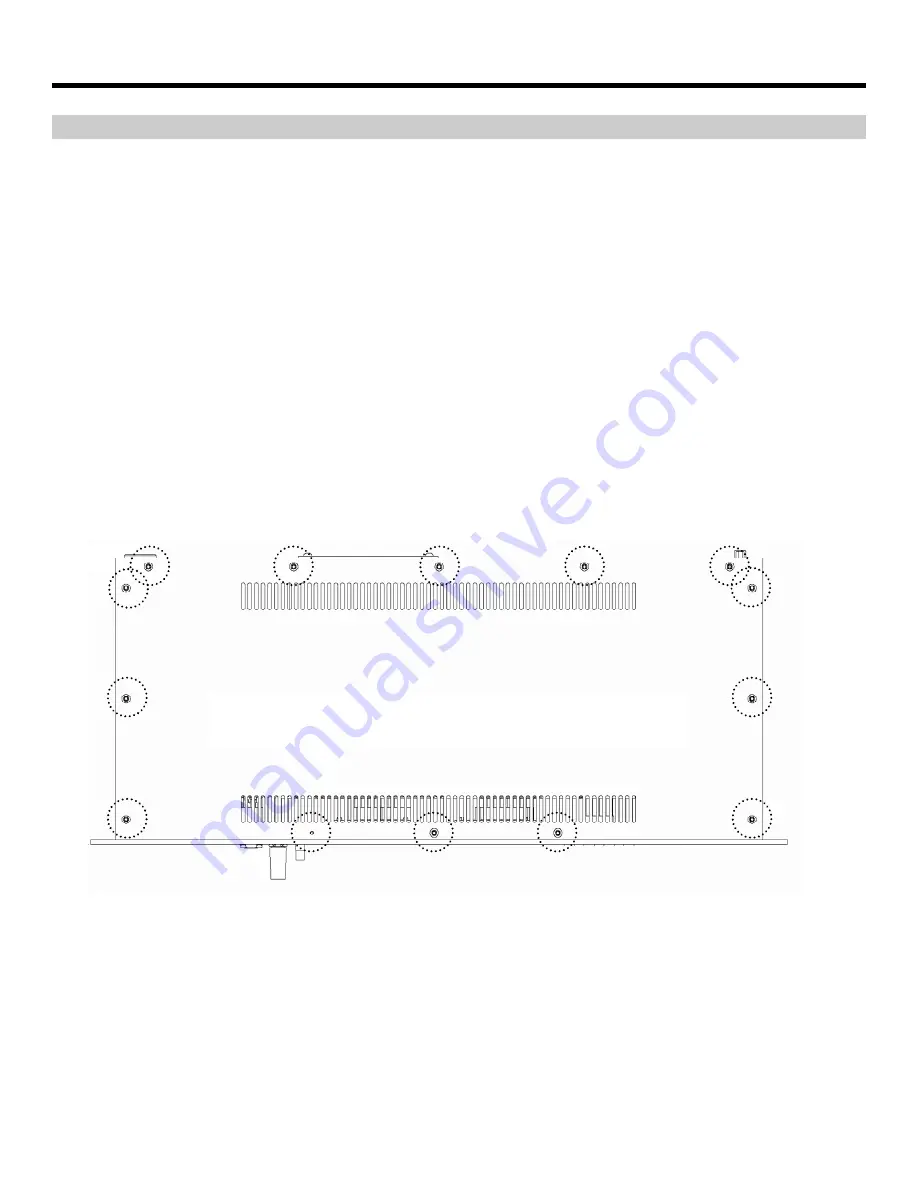
3. Remove the top panel of the audio monitor by removing the 14 Phillips-head screws shown in the following diagram:

Remove 14 screws (circled) to open the top panel.

Содержание AR-DM1

Страница 1: ...Marshall Electronics AR DM1 Digital Audio Monitor with Channel Presence LEDs Operating Instructions ...

Страница 2: ... Volume Control 10 Balance Control 10 Mute Functions 10 Reset Functions 10 DOLBY Encoded Signals 11 DOLBY Signal Indication 11 Decoding and Monitoring DOLBY Signals 11 Introduction 11 Entering DOLBY Decoding Mode 11 Downmixing DOLBY Decoded Audio 11 DOLBY Downmix Configurations 12 Optional Modules 13 Input Modules 13 ARDM AES BNC 13 ARDM AES XLR 13 ARDM HDSDI 13 ARDM AA 8XLR 13 Output Modules 14 A...

Страница 3: ...ns for multi channel audio Sixteen dedicated LEDs indicate digital or analog signal presence for 16 channels of audio simultaneously Additional features include volume and balance controls a headphone jack and an RS 485 port for on site firmware upgrades Features Superior Audio Quality Stereo Loud Speakers provide superior audio quality in a compact 1RU form factor Sixteen LED Channel Presence Ind...

Страница 4: ...ation If your audio monitor has not been pre configured with input and output modules at the factory you must install at least one input module to use the audio monitor Additional modules can also be purchased and installed when needed The modules are designed for simple installation and removal without tools For detailed instructions see Module Installation page 15 Note Modules cannot be installe...

Страница 5: ...LR connector to the back of the audio monitor The Power LED on the front panel will illuminate green 4 Select an Input Module Using the SRC switch on the front panel choose the module location 1 4 to which the input is connected Modules are identified as numbers 1 4 with location no 1 on the far left if facing the rear of the audio monitor The channel presence LEDs will then immediately show which...

Страница 6: ...tors Sixteen LEDs indicate analog or digital signal presence See page 8 Channel Assign and DOLBY Indicator LEDs The channel assign LED below each channel indicates how that channel is being reproduced through the stereo speakers see page 9 The DOLBY LED below each channel pair indicates the presence of a DOLBY encoded signal see page 11 Monitor Modes The single pair and mix buttons are used to sel...

Страница 7: ...nly the included power supply to power the AR DM1 audio monitor RS 485 Port The RS 485 port is used to download firmware to the AR DM1 audio monitor Contact Marshall Electronics regarding available firmware upgrades and instructions I O Module Slots Four slots are available for a variety of I O modules See page 13 for available modules ...

Страница 8: ...with numbers 1 4 from left to right when facing the rear panel of the audio monitor Only the selected module s channel inputs can be monitored simultaneously Audio channels from different input modules cannot be monitored at the same time Loop through outputs and dedicated output modules however will function at all times regardless of the selected module See module specifications for details If t...

Страница 9: ...are available 5 1 7 1 and 4L 4R The channel assignments in each downmix configuration are based on the DOLBY recommended track layout for Left Right Center LFE Low Frequency Effect Left Surround and Right Surround channels Press the LEFT and RIGHT buttons to select amongst these configurations The following table shows how each audio channel is monitored through the speakers for each of the availa...

Страница 10: ...dphone output Press the MUTE button once to mute both the speakers and headphone output Press again to un mute Pressing the MUTE button multiple times in succession has the following additional functions Press the MUTE button twice within 2 seconds to solo the left speaker disable the right speaker Press the MUTE button a third time to solo the right speaker disable the left speaker Press the MUTE...

Страница 11: ...te channels of audio DOLBY DIGITAL is typically used to transmit a multi channel audio program to consumers on a DVD or through DTV What is DOLBY E DOLBY E is an encoded bitstream that carries up to 8 discrete channels of audio DOLBY E has several technical advantages over DOLBY DIGITAL which make it ideal for distributing multi channel audio within a production environment using an existing AES E...

Страница 12: ... 1 2 C C C 1 2 Ls Rs L R 1 2 LFE LFE C 1 2 Lt Rt L R C C L R 1 2 L C R C L R C 2 2 Stereo Ch L R 5 1 2 2 2 L R L R C C 1 2 Stereo Ch L R 1 2 L R L R C C 2 2 Stereo Ch L R 2 2 2 2 L R L R C C 1 3 Stereo Ch L R 1 3 L R L R C C 2 3 Stereo Ch R L 2 3 L R L R C C 3 3 Stereo Ch R L 3x2 3 3 L R L R C C 1 8 Mono Ch C 2 8 Mono Ch C 3 8 Mono Ch C 4 8 Mono Ch C 5 8 Mono Ch C 6 8 Mono Ch C 7 8 Mono Ch C DOLBY...

Страница 13: ...ule Embedded Metadata Display with AR DM2 L Audio Monitor Operation 1 Securely connect included DB 25 cable to module tightening screws on the connector 2 When using passive the loop through outputs unterminate the corresponding inputs using the DIP switch switches in DOWN position If the loop through outputs are not used terminate the corresponding inputs switches in UP position ARDM HDSDI Featur...

Страница 14: ...S 4OUT module Monitoring individual channels does not affect the output ARDM AA 2OUT Features 2 Balanced Analog Audio Outputs Built In XLR Connectors Outputs the Stereo Mix currently selected on the audio monitor Excellent for external monitoring Nominal level 20dBFS 8 dBu Operation The current stereo mix being sent to the loudspeakers will be output from the ARDM AA 2OUT module DOLBY Module ARDM ...

Страница 15: ...pped while the audio monitor is powered on 2 Remove the blank cover if present over the empty slot using a Philips screwdriver with appropriate head size 3 Carefully slide the module into the open slot aligning the side edges of the module with the guides inside the monitor Push the module all the way in until it locks into place 4 Tighten the two thumbscrews on the face of the module Note Avoid t...

Страница 16: ... wrist strap or another type of grounding device Opening the AR DM1 Audio Monitor without proper anti static precaution may void the warranty For further information contact Marshall Electronics Use the following instructions to install the ARDM D552 module in the AR DM1 Audio Monitor 1 Ensure that power is disconnected from the audio monitor 2 Disconnect all inputs and outputs 3 Remove the top pa...

Страница 17: ...g up 6 Slowly push the module down so that it is parallel to the main board Two metal brackets on either side of the slot will snap into place over the edges of the module holding it place If the module does not move downwards check the orientation of the board to make sure it is not upside down Do not force the module into place if it does not move easily 7 To remove the module push aside the met...

Страница 18: ...adphone Power Output 150 mW ELECTRICAL Power Consumption Less than 45W Voltage Requirement 24 VDC Included Power Supply AC Input 100V 240V 2 5A 50 60Hz DC Output 18 24V 7 5A 150W Max MECHANICAL Dimensions w x h x d 18 94 x 1 75 x 7 80 Rack Height 1 RU Weight w o modules 3 7 lbs With w 4 modules 4 9 lbs depending on modules installed ...

Страница 19: ...e Inputs 4 x AES EBU Balanced 110Ω XLR F via DB 25 Connector Outputs 4 x AES EBU Balanced 110Ω XLR M via DB 25 Connector Passive Loop Through Formats Professional and Consumer SPDIF Audio Coding PCM DOLBY E DOLBY DIGITAL AC 3 Sample Rates 44 1kHz 48kHz DB 25 Pinout Tascam Standard Pinout Mogami GOLD AES TD DB25 XLR 05 Break Out Cable Included ARDM AA 8XLR Input Module Inputs 8 x Analog Balanced XL...

Страница 20: ...erefore labor and parts may be charged to the consumer This warranty does not apply to the product exterior or cosmetics Misuse abnormal handling alterations or modifications in design or construction void this warranty No sales personnel of the seller or any other person is authorized to make any warranties other than those described above or to extend the duration of any warranties on behalf of ...

Отзывы: