background image


P 21 of 29 


8880-610_200_c900 fl-tg wireless monitor user manual


Rev: 2 


Channel  Frequency (MHz) 

903.08 

1


905.24 

2


907.4 

3


909.56 

4


911.72 

5


913.88 

6


916.04 

7


918.2 

8


920.36 

9


922.52 

10


924.68 

11


926.84 

12


915.00 

Table 3: Channel Frequency List 

9.2


RF Frequency Channel Setting 

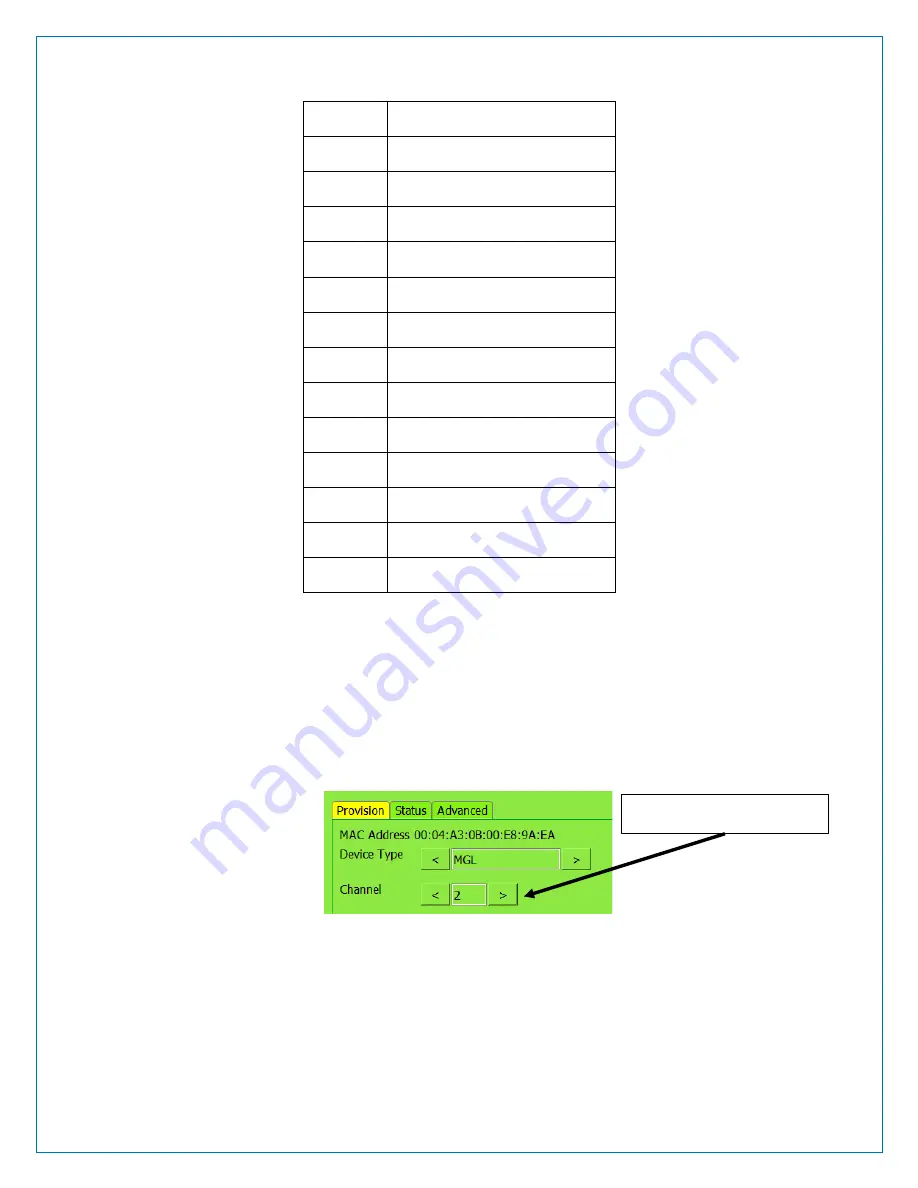
To set the wireless monitor frequency (MHz) signal, click the left or right 

arrow next to the Channel field located on the Provision tab, click the Save 

button. For channel and frequency cross-reference, see Table 3 above. 


Figure 24: RF Frequency Channel Window 

Receive Sensitivity: (-) 146 dBm at the pc board RF port. 

Field to set Frequency 

Содержание C900 FL-TG

Страница 1: ...tg wireless monitor user manual Rev 2 User Manual Model C900 FL TG Description Wireless Monitor This Document Revision 2 Date 2020 08 11 60 Kingsbridge Road Piscataway New Jersey 08854 P 908 233 0101...

Страница 2: ...P 2 of 29 8880 610_200_c900 fl tg wireless monitor user manual Rev 2 This page was left intentionally blank...

Страница 3: ...ange without notice All rights reserved Please send comments to E mail techinfo marsint com Phone 908 233 0101 Fax 908 233 4111 1 Revision History REV ECN Description Date By 1 0 Initial release 2020...

Страница 4: ...rostatic sensitive device 8 5 2 Additional Notice 8 6 Installation 8 6 1 Provision Application 9 6 2 Factory Defaults 11 6 3 User Updates 12 7 Troubleshooting Guide 18 8 Device Details 19 9 Specificat...

Страница 5: ...re 4 COM Port Field 10 Figure 5 Connect Button 10 Figure 6 MAC Address View 11 Figure 7 Provision Tab Window MGL Configuration 11 Figure 8 Provision Tab Window Station Configuration 13 Figure 9 Status...

Страница 6: ...M Port Found Window 19 Figure 22 Provision App Ghost Window 19 Figure 23 C900 FL TG Wireless Monitor Details 20 Figure 24 RF Frequency Channel Window 21 Figure 25 Wireless Monitor Input Interface Conn...

Страница 7: ...ceive interface data lines Device can also be adapted to connect to a digital addressable lighting interface DALI for network based systems that control lighting applications A provision application t...

Страница 8: ...ention Label Prior to handling equipment electrically discharge yourself by momentarily touching an unpainted metal ground object 5 2 Additional Notice Terminate device RF port with a 50 Ohm load usin...

Страница 9: ...nnection End 1 Custom Cable USB B to Mini USB MGL Light Fixture with cable Connection End 2 Figure 3 Wireless Radio Connected to Laptop using custom cable Make sure the wireless monitor amber LED turn...

Страница 10: ...nced Tab The Advanced tab is to load firmware upgrade and for a Super User to make changes o Provision Tab On the application provision tab click the Refresh button The COM port that the wireless moni...

Страница 11: ...This is the default view of the application Provision tab shown in figure below Figure 7 Provision Tab Window MGL Configuration 6 2 Factory Defaults The provision tab has the following factory defaul...

Страница 12: ...nds 28 800 8 Hours It can be set as low as 60 seconds Table 1 Factory Defaults 6 3 User Updates User shall update the following fields with information from the device assigned location information De...

Страница 13: ...tg wireless monitor user manual Rev 2 Figure 8 Provision Tab Window Station Configuration o Status Tab This is the default view of the application Status tab Lamp On AC Source Selected 600 Stat 0 25...

Страница 14: ...y Voltage Internal Battery Charge Discharge Voltage Power Source Which source is powering up light fixture LED Status External Luminaire Wireless firmware version Active wireless monitor firmware inst...

Страница 15: ...wing Temporarily click the Disconnect button On the window top left corner click Settings checkmark the box next to Super User click the Save button Connect back to the wireless monitor by clicking th...

Страница 16: ...code loaded How to load firmware in radio Click the Advanced tab a warning window will pop up click Yes to proceed Figure 12 Advanced Tab Warning Window Click the Bootloader tab Figure 13 Bootloader...

Страница 17: ...r it will say Flashing Success Figure 17 Flashing Success Window bottom left corner Click the Disconnect and then Connect button Click the Status tab and confirm that the correct firmware version is d...

Страница 18: ...eft corner Click File Figure 19 File Window Click the File Click Fetch Settings This step is performed once After each use cover the mini USB port with cap to protect it from damage Figure 20 Wireless...

Страница 19: ...s monitor The bottom left corner will state Not Connected Figure 22 Provision App Ghost Window Wireless monitor does not transmit The update rate is too long Speed up the update rate by entering a low...

Страница 20: ...lli amps Operating Temperature 30 C to 55 C 9 1 RF Specifications Frequency band of operation 902 to 928 MHz Transmit Power 17 dBm Maximum Frequency RF Channels of operation See Table 3 1 4 3 2 5 1 An...

Страница 21: ...2 915 00 Table 3 Channel Frequency List 9 2 RF Frequency Channel Setting To set the wireless monitor frequency MHz signal click the left or right arrow next to the Channel field located on the Provisi...

Страница 22: ...7 L inches Excludes ground tab Approximate Weight 8 Oz 226 8 Grams Power Communication Interface type 4 Wires VCC Input 5V Ground Transmit Receive Figure 25 Wireless Monitor Input Interface Connector...

Страница 23: ...P 23 of 29 8880 610_200_c900 fl tg wireless monitor user manual Rev 2 10 Outline Drawing Measurements in inches mm 11 Tools The following tools are used to install device Tamper resistant Torx Key T10...

Страница 24: ...ousing The device mounting screws can be change to meet your product overall requirements 12 Block Diagram 12 1 Wireless Monitor The components that make up a wireless monitor are depicted in Figure 2...

Страница 25: ...eless Monitor Gateway Ciqada IoT Platform Web Browse Mobile App Monitored LED Fixture Monitored LED Fixture Monitored LED Fixture Gateway Web Browser Ciqada IOT Platform Cloud 915MHz Wireless Mesh Net...

Страница 26: ...operation Note 1 An FCC ID label must be conspicuously visible on the wireless radio exterior surface Note 2 FCC Information to user Any product changes or modifications not expressly approved by the...

Страница 27: ...eplace the problem unit The warranty applies to repaired or replaced products for the balance of the applicable period of the original warranty or ninety 90 days from the date of shipment of a repaire...

Страница 28: ...is document may contain technical inaccuracies or typographical errors Mars Int l waives responsibility for any labor materials or costs incurred by any person or party as a result of using this docum...

Страница 29: ...e shipped back to Mars To request an RMA please call 908 233 0101 and type the extension of the product account manager 18 Product Identification Scheme To order wireless monitor or obtain product inf...

Отзывы: