Marlon Xplore Pro II SxS Скачать руководство пользователя страница 12


                                Load Instructions with Vehicle Power 
 

1.


Set parking brake and chock tires of the loading vehicle to prevent movement while 
loading & unloading, never stand between UTV and deck while loading, do not 
operate vehicle or UTV under the influence of drugs or alcohol. 
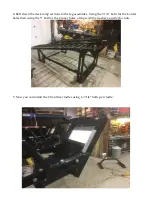
2.


Remove ramps from deck, make sure the ramp hooks are securely engaged on the 
rear load bars of the deck.  

3.


Line up ramps to match 

your

 machines tire width. 

4.


Wear your helmet and use your seatbelt. 

5.


I

nstall the moveable ladder to the driver’s side of deck

 using the spring pin provided 

(This is a must as it will keep the ladder from possible rotating and causing vehicle or 
bodily harm). Place it in front of the Marlon side decal (this is so you can get out of 
the vehicle once you park). 

6.


Start vehicle and put it in low range 4x4 mode. 

7.


Climb ramps at a slow steady pace 

(high speed not needed or recommended).


8.


You will feel the front of the machine drop slightly once the front tires roll into the 
front tire cradle.  

9.


You’re there apply the brakes and put the vehicle in park.


10.


If you have a winch on your vehicle or mounted on the deck, hook it to the winch 
mount point and snug up the tension on the cable. 

11.


Dismount the vehicle using the movable ladder. 

12.


Move the m

ovable ladder to the front tire location on the driver’s side, install with 

spring pin. 

13.


Climb ladder with 1 tire tiedown strap in hand. Lock the adjustable anchor end into 
the supertrac that is installed on the deck. Loop the lasso end of the strap over the tire 
at the 10-2 position. If the supertrac is mounted on an angle look at it as if you were 
looking at a clock and the anchor point would be 6:00, that will always put the lasso 
in the right position. Tighten the lasso by pulling the end of the strap until the lasso 
and ratchet mechanism look like the picture below. Then tighten the lasso by using 
the ratchet level, tighten until strap depresses into tire approx. 1 inch. Make sure the 
D ring is centered as close as possible, this may take loosening the strap a couple time 
and adjusting. Once its centered and the strap is tightened, tie the remaining strap 
end up in such a way that is not able to flap in the wind. As this can damage the 
finish on the wheel and or the deck 


Содержание Xplore Pro II SxS

Страница 1: ...Marlon Xplore Pro II SxS Deck Owner s Manual Assembly Installation Instructions 2850lbs load max on deck 2500lbs load max on ramps Marlon Recreational Products www marlonproducts com 1 800 663 7367 ...

Страница 2: ... the loading vehicle to prevent movement while loading unloading it is also recommended operators load unload with a winch never stand between UTV and deck while loading do not operate vehicle or UTV under the influence of drugs or alcohol Do not exceed the rated capacity of the ramps which is 2500 lbs evenly distributed when one end of the ramp is elevated 48 Do not exceed the rated capacity of t...

Страница 3: ...it comes in contact with Go slow do not cut corners know your limitations DOWNHILL USE The Deck and load ads to the GVW of the truck Do not exceed vehicle GVW SIDE HILL USE CORNERING Travelling alongside slope is dangerous and should be avoided If you must travel along a side slope be aware that with the load on the deck the vehicles center of gravity is higher and therefore more unstable This app...

Страница 4: ... DECK LOCATION 24 1 2 3 1 4 Hex Head Bolts SS Deck Ramps Braces 6 1 2 5 1 2 Hex Head Bolt SS Deck Ramps Braces 32 1 2 N A Nylock Nut Deck Ramps Braces 64 1 2 N A Flat Washers Deck Ramps Braces 2 1 4 N A Spring Pins Ramp Hold Downs Install Kit 4 3 4 x 2 1 2 Carriage Bolt 4 1 2 Washers 4 Threaded Backing Plates ...

Страница 5: ...DECK ASSEMBLY INSTRUCTIONS Note do not tighten any nuts until all bolts are in place ...

Страница 6: ...cated near the bottom of the leg assembles using 3 1 4 bolt washers and Nyloc nuts You will be left with the 2 crossmembers that you don t use Keep them as you may change truck bed lengths and they will fit the new truck if you switch from a short box to long box truck or vice versa 3 Bolt in the centers brace that supports the ramps with 3 1 4 bolt washers and Nyloc nuts ...

Страница 7: ...tions to the leg assembles Using the 3 1 4 bolts for the 4 outer holes then using the 5 bolt for the 4 inner holes along with the washers and Nyloc nuts 5 Now you can install the 2 front tire cradles using 4 3 1 4 bolts per cradle ...

Страница 8: ...6 Now install the 2 side bars using the 7 3 1 3 bolts per side 7 Now install the winch mount plate bar with 2 3 and 2 5 bolts ...

Страница 9: ...ighten all nuts starting from the lowest to the highest All nuts are to be tightened and torqued to 45ft lbs 9 Slide Ramps in center narrow ramp on top of wider ramp and pin into place CONGRADULATIONS Finished Product ...

Страница 10: ...ruck boxes are not square and will taper in the rear Usually align center of deck to center of cab rear window 4 Drill a pilot hole through the center of the deck leg mounting hole and the truck box be careful to not drill through any fuel lines 5 Providing that a pilot hole has clearance underneath the truck follow the pilot hole with a drill bit 6 Install a 1 2 zinc flat washer the smaller flat ...

Страница 11: ... spring pins Congrats your New Side by Side Deck is ready to Load www marlonproducts com Marlon Recreational Products Proudly serving you from Chilliwack BC Office 1 800 663 7367 Stony Plain AB Office 1 855 962 5500 St Andrews MB Office 1 855 885 9150 Tacoma WA Office 1 866 930 9411 ...

Страница 12: ...es and put the vehicle in park 10 If you have a winch on your vehicle or mounted on the deck hook it to the winch mount point and snug up the tension on the cable 11 Dismount the vehicle using the movable ladder 12 Move the movable ladder to the front tire location on the driver s side install with spring pin 13 Climb ladder with 1 tire tiedown strap in hand Lock the adjustable anchor end into the...

Страница 13: ... tire tiedowns as well as winch hook from winch brace remember to install the spring pin when using the movable ladder this is imperative to the strength of the mounting positions 3 Enter vehicle close door apply seat belt press on the brake start vehicle Place in reverse and start to back off slowly Watch to make sure your tires are lined up when transitioning from the deck to the ramps This is e...

Страница 14: ...on on the cable to keep the vehicle touching the front support braces on the tire cradle 9 You re there apply the brakes and put the vehicle in park 10 Dismount the vehicle using the movable ladder 11 Move the movable ladder to the front tire location on the driver s side install with spring pin 12 Climb ladder with 1 tire tiedown strap in hand Lock the adjustable anchor end into the supertrac tha...

Страница 15: ...g a remote operated winch make sure vehicle is in neutral and reverse the winch slowly Watch to make sure your tires are lined up when transitioning from the deck to the ramps This is easier to achieve with another person helping spot you but not necessary 4 Continue down ramps until vehicle is completely on the ground Place vehicle in park 5 Place ramps back on the deck and pin in place with spri...

Отзывы: