background image

INSTALLATION
INSTRUCTIONS

General

Theheaterisdesignedforrecessedinstallationin2”X4”

(50mmX101mm)studorlargerwallorceilingsectionsusing

thewallboxprovided.Theheatermayalsobesurfacemounted

byusingtheSurfaceMountingFrame,ModelCWHSMorsemi-

recessmountedbyusingaCWHS1(for1”(25mm)recess

frame)oraCWHS2(for2”(50mm)recessframe).Allthree

accessoriesareorderedseparately.Theheatermaybewired

withstandardbuildingwire(60°C).Refertospecificationchart

forcorrectsupplyvoltageandwiresize.
Forsurfaceorsemi-recessmounting,consultInstallation
InstructionspackedwithCWHSM,CWHS1,CWHS2.

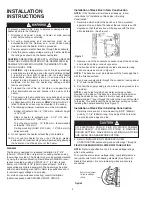
Installation of Back Box in New Construction

NOTE: 

Ifthefinishedwallsurfaceisalreadyup,follow

instructionsfor“InstallationofBackBoxinExisting
Construction”.

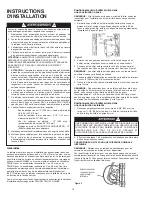
1. Determinewhichsideofthebackboxistobemounted

againstastudandbendthetabsattherearcornersout90
degreessothatthebackboxwillbesquarewiththestud
afterinstallation.(SeeFigure1).

2. Removeoneoftheknockoutsonsocketsideofthebackbox

andinstallacableorconduitconnector.

3. Positionbackboxagainstsideofstudsandsecureusing

nailsorscrewsasshowninFigure1.

NOTE: 

Thebackboxmustbeinstalledwiththefrontedgeflush

withthefinishedsurface.

4. Runpowersupplycablethroughtheconnector,leavingabout

8”ofwireinsidethebox.

5. Connectthesupplycablegroundwiretogreengroundscrew

provided.

NOTE:

Leadholesfora#8sheetmetalscrewhavebeen

providedinthesidesofthebackbox.Afterthefinishedwallor

ceilinghasbeenputup,drivea#8(m4)sheetmetalscrew

(recommended1”long)throughthesideoftheboxnotmounted

tothestud.Thiswillpreventthebackboxfrompullingoutwhen

installingtheheaterassembly.(SeeFigure1)

Installation of Back Box in Existing Construction

1. Carefullymarkandcutaholemeasuring9-3/8"(235mm)

wideby11-1/8"(283mm)long.Oneedgeoftheholemust
becutalongtheedgeofastud.

2. RefertoINSTALLATIONOFBACKBOXINNEW

CONSTRUCTIONsectionandproceedwithsteps1through5.

FIELD CONVERSION FOR LOWER WATTAGE RATING
NOTE:

Refertospecificationchartforlowerwattageratings

whichareavailable.
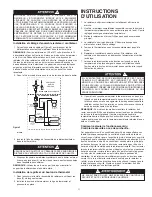
Toconvertheatertolowerwattagerating,completelyremove
redjumperwirefrombothheatingelements(SeeFigure2).
Discardthisjumper.Besureremainingwiresaresecurely
connected.

Topreventapossiblefire,injurytopersonsordamagetothe
heater,adheretothefollowing:
1. Disconnect all power coming to heater at main service

panelbeforewiringorservicing.

2. All wiring procedures and connections must be in

accordance with the National and  Local Codes having

jurisdictionandtheheatermustbegrounded.

3. Powersupplymustenterbackboxthroughtheknockouts.
4. Verifythepowersupplyvoltagecomingtoheatermatches

theratingsasshownontheheaternameplate.

CAUTION: 

ENERGIzINGHEATERATAVOLTAGEGREATER

THANTHEVOLTAGEPRINTEDONTHENAMEPLATEWILL
DAMAGETHEHEATERANDVOIDTHEWARRANTYAND
COULDCAUSEAFIRE.
5.

CAUTION

- High temperature, risk of fire, keep electrical

cords,drapery,furnishings,andothercombustiblesatleast

3 feet (0.9 m) from front of heater. Do not install heater

behinddoors,belowtowelracks,orinanareawhereitis

subject to being blocked by furniture, curtains or storage

materials. Hot air from the heater may damage certain

fabricsandplastics.

6. To reduce the risk of fire, do not store or use gasoline or

other flammable vapors and liquids in the vicinity of the

heater.

7. Thisheateristobemountedonlyusingbackboxandmay

beinstalledwiththebackboxrecessedorsurfacemounted

asdescribedwithinthismanual.

ONLY

model

WHB1101FC

rated1000wattsorlessmaybemountedintheceiling.

8. Thefollowingminimumclearancesmustbemaintained:

Bottomofheatertofloor-4”(102mm)-optimumheight

is18”to24”.
Sides of heater to adjacent wall - 4-1/2” (114 mm) -

optimumminimum12”(305mm).
Topofheatertoceiling-12”(305mm)-recommended

atleast36”(915mm).
Ceilingmounting(

WHB1101FCONLY)

-12”(305mm)to

adjacentwalls.

9. Donotoperatetheheaterwithoutthegrilleinstalled.
10. Do not use this heater for dry out as the paint, plaster,

sawdustanddrywallsandingdustwillpermanentlydamage

theheaterandmustbekeptoutoftheheater.

AN ELECTRICAL SHOCK, FIRE OR WATER DAMAGE
COULD RESULT IF WIRING OR PIPING IS DAMAGED
DURINGCUTTING.MAKESUREALLWIRINGANDPIPING
ARECLEAROFAREABEFORECUTTING.

2

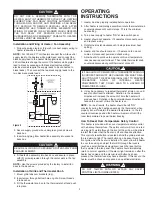
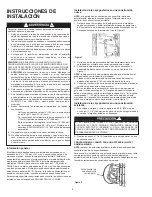
Figure 2

Figure 1

Remove red jumper

for lower wattage

rating

BEND

OUT
TAB

CABLECLAMP

BACKBOX

LEAD

HOLES

SUPPLY

WIRING

CABLE

NAILSOR

SCREWS(2)

Содержание WHB1000 Series

Страница 1: ...e the light on immediately turn the heater off and inspect for any objects on or adjacent to the heater that may have blocked the airflow or otherwise caused high temperatures to have occurred DO NOT OPERATE THE HEATER WITH THE ALARM LIGHT ILLUMINATING 12 This heater is intended for comfort heating applications and not intended for use in special environments Do not use in damp or wet locations su...

Страница 2: ...lable To convert heater to lower wattage rating completely remove red jumper wire from both heating elements See Figure 2 Discard this jumper Be sure remaining wires are securely connected To prevent a possible fire injury to persons or damage to the heater adhere to the following 1 Disconnect all power coming to heater at main service panel before wiring or servicing 2 All wiring procedures and c...

Страница 3: ...will produce heat Rotation in the counterclockwise direction will reduce the amount of time the heater is on NOTE For best results the heater should be left ON constantly during the heating season as the thermostat when properly set will maintain the desired temperature In the full counter clockwise position the heater will remain off until the room temperature drops well below freezing How To Res...

Страница 4: ...ly to damage from accident misuse or alteration nor where the connected voltage is more than 5 above the nameplate voltage nor to equipment improperly installed or wired or maintained in violation of the product s installation instructions All claims for warranty work must be accompanied by proof of the date of installation The customer shall be responsible for all costs incurred in the removal or...

Страница 5: ...osible incendio no bloquee de ningún modo la entrada ni la descarga de aire 9 Un calefactor tiene en su interior piezas calientes y piezas en las que se producen arcos o chispas No lo utilice en áreas en las que se utilice o almacene gasolina pintura o líquidos inflamables 10 Utilice este calefactor únicamente de la manera descrita en este manual Cualquier otra forma de uso no recomendada por el f...

Страница 6: ...menor retire completamente el puente de cable rojo de ambos elementos calefactores vea la Figura 2 Deseche este puente Asegúrese de que los cables restantes estén conectados firmemente Para evitar un posible incendio lesiones personales o daños al calefactor observe lo siguiente 1 Antes de proceder a tareas de conexionado o de reparación del calefactor desconecte toda la alimentación eléctrica que...

Страница 7: ...te el cual el calefactor está encendido NOTA para obtener los mejores resultados el calefactor debe permanecer constantemente Encendido ON durante la temporada en que se necesite calefacción ya que el termostato siempre que esté correctamente ajustado mantendrá la temperatura deseada En la posición extrema en sentido antihorario el calefactor permanecerá Apagado OFF hasta que la temperatura de la ...

Страница 8: ...ha de instalación Esta garantía no se aplica a daños debidos a accidente mal uso o alteración ni a los casos en que la tensión eléctrica conectada supere a la tensión nominal indicada en la placa de características en más de 5 ni a equipos que hayan sido instalados o cableados incorrectamente o mantenidos en forma que no cumpla lo indicado en las instrucciones de instalación del producto Todo recl...

Страница 9: ...rt d incendie n obstruez en aucune façon les admissions et les échappements d air 9 Un radiateur comporte à l intérieur des parties chaudes et pouvant produire un arc ou des étincelles électriques Ne l utilisez pas dans des zones où de l essence ou des liquides inflammables sont utilisés ou entreposés 10 N utilisez ce radiateur que comme c est décrit dans ce manuel Toute autre utilisation non reco...

Страница 10: ...uissance enlevez complètement le cavalier en fil rouge entre les deux éléments de chauffe Voyez la Figure 2 Vous pouvez jeter ce cavalier Assurez vous que les fils qui restent sont solidement branchés Pour éviter un possible départ d incendie des blessures corporelles ou des dommages au radiateur respectez ces consignes 1 Débranchez toute alimentation secteur arrivant au panneau de service princip...

Страница 11: ...le radiateur doit rester en marche ON en permanence durant la saison de chauffage du fait que le thermostat quand il est bien réglé maintiendra la température désirée Mis en position antihoraire à fond le radiateur restera arrêté jusqu à ce que la température ambiante retombe bien au delà du niveau de gel Comment restaurer le fonctionnement du Contrôle de sécurité en cas de surchauffe Cet appareil...

Страница 12: ... des dommages résultant d accident de mésusage ou d altération ni si la tension secteur envoyée fait 5 ou plus au dessus de la tension nominale de la plaque signalétique ni sur l équipement est incorrectement installé ou câble en violation avec les instructions d installation Toutes les demandes d exercice de la garantie devront être accompagnées de la preuve de date d installation Le client doit ...

Отзывы: