24 - User Manual - Sigillo
®
3.2.11 How do I interrupt the machine operations?
Follow the process described in paragraph 3.2.6 .
3.2.12 How do I stop the machine in case of emergency?
Follow the process described in paragraph 3.2.7 .
3.2.13 Machine stop in safety conditions
Follow the process described in paragraph 3.2.9 .
3.2.14 In case of empty tipper body
When the tipper body is totally empty, two different behaviours of the operator are required:
•
If the tipper should be loaded again on the same place where the unloading happened, the operator is allowed to let the
elastic strings removed (if these are part of the equipment). Then, after loading, the operator unfolds again the tarpaulin
and fastens the elastic strings properly.
•
If the vehicle should move on the road with empty tipper body, it is mandatory to fasten the elastic strings to their frontal
hooking points to prevent any risks of entanglement for persons or objects while travelling on the road.
1. Push the emergency pushbutton to set the machine in SAFETY SHUTDOWN and remove the key.
2. Carry out a quick but attentive control to verify that everything is in good order before moving the vehicle on the road.
3.3 Using the optional accessories (if installed)
3.3.1 Automatic rear closing device
The possible presence of the automatic rear closing device avoids that the operator has to arrange manually the end part of
the tarpaulin when securing the tipper body. With this device, the covering closes automatically when the covering reaches
the end stop.
3.3.2 Steel cable quick release device
This system allows removing the lateral steel cables, setting the upper edge free and making it possible to tip sideward or to
swing out the lateral walls. Of course, this operation would be infeasible with the standard equipment of the covering.
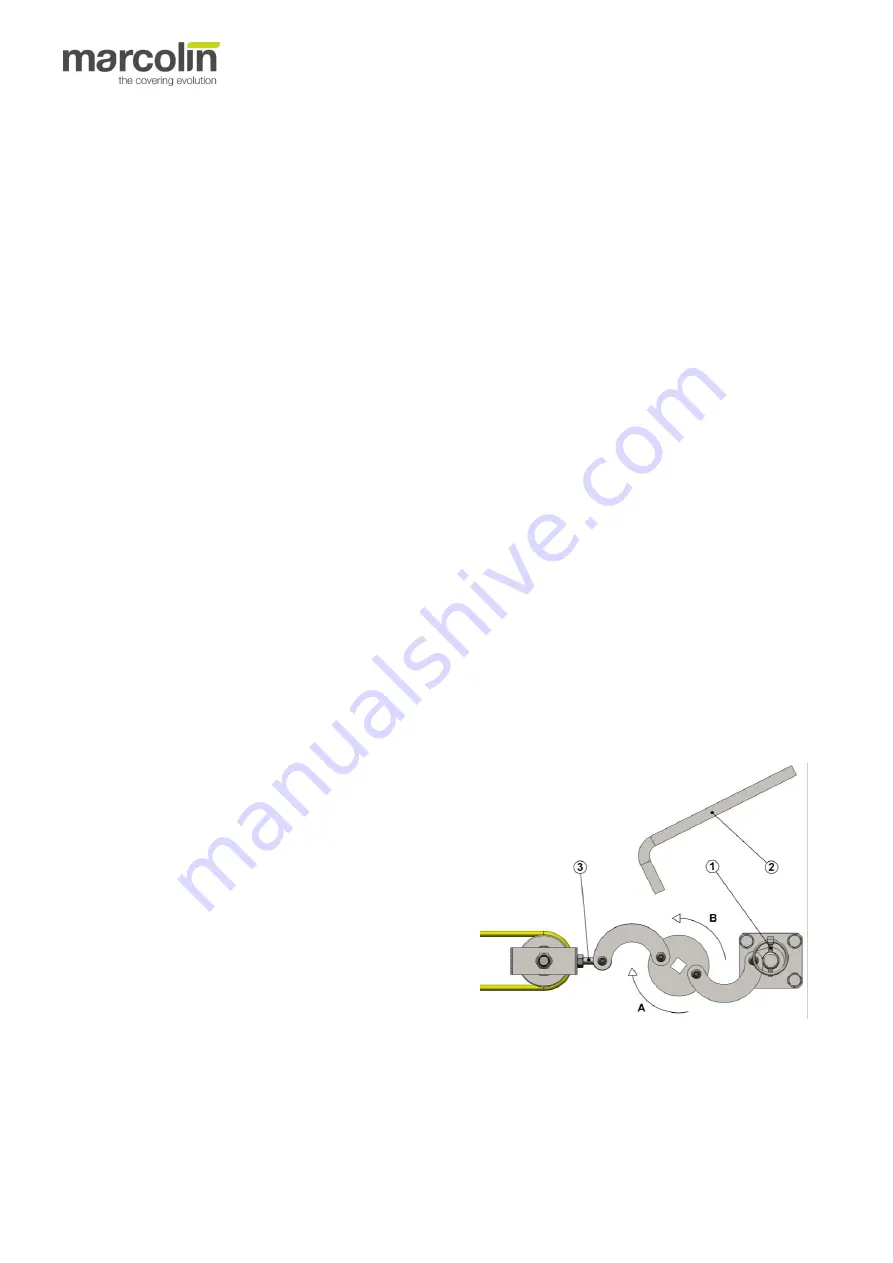
The cable quick release device is equipped with a lever for
opening and closing the release device.
To release the cables, proceed as follows:
1. insert the lever (2) in the central hole of the release device;
2.
open the release device
turning the lever in the direction
shown in the figure (A);
3. remove the safety locking pin (1) from the pivot of the plate;
4. remove now the steel cables pulling out the release device
from the plate.
For tightening up again the steel cables, repeat the operations in
reverse order.


