background image

Chapter 9: Sample Configurations 

___________________________________________________________________


9-17 

 
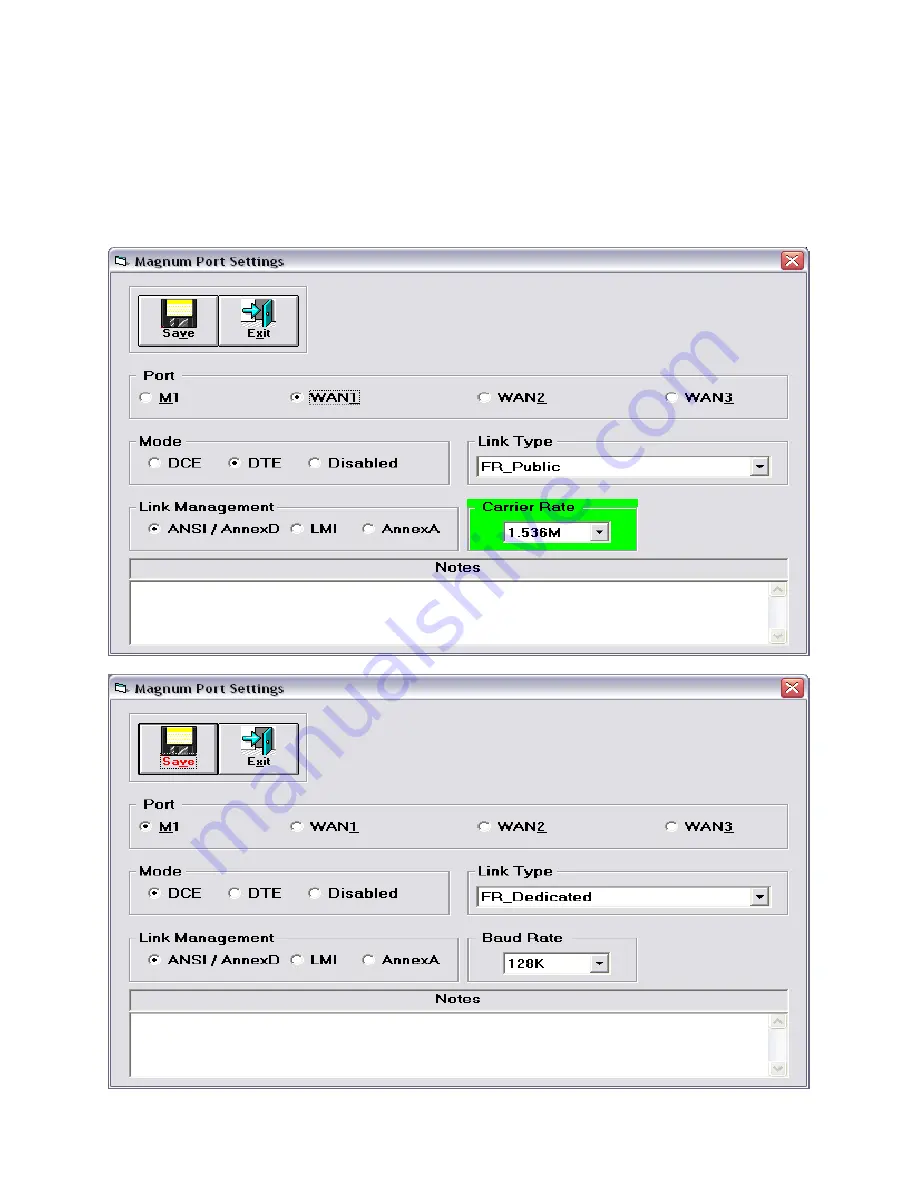
Port Settings 

Once again, the carrier is supplying all clocking and Frame Relay information, so the WAN1 port 
on all 3 Magnum Routers will be programmed to be Frame Relay USER ports (FR_Public).  
Further, the M1 port will be supplying clocking and Frame Relay information to the Marathon, 
becoming a Frame Relay NETWORK port (FR_Dedicated). 
 
Port Settings for WAN1 and M1 on all three Magnum Routers in this network 


Содержание MAGNUM ROUTER

Страница 1: ...I MAGNUM ROUTER User s Guide Release 2 0 marathonstore com Where Customer Service Comes First...

Страница 2: ...II...

Страница 3: ...pter 4 Installing the Hardware Explains how to install the Magnum Router into a Marathon chassis Part 2 Chapters 5 through 10 comprise Part 2 of the User s Guide These chapters explain how to install...

Страница 4: ...section Text with this icon is to inform of cautionary information Text with this icon is to inform of general information Text with this icon is to inform of information that could cause errors if pr...

Страница 5: ...ware 5 1 Upgrading the Magnum Router Manager 5 4 Starting the Magnum Router Manager 5 4 First Time Startup 5 5 CHAPTER 6 LOGGING ONTO A MAGNUM ROUTER 6 1 Connecting to a Magnum Router 6 1 Console Cabl...

Страница 6: ...7 21 DHCP Functions 7 25 Save Configuration 7 26 Send Configuration 7 27 Reboot the Magnum Router 7 28 Menu Bar 7 30 Access Menu ALT A 7 30 Configuration Menu ALT C 7 33 Settings Menu ALT S 7 37 Syste...

Страница 7: ...to license the Software In such event You may not install copy download or otherwise use the Software SOFTWARE LICENSE The Software is protected by intellectual property laws and treaties The Software...

Страница 8: ...e printed materials accompanying the Software All rights not specifically granted under this EULA are reserved by Licensor and its suppliers U S GOVERNMENT LICENSE RIGHTS All Software provided to the...

Страница 9: ...nding any damages that you might incur for any reason whatsoever including without limitation all damages referenced above and all direct or general damages the entire liability of Western NRG Inc and...

Страница 10: ...X...

Страница 11: ...his product s design The Magnum Router can also encapsulate various protocols such as serial data and Micom Clear Voice G 729 voice compression technology into IP packets for transport across any IP n...

Страница 12: ...Chapter 1 Introduction ___________________________________________________________________ 1 2...

Страница 13: ...ures Supports industry standard Ethernet TCP IP Routing Supports dynamic routing RIP Version 1 Functions as a DHCP Server Microband VoIP a k a IP Encapsulation IP encapsulation for all legacy Marathon...

Страница 14: ...e Relay Support DLCI s PVC s Unlimited Frame Size 2K Compatibility The Magnum Router is compatible with other manufacturers RFC 1490 compliant products Must reside in a new or existing Marathon Base U...

Страница 15: ...An available PC COM port DB9F to DB25M console cable included Appropriate cables Please see the applicable cable kits in the illustration below MAGNUM ROUTER CABLE KITS MARATHON 2K 2K Plus 5K Turbo Ki...

Страница 16: ...Chapter 2 Magnum Router Features ___________________________________________________________________ 2 4...

Страница 17: ...of each PVC if your network is public Frame Relay Available bandwidth for each PVC CIR After successful installation of the Magnum Router Marathon retain this drawing for future reference to aid in t...

Страница 18: ...anning phase to be completed Determine the Name of your Magnum Router Determine the WAN Configuration Port Settings Determine the Master WAN IP Address Determine the WAN IP Route Map information Deter...

Страница 19: ...he screws removed from the step 1 fasten the Magnum Router sheet metal back plane to the Marathon chassis and re assemble the required number of blank back plane dividers 4 Re install the Marathon bas...

Страница 20: ...Connect the appropriate M1 to A1 cable from the M1 port of the Magnum Router to the A1 port of the Marathon base unit Connect the appropriate WAN port cables to their respective CSU DSU s Connect the...

Страница 21: ...Magnum Router GUI Manager is installed much the same as any Windows software Follow these easy steps Exit all open Windows programs Insert the Magnum Router GUI Manager cd in your computers cd drive T...

Страница 22: ...tallation or click Exit Setup to abort the installation If OK was clicked the select directory perform installation screen will be displayed Figure 3 Setup Install and Directory Screen Under most cond...

Страница 23: ...Router Manager Enter another Program Group name select one from the list or click on Continue to proceed After clicking the Continue button the setup program will install the Magnum Router Manager fi...

Страница 24: ...outer Manager do these following steps Click on Start Click on Settings Click on Control Panel Click on Add Remove Programs Click on the Magnum Router Manager entry Select Remove Program Once these st...

Страница 25: ...is to be used to connect to the Magnum Router by clicking on the Comm Port dropdown box When you ve completed that step click on Save to save this setting and then click on Exit to start the manager...

Страница 26: ...Chapter 5 Magnum Router Manager Installation ___________________________________________________________________ 5 6...

Страница 27: ...ght thru cable from a PC s communications port to the Magnum Router s console port Included with the Magnum Router is a DB 9 to DB 25 console cable labeled M5000C CP If the interface on the PC s inter...

Страница 28: ...uired to connect the second Marathon Async port to the Magnum Router Console port This example assumes a direct connection from the PC to a Marathon First attach the DB 9 to DB 25 console cable includ...

Страница 29: ...sult the modem manual or vendor if necessary for assistance Type the command string AT D2 S1 C1 K0Q1E1S0 1 W and press Enter Below is a definition of the AT commands that is recommended D2 Modem hangs...

Страница 30: ...ds allow access to the Magnum Router via Console Port Dial Modem Telnet or Marathon Matrix by Marathon Node Channel Begin the login process by selecting the desired Login Method By default Console con...

Страница 31: ...a Magnum Router card The connection is accomplished by connecting either the supplied DB 9 to DB 25 straight thru cable or equivalent from the PC to the Magnum The settings for serial communication wi...

Страница 32: ...g the selected LOGIN METHOD Start the TEXT ONLY terminal program Enter EITHER the IP address of the Magnum Router OR select a name from the dropdown box Figure 9 Telnet Login Screen Login by typing in...

Страница 33: ...in Screen Connect to a Magnum Router using the selected LOGIN METHOD Start the TEXT ONLY terminal program Enter the Marathon NODE name and the channel to be used to connect to the Magnum Router Consol...

Страница 34: ...the Magnum Router PC M5000C CP M5000C MATRIX Marathon Node Name TOP To use a login method of Marathon Matrix for the above example fill in the fields as shown below This causes the PC attached to the...

Страница 35: ...nager has the ability to send up to 5 of these special commands Special modem commands can be accessed from the Modem Parameters button of the Communications Settings screen The communications setting...

Страница 36: ...ered commands before dialing the selected number If there is a modem change on the PC that is running the Magnum Router Manager then these commands may be changed or deleted Dialing to a Magnum Router...

Страница 37: ...in the Phone Directory perform the following steps 1 Click on New Entry or press ATL N 2 Fill in the fields on the screen 3 Click Save Edit or press ALT V 4 Click Exit Edit or press ALT X All informa...

Страница 38: ...X If this entry was selected by mistake and is not the one that needed modification just click on the Exit Edit or press ALT X Deleting Phone Directory Entries In some cases an entry may need to be de...

Страница 39: ...f the Magnum Router will prompt if the modem is to be disconnected If the modem is left in an on line state it can be disconnected at a later time by selecting Hang Up Modem from the Access menu Passw...

Страница 40: ...o show the status of the login process Once the basic login process has completed the following question will be asked The Magnum Router does support a real time clock This option is just to set the d...

Страница 41: ...owing screen will appear reporting that the manager is getting the connected Magnum Router s stored configuration Other Login Screen Options There are 2 other buttons on the login screen Select this b...

Страница 42: ...isplayed As an example it could be used to access a Micom Marathon to check the unit status The terminal program will ONLY work if the Manager IS NOT currently logged onto a Magnum Router The terminal...

Страница 43: ...erminal will display the Magnum Router Manager terminal screen Figure 12 Magnum Router Manager Terminal Screen The terminal program has an internal scroll back buffer of 4000 bytes the ability to capt...

Страница 44: ...te a Marathon Matrix connection Each time this button is clicked the terminal program will show Break Sent in the display when it has completed the task This is used for capturing incoming data to a f...

Страница 45: ...a menu or button or using the tab key Selected buttons change text color from black to red Throughout the Magnum Router Manager there are several shortcut keys that have been kept constant these are A...

Страница 46: ...RED Down Arrow Not Connected Connection Type Display s how the Magnum Router Manager is connected to a Magnum Router Figure 13 Magnum Manager Main Screen The Magnum Router Manager screen is broken int...

Страница 47: ...num Router Manager customization Selecting this item will cause the Set Mangum Name screen to appear Figure 15 Set Magnum Name Screen This sets the name of the Magnum Router It is for informational pu...

Страница 48: ...LMI type and the Frame Relay link type To get to the Port Configuration screen from the manager main screen click the Port Config button or press ALT P This is also accessible by clicking on the Sett...

Страница 49: ...o point leased lines or T1 E1 or fractional T1 E1 dedicated leased lines Selecting the DEDICATED MASTER causes the Magnum Router WAN port to function as a Frame Relay Network Port supplying LMI and DL...

Страница 50: ...ud Rate Notes A baud rate denotes the speed of which a serial port is to operate at The Magnum Router handles baud rates in the following manner When the Port Mode is selected as DCE then the baud rat...

Страница 51: ...is where these PVC connections are created in the Magnum Router Add a NEW WAN entry into the configuration Delete a WAN entry from the configuration Save changes to the Magnum Router Manager Exit this...

Страница 52: ...e up to 1 024 characters in length Adding a WAN Configuration Entry To add an entry in the Master WAN IP screen perform the following steps 1 Begin by clicking on the New Entry button or by pressing A...

Страница 53: ...or press ALT D 3 A verification question is asked to make sure that this is the entry to delete if it is select Yes Selecting No will return to the WAN Configuration screen Repeat for each entry that...

Страница 54: ...le WAN interface or multiple WAN sub interfaces by mapping and assigning a unique IP network number to specific DLCI s Add a NEW WAN entry into the configuration Delete a WAN entry from the configurat...

Страница 55: ...t is possible to change an entry after it has been entered into the table Follow these steps to change an entry 1 Double Click on the entry that needs modification in the table 2 Make any modification...

Страница 56: ...twork address with its corresponding DLCI number port number and associated gateway a k a next hop IP address Add a NEW WAN entry into the configuration Delete a WAN entry from the configuration Save...

Страница 57: ...Follow these steps to change an entry 1 Double Click on the entry that needs modification in the table This will cause all of the entry data to be loaded in the fields above the table 2 Make any modi...

Страница 58: ...o another router for internet access Click on the Advanced Routing button of the WAN IP Route Map screen or press ALT A to display the Advanced Routing screen Add a NEW WAN entry into the configuratio...

Страница 59: ...cause all of the entry data to be loaded in the fields above the table 2 Make any modifications required 3 Click on Save Edit or press ALT V 4 Click on Exit Edit or press ALT X If this entry was sele...

Страница 60: ..._______________ 7 16 RIP Version 1 Routing Enable RIP routing by clicking on the box next to Enable RIP Version 1 Routing To disable RIP routing remove the check in the box The Magnum Router implement...

Страница 61: ...num Router From the Magnum Router Manager main screen click on the Ethernet Config button press ALT E or select Ethernet Configuration from the Settings menu to display the Ethernet Configuration scre...

Страница 62: ...eeds modification in the table This will cause all of the entry data to be loaded in the fields above the table 2 Make any modifications required 3 Click on Save Edit or press ALT V 4 Clock on Exit Ed...

Страница 63: ...on Save changes to the Magnum Router Manager Exit this screen to the Main Screen MVoIP DLCI Entered in the WAN Configuration screen Destination MVoIP Address Source MVoIP Address Add documentation not...

Страница 64: ...ck Save Edit or press ALT V 4 Click Exit Edit or press ALT X Changing an MVoIP Entry It is possible to change an entry after it has been entered into the table Follow these steps to change an entry 1...

Страница 65: ...affic while IP hosts make requests for information Below is the DHCP Configuration screen View Assigned DHCP Leases Clear all fields on this screen Save changes to the Magnum Router Manager Exit to th...

Страница 66: ...that an IP address be entered in the Ethernet Configuration screen Multiple IP addresses can be entered in the Ethernet Configuration screen up to 254 but only one can be selected to work as the host...

Страница 67: ...ultiple IP Addresses In the case where there are multiple IP addresses entered in the Ethernet Configuration screen and the DHCP server has already been configured then selecting an IP address that wa...

Страница 68: ...ss need to be within the same subnet as the host IP address and cannot overlap the host IP address In the case where there is a DHCP Range error an error message will be displayed informing of what th...

Страница 69: ...______________________________________________________ 7 25 DHCP Functions Other buttons on this screen are Select this button to clear all the fields on the screen Select this button to see any DHCP...

Страница 70: ...pon completion of the customization of the Magnum Router configuration it is advisable that the configuration be saved for later use To accomplish this click on the Save Config button or press ALT V T...

Страница 71: ...st item that Send Config does is a cursory check of the configuration to be sent If there are any errors or warnings found this screen would appear The Send Config button will ONLY be available if the...

Страница 72: ...n the screen will send informational messages to inform the user of the current status of the configuration being sent When the configuration send has completed the Magnum Router main screen will be s...

Страница 73: ...takes approximately 2 minutes to complete a reboot and after the reboot is complete the Magnum Router Manager will automatically log back onto the Magnum Router The exception to the auto login process...

Страница 74: ...icate definitions in this user guide Access Menu ALT A Figure 26 Main Screen Access Menu Selections in this menu allow the ability to login to a Magnum Router or access a remote Magnum Router on the n...

Страница 75: ...gnum Routers If the Magnum Routers in a network are programmed for frame switching only then remote access is not available Selecting this function will display the following screen Enter the remote I...

Страница 76: ...icking OK will then re log the Magnum Router Manager onto the local Magnum Router Logoff a Remotely Accessed Magnum Router This menu item terminates a login from a remotely accessed Magnum Router Hang...

Страница 77: ...me as clicking on the New Config button of the main screen All settings within the Magnum Router Manager are defaulted and the Set Magnum Name screen will be displayed Opening Configuration File You c...

Страница 78: ...just change the configuration file in the File name box to save under a different name And just like Open Configuration the configuration can be saved as a version 1 x cfg or version 2 x cf2 configur...

Страница 79: ...r Manager Send Data to the selected printer View the selected data on the screen Close this screen and return to the Main Screen Select the Page Orientation for printing Select the number of copies to...

Страница 80: ...to see what the configuration looks like before actually making a hard copy of the configuration Below is an example of what the Print Preview might look like Get A Configuration from Magnum Router Se...

Страница 81: ...Selecting the COMMUNICATIONS SETTINGS from the menu will display the main communications setup screen This screen which is shown when the Magnum Router Manager is first started gives the ability to c...

Страница 82: ...and the following screen will be displayed Figure 30 Remote Names Screen Adding a Remote Name Entry To add an entry in the Router Names screen do the following steps 1 Click on New Entry or press ATL...

Страница 83: ...cases an entry may need to be deleted To do this follow these steps 1 Select an entry in the table 2 Either click the Delete Entry button or press ALT D 3 A verification question is asked to make sure...

Страница 84: ...way to bring a Magnum Router up to the latest revision so that any new functions or improvements can be utilized Upgrade files may be supplied via a compressed folder or can be located on a supplied...

Страница 85: ...__________________________ 7 41 The following screen will be displayed Click Continue to proceed or click Exit to return to the Magnum Router Main Screen Clicking on the Continue button will display t...

Страница 86: ...tinue If a manual upgrade is required perform the following steps Start the FTP client program and access the Magnum Router Enter the username of magnum Enter a password of magnum Send all files locat...

Страница 87: ...ind the update files Do this by selecting the hard disk and directory where the Update files were de compressed The Magnum Router Manager will then verify that the upgrade files are correct If there i...

Страница 88: ...splayed If this error appears click on OK and try the upgrade process again Once the files have been verified the Magnum Router Manager will try and access the Magnum Router If that step is successful...

Страница 89: ...by processing a specific set of commands Figure 33 Upgrade Magnum Router Process Upgrade Commands Screen Once all steps have been completed a message will display signifying that the upgrade has compl...

Страница 90: ...tivity DLCI status and IP Routes on a Magnum Router Below is the overview of the DIAGNOSTIC screen Show IP Routes known by the Magnum Router List DLCI s reported by port Stop Processing a command Exit...

Страница 91: ...specified IP Host device is active To perform the PING command from the DIAGNOSTICS screen enter either the IP address of the IP host or select it from the Router Name field Other options for the PIN...

Страница 92: ...__________________________________________ 7 48 To stop a PING at any time either click on EXIT or STOP If STOP is selected or if the requested number of PING s has been reached the following screen w...

Страница 93: ...___________________________________________________________________ 7 49 If the IP Host that is being PING ed does not respond to requests within 10 seconds the PING command automatically terminates a...

Страница 94: ...___________________________ 7 50 Show IP Routes The Show IP Routes command shows any routes that have been programmed into the Magnum Router It does not differentiate between static routes or routes t...

Страница 95: ...screen just reports the DLCI s it DOES NOT display detailed DLCI information use the Display Port Statistics command in the Statistics menu for detailed DLCI status information Figure 38 Diagnostics...

Страница 96: ...hange the access password begin by selecting Change Access Password from the System menu Once selected the following warning message will appear Selecting YES will continue to the password entry scree...

Страница 97: ...n entered click on Save or press ALT V and then click on Exit or press ALT X The first warning message will be displayed Selecting Yes will then display a second warning message Selecting Yes again wi...

Страница 98: ...of these screens show a great amount of data It can take up to 30 seconds to get all the required data for display to complete Further several of these screens allow for an Update Interval change tha...

Страница 99: ...Tx Bytes The total number of bytes transmitted since the unit was started or since the last time the counters were cleared Rx Frames The total number of frames received since the unit was started or...

Страница 100: ...num Router not the Ethernet port Display Detailed Port Information The Display Detailed Port Information screen gives a more comprehensive overview of the port status and gives additional information...

Страница 101: ...The DLCI is up and operational Configured NOT Reported and Active The DLCI has been configured but is currently down Configured NOT Reported and NOT Active The DLCI has not been configured into the Ma...

Страница 102: ...ce in both a BAR chart format and a LINE chart format This screen does not have the ability to look at independent DLCI s nor can it clear the Magnum Router counters For those items use the Display Po...

Страница 103: ...this function is actually selected before data is displayed This screen is broken into 3 sections The Menu bar the Chart Section and the Data section Menu Bar Figure 43 Magnum Utilization Menu Bar Fi...

Страница 104: ...date Interval Menu This menu item sets the amount of time between updating data to the chart and data grid Selections include NOW Immediate Update 30 seconds 1 Minute the default setting 5 Minutes 10...

Страница 105: ...n can be displayed in a columnar format for each port In the LINE chart only 1 column of data can be displayed at a time for the selected ports Port Selection In the lower section of the display are t...

Страница 106: ...Click on the column heading to select or de select it A column heading that is green is selected to be on the chart non green column headings will not be included in the chart Bar Chart The BAR chart...

Страница 107: ...the new selection will be charted General Numbers Charted Data Update Placeholder Table Description Chart Description Figure 51 Magnum Utilization Line Chart Screen Chart Numbers On the left side of b...

Страница 108: ...Port Status Strobe menu item This is used as an indicator as to whether the strobe is active or not Clicking on the Port Status Strobe menu item turns the function on of off Figure 52 Port Status Stro...

Страница 109: ...Manager version and miscellaneous information that could be helpful in diagnosing problems Exit Menu Item ALT X Selecting this option closes the Mangum Router Manager program When exiting the Magnum...

Страница 110: ...Chapter 7 Magnum Router GUI Manager ___________________________________________________________________ 7 66...

Страница 111: ...nnection where the input DLCI and output DLCI are the same number Direct Connect DLCI s Networks with only one connection at each end point are also known as direct connect These PVC s do not need to...

Страница 112: ...s be the same on each Magnum Router or Virtual Routing will not work Further the public DLCI cannot be the same as any of the private DLCI s Since one public DLCI is being multiplexed to 2 Magnum Por...

Страница 113: ...r The Magnum Router Manager treats WAN Configuration entries differently based on the Input DLCI and Output DLCI If the Input DLCI is different from the Output DLCI Input DLCI 100 Output DLCI 200 for...

Страница 114: ...e exclusive to MVoIP only The Magnum Router looks at all connections in the WAN connection table only DLCI s from 900 through 989 with a connection to the E1 port are automatically considered to be MV...

Страница 115: ...ports and can learn routing information through these ports The Ethernet port of the Magnum Router uses this information in the same way as any other RIP router but the WAN section of the Magnum Route...

Страница 116: ...ng configuration files from disk The following types of configurations are discussed Sample 1 Dedicated Point to Point Network Sample file names Dedicated Point to Point A CF2 Dedicated Point to Point...

Страница 117: ...be set to DTE accept clock The Frame Relay configuration is a little different As described in chapter 7 there are several Link Types available In this case DEDICATED_MASTER and DEDICATED_SLAVE will...

Страница 118: ...f the Magnum A and Magnum B s configuration M1 Port Settings for both Magnum A and Magnum B Here the M1 port is configured to act as a Frame Relay NETWORK port FR_Dedicated but to also act as a synchr...

Страница 119: ...ce that the WAN1 port is set for DTE and the Link Type is set for DEDICATED_MASTER As described above this is the Frame Relay NETWORK port side Also note that the Baud Rate box that was present for th...

Страница 120: ...___________________________________________________________ 9 5 WAN1 Port Settings for Magnum B Notice that the WAN1 port is set for DTE and the Link Type is set for DEDICATED_SLAVE As described above...

Страница 121: ...of this line can be anywhere from 9 6k through 2 048m However this line only supplied clocking information The Magnum Router must then act as a Frame Relay switch and Frame Relay NETWORK or USER port...

Страница 122: ...________________________________________ 9 7 Master WAN IP Address for Magnum A The following table shows the Master WAN IP Address screen for Magnum A Master WAN IP Address for Magnum B The following...

Страница 123: ...IP traffic there must be an IP address on the WAN port WAN IP Route Map Here the actual routing commands are created to allow Ethernet traffic to flow from Magnum A to Magnum B See Chapter 7 for detai...

Страница 124: ..._________________________________________________ 9 9 Ethernet Configuration The following window illustrates the Ethernet Configuration associated with this sample configuration Ethernet Configuratio...

Страница 125: ...thernet port Network 172 16 1 0 24 IP Address 172 16 1 250 24 Public Frame Relay DLCI 16 PVC WAN Network 192 168 1 0 24 DLCI 17 A1 to M1 cable Although this sample is very similar to SAMPLE 1 there is...

Страница 126: ...ample Configurations ___________________________________________________________________ 9 11 M1 and WAN1 settings on Magnum A and Magnum B In this sample the port settings of Magnum A and Magnum B ar...

Страница 127: ...ram for this example Magnum A is being supplied with a DLCI of 16 from the carrier and Magnum B is being supplied with a DLCI of 17 Once again a Virtual DLCI is being utilized to split one DLCI into 2...

Страница 128: ...__________________________________________ 9 13 Master WAN IP Address As in the previous sample and IP address needs to be assigned to the WAN port for IP routing to function across the Frame Relay ne...

Страница 129: ...Chapter 9 Sample Configurations ___________________________________________________________________ 9 14 WAN IP Route Map Table Magnum A s WAN IP Route Map Magnum B s WAN IP Route Map...

Страница 130: ...Chapter 9 Sample Configurations ___________________________________________________________________ 9 15 Ethernet Configuration Magnum A s Ethernet IP Address Magnum B s Ethernet IP Address...

Страница 131: ...ork 192 168 1 0 24 DLCI 17 A1 to M1 cable IP Address 192 168 2 2 24 Network 172 17 1 0 24 Magnum Marathon C IP Address 172 17 1 250 24 Ethernet port DLCI 18 CSU DSU This example is basically the same...

Страница 132: ...all clocking and Frame Relay information so the WAN1 port on all 3 Magnum Routers will be programmed to be Frame Relay USER ports FR_Public Further the M1 port will be supplying clocking and Frame Re...

Страница 133: ...___________________________________ 9 18 WAN Configuration As noted earlier this configuration utilizes multiple Virtual DLCI s Notice that the PUBLIC DLCI s 17 and 18 are assigned to 4 different PRIV...

Страница 134: ...ample Configurations ___________________________________________________________________ 9 19 Magnum C Master WAN IP Address The following table shows the Master WAN IP Address Magnum A using two sub...

Страница 135: ...Chapter 9 Sample Configurations ___________________________________________________________________ 9 20 Magnum B Magnum C...

Страница 136: ..._______________ 9 21 WAN IP Route Map Table The following table shows the WAN IP Route Map Table Configuration associated with this sample configuration See chapter 7 for detailed information on using...

Страница 137: ...rations ___________________________________________________________________ 9 22 Magnum C Ethernet Configuration The following window illustrates the Ethernet Configuration associated with this sample...

Страница 138: ...Chapter 9 Sample Configurations ___________________________________________________________________ 9 23 Magnum B Magnum C...

Страница 139: ...rt Network 172 16 1 0 24 Carrier Class IP Network or Public INTERNET E1 IP Address 172 16 1 250 24 MVoIP Source IP Address 172 16 1 251 24 Router Firewall Router Firewall Telephone Sync Async Data Ter...

Страница 140: ..._________________ 9 25 Port Settings Port settings for all ports in the Microband VoIP sample are the same on both Magnum A and Magnum B Ports WAN1 WAN3 are set for disabled WAN Configuration The foll...

Страница 141: ...nnection just like any other PVC connection Also note that when using the Microband VoIP features the CIR should be set the same as the clock speed on the M1 port The default clock speed on M1 is 128K...

Страница 142: ...that will carry the network traffic across the WAN or Internet See chapter 7 for detailed information on using the Magnum Router Manager to change data in the DLCI IP Map Table Advanced Routing The Ad...

Страница 143: ...rations ___________________________________________________________________ 9 28 Ethernet Configuration The following window illustrates the Ethernet Configuration associated with this sample configur...

Страница 144: ...this example the IP addresses to be used are as follows Magnum A E1 IP address 10 1 100 250 24 MVoIP address 10 1 100 251 24 Magnum B E1 IP address 172 16 1 250 24 MVoIP address 172 16 1 251 24 Altho...

Страница 145: ...Magnum B The destination IP is the Ethernet Interface of the target Magnum Marathon unit on the other end of the network Please refer to the Microband VoIP diagram at the beginning of this example See...

Страница 146: ...r not only the networks directly attached to it but also a remote network that has a generic brand x router running a RIP protocol This sample is built from sample 2 Public Point To Point Frame Relay...

Страница 147: ...elow On Magnum A RIP routing needs to be enabled To do this click on the WAN Config button then select the WAN IP Route Map button and finally the Advanced Routing button The following screen will be...

Страница 148: ...not support BOOTP processing and does not support multiple scopes It will supply to the local IP host device such things as an IP address WINS addresses up to 3 DNS addresses up to 3 Domain Name and d...

Страница 149: ...y in the table of the Ethernet Configuration screen highlighting the entry for 10 1 100 250 by clicking once on it and then click on the DHCP button to display the DHCP Configuration screen By default...

Страница 150: ...stalled properly power down and check to ensure the module is seated properly in the Marathon module stack LK Green Magnum 10 100 Base T UTP Ethernet port is successfully plugged into a local LAN swit...

Страница 151: ...rectly connecting to FRAD Router or bridge DTE Magnum Router Module port should be DCE with baud rate set to match capability of connected DTE device Magnum Router Module port Link Type configuration...

Страница 152: ...y configured and operating correctly Frames could not be forwarded due to port speed mismatch and resultant congestion Make sure the CIR or physical port speed is high enough to handle all configured...

Страница 153: ...__________________________________________________________________ 10 4 Telnet Login Problems Symptom Cannot access the Magnum Router using a Telnet Login Method Solution Verify that the PC is able to...

Страница 154: ...5 4 16 8 7 15 12 9 17 4 7 18 21 23 24 Receive Data A RD A 1 1 Receive Data B RD B Send Data A SD A Send Data B SD B Receive Line Signal Detector RLSD Unassigned Data Terminal Ready DTR Data Set Ready...

Страница 155: ...7 12 15 17 9 13 7 18 19 24 23 Receive Data A RD A Receive Data B RD B Send Data A SD A Send Data B SD B Receive Line Signal Detector RLSD Unassigned Data Terminal Ready DTR Data Set Ready DSR Serial...

Страница 156: ...Data Carrier Detect DCD Serial Clock Receive External B SCRE B Serial Clock Transmit External B SCTE B Transmit Data B TXD B Serial Clock Transmit External A SCTE A Receive Data B RXD B Serial Clock R...

Страница 157: ...E B Transmit Data B TD B Serial Clock Transmit External A SCTE A Receive Data B RD B Serial Clock Receive External A SCRE A Data Terminal Ready DTR Shield Request To Send RTS Clear To Send CTS Data Se...

Страница 158: ...4 5 8 7 6 9 8 3 2 20 7 5 4 6 22 For use between user PC and Magnum Router console port Data Carrier Detect Request To Send Data Set Ready Ground Data Terminal Ready Transmit Data Receive Data Ring In...

Страница 159: ...Magnum Console Port To Dial Modem Ground GND Transmit Data TD Receive Data RD Request To Send RTS Clear To Send CTS Data Set Ready DSR Carrier Detect CD Data Terminal Ready DTR Ground GND Receive Dat...

Страница 160: ...Magnum Console Port To Dial Modem Ground GND Transmit Data TD Receive Data RD Request To Send RTS Clear To Send CTS Data Set Ready DSR Carrier Detect CD Data Terminal Ready DTR Ground GND Receive Dat...

Страница 161: ..._________________________________ 11 8 RJ45 Connector RJ45 Connector M5000C CAT5E 10 1 2 3 4 5 3 2 1 8 7 6 8 7 6 5 4 Receive Receive Transmit Transmit Transmit Transmit Receive Receive To LAN hub or s...

Страница 162: ..._____________________________________________ 11 9 M5000C LOCAL DB 25 Female 3 1 2 4 5 6 7 8 9 10 11 12 13 14 15 16 17 18 19 20 21 22 23 24 25 3 1 2 4 5 6 7 8 9 10 11 12 13 14 15 16 17 18 19 20 21 22...

Страница 163: ...Chapter 11 Magnum Router Cable Specifications ___________________________________________________________________ 11 10...

Страница 164: ...2 PORT CLOCKING TX EXTERNAL RX EXTERNAL 3 MAXIMUM FRAME SIZE 1500 4 NETWORK ADDRESS 5 LOCAL MANAGEMENT PROTOCOL ANNEX D LEAVE ALL THESE SETTINGS ALONE LOCAL MANAGEMENT PROTOCOL PARAMETERS LEFT A01 1 F...

Страница 165: ...CR DELAY 0 12 LF DELAY 0 13 FF DELAY 0 ASYNC CHANNEL FEATURES TOP A04 1 PRIORITY HIGH 2 EIA CONTROL ENABLE 3 SMOOTH SCROLL ON 4 TANDEM NO 5 FLOW CONTROL STRIP STRIP 6 HP ENQ ACK NO 7 SYNC LOSS DISCON...

Страница 166: ...ets Make copies of the worksheets on these pages and use them to plan your configuration Once you ve determined the configuration and completed the worksheets use the Magnum Router Manager to enter th...

Страница 167: ...AN3 DCE DIS Link Type Link Management Baud Rate Notes Section 2 WAN Configuration Input Port Output Port Private DLCI Public DLCI CIR Non VR DLCI Notes 1 2 3 4 5 Section 3 Master WAN IP Address Networ...

Страница 168: ...______ 13 3 Magnum Router Configuration Sheet Section 5 Advanced Routing Section 6 Ethernet Configuration Network Address 1 Subnet Mask Notes 2 3 4 5 Section 7 MVoIP 1 2 3 4 5 DLCI Source Address Dest...

Страница 169: ...gnum Router Configuration Sheet Section 8 DHCP Magnum Name Date Page Notes Enabled Ethernet IP Address DHCP Range Start DHCP Range End Default Lease Time Maximum Lease Time Domain Name DNS IP Address...

Страница 170: ...HCP Server Screen 7 21 Figure 24 Save Configuration Screen 7 26 Figure 25 Main Screen Menu Bar 7 30 Figure 26 Main Screen Access Menu 7 30 Figure 27 Main Screen Configuration Menu 7 33 Figure 28 Print...

Страница 171: ...______________ ii Figure 50 Magnum Utilization Bar Chart Screen 7 62 Figure 51 Magnum Utilization Line Chart Screen 7 63 Figure 52 Port Status Strobe Main Screen 7 64 Figure 53 Port Status Strobe Quic...

Отзывы: