5
Press WAVE/+/MONTH/HR button or ALM/-/DATE/MINUTE button to choose 12H or 24H.
Press MODE/ALM SET button once to confirm and enter the setting temperature format mode.
Setting temperature format
In the setting temperature format mode, press WAVE/+/MONTH/HR button or ALM/-/DATE/MINUTE button to
choose
O
C or
O
F.
Press MODE/ALM SET button once to confirm and enter the setting time mode.
Setting time
In the setting time mode, depress WAVE/+/MONTH/HR button to increase the value of Time Hour.
Depress ALM/-/DATE/MINUTE button to advance Minutes.
When the intended Time Hour and Time Minute appear, press MODE/ALM SET button once to confirm and enter
the state of setting calendar.
Setting calendar
In the state of setting calendar, depress the WAVE/+/MONTH/HR button to increase the value of Month.
Depress the ALM/-/DATE/MINUTE button to increase the value of Date.
Depress the YEAR/CHANNEL button to increase the value of Year.
When the intended Month, Date and Year appear, press MODE/ALM SET button once to confirm and exit the
setting time mode.
Note: At the setting mode, if there isn’t any operation within 30 seconds, it will exit from the setting mode automatically
and return to normal display.
Daylight Saving Time
1)
If you live in an area that does observe DST, slide the DST switch on the back of the clock to the ON position. The
Letters DST will appear on the display next to the Atomic Signal ICON confirming you are in the Daylight Saving
Time mode. The clock will now adjust automatically each spring and fall to correct for the 1-hour time change.
2)
If you live in an area that does not observe Daylight Saving Time (DST), slide the DST switch on the back of the
clock to the OFF position to deactivate the DST function.
Setting time zones
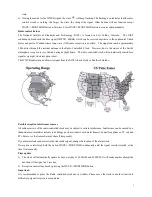
There are four time zones to choose from: PST (Pacific Time), MST (Mountain Time), CST (Central Time), and EST
(Eastern Time). Slide the switch on the back of the clock to the time zone you want, then the current time will change
correspondingly and the map of the time zone will display at the same time.
Trend symbols
1.
The trend shows UP
, if there is a 1
O
C increase compared with the last hourly reading.
2.
The trend shows DOWN
, if there is a 1
O
C decrease compared with the last hourly reading.
3.
The trend shows STANDARD
, if change is less than 1
O
C within a 1 hour period.
Cycle symbol
When the signal is being received from over two channels, the cycle function will be activated, and the cycle symbol
appears. At this time, the data of the corresponding channel will automatically alternate every 10 seconds. It can also
display each channel by pressing the YEAR/CHANNEL button by hand, but the cycle symbol will disappear.
To activate this function, it needs more than two remote sensors.
Low battery symbol
When a “Low Battery” symbol appears in the indoor temperature field, please replace the batteries of the main unit.
After installation of new batteries, the setup procedures need to be performed.
Note:
When the main unit is abnormal in display and function, please reload the batteries or use new ones.


