


5
12.
Aux/MP3 Switch:
When the button is depressed, the Aux signal will pass through. When the button is raised, the
MP3/Bluetooth signal will pass through. Use the
Aux/MP3 Level
knob below it to control the volume of sound
source.
13.
Power On/Off Switch:
Turns Voice Rover on or off.
14.
Power Cable Input (IEC):
Insert the included power cable here to power the unit.
15.
Voltage Selector:
If your unit has a voltage selector switch, change its setting only when necessary (e.g., when
traveling to a country or region with a different voltage), and replace the fuse with one with an appropriate rating
(printed under the unit’s power cable input, next to the desired voltage). Selecting an improper voltage setting or
using a fuse with an incorrect rating can damage the unit and/or fuse.
16.
Fuse:
If the fuse needs replacing, use a fuse rated at T2.5AL/250V for voltages of 220-240V; for voltages of 100-
120V, use a fuse rated at T5AL/250V.
17.
Charge Indicator:
When connected to AC power, Voice Rover’s LED light will illuminate when it is charging. Once
charging is complete, the LED will go off.
18.
Battery Level Indicator:
While Voice Rover is powered ON
and unit is not plugged in, these lights indicate the power left
in the battery. Battery life varies based on volume and
usage. When the “LOW” light on, the battery will be depleted
soon and should be recharged.
19.
Reverb:
Adjust this knob to control how much of an echo
effect is applied to the signal for the wireless microphone and
the two
Mic Inputs
.
20.
Master Volume:
This controls the overall level for all inputs.
21.
Wireless Mic Settings:
Adjust these controls when using the wireless mic. Make sure to hold the microphone
close to your mouth when speaking.
The group of controls includes an IR emitter for wireless mic
synchronization. See the
Wireless Mic Setup
chapter for more details on using these controls.
22.
Antenna
Connector
: Remove the rubber cover on the connector to attach the included BNC antenna. Adjust this
antenna to get the best wireless mic reception. Disconnect the antenna when not using the wireless mic and
when moving the unit.
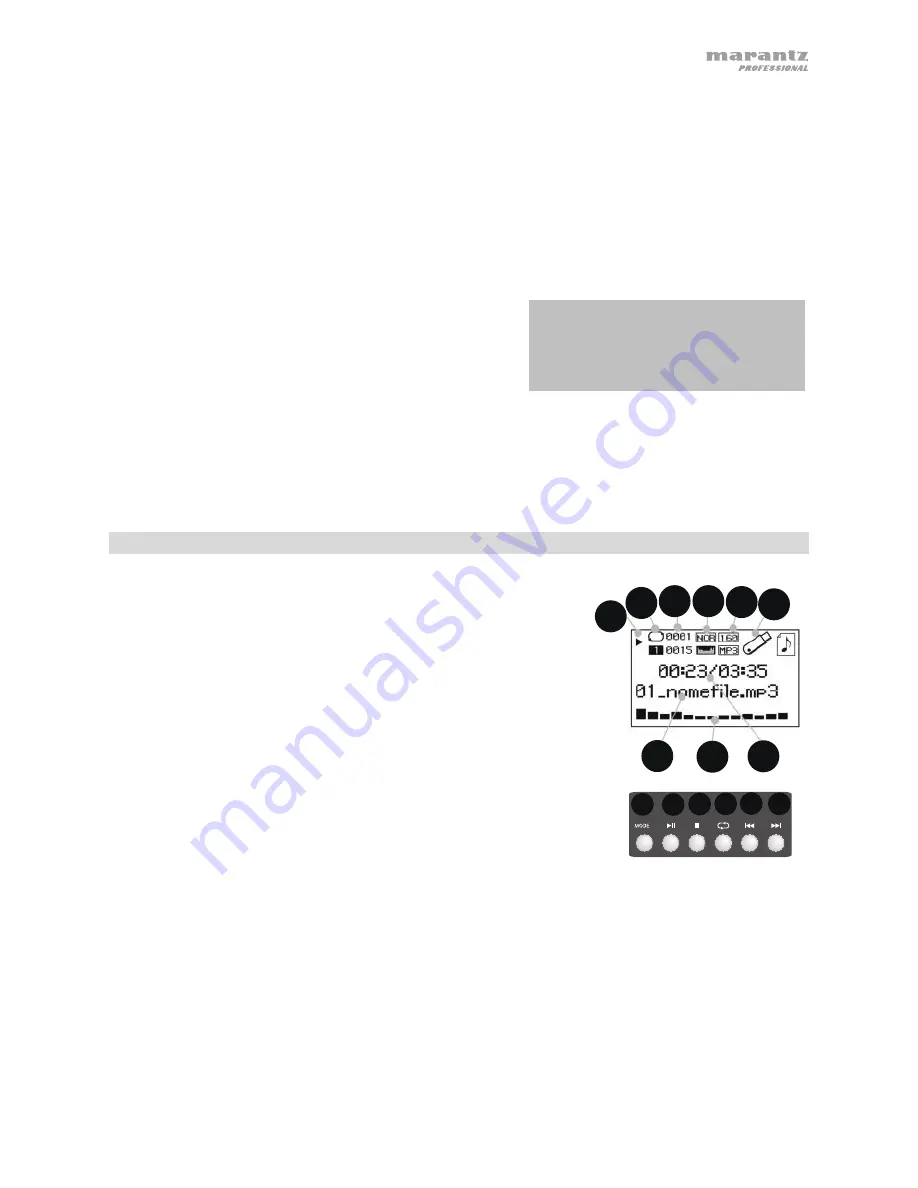
Media Panel
Media Panel functions:
1.
Mode:
Selects the Media Panel source: USB, SD, and Bluetooth.
2.
Play/Pause:
Plays or pauses the USB, SD, or Bluetooth Media Panel
source.
3.
Stop:
Stops the Media Panel source from playing.
4.
Repeat:
Cycles through the different repeat options for USB and SD
sources.
5.
Prev:
Goes to the previous USB or SD card track. When listening to
Bluetooth sources, pressing
Prev
in some apps may go to another
playlist or music genre. Press and hold this button to decrease the track
volume.
6.
Next:
Advances to the next USB or SD card track. When listening to
Bluetooth sources, pressing
Next
in some apps may go to another
playlist or music genre. Press and hold this button to increase the track
volume.
7.
The Play symbol illuminates when a track is being played.
8.
The Repeat symbol illuminates when a SD or USB track has been set to
repeat.
9.
Displays the current song playing and the total number of songs in the
selected folder.
10.
Displays the EQ preset type.
11.
Displays the bit rate and type of playing song.
Note:
If the file uses a variable bit rate, this number will change as the
song plays.
12.
SD or USB memory being played.
13.
Name of the file being played.
14.
Frequency spectrum analyzer.
15.
Current time and total time of the playing song.
1 2 3 4 5 6
7 8 9
10 11 12
13 14 15
IMPORTANT:
To maximize battery life, it is
important to charge the unit regularly. It is
not recommended to leave the unit
uncharged for longer than 3 consecutive
days.
Содержание Voice Rover
Страница 11: ......


