Marantz M-CR502 Скачать руководство пользователя страница 29

27

NAMES AND 

FUNCTIONS

BASIC

CONNECTIONS

BASIC 

OPERA

TIONS

BASIC

SETTINGS

PRACTICAL

CONNECTIONS

ADV

ANCED OP-

ERA

TIONS

IF YOU EXPERIENCE 

PROBLEMS

MISCELLANEOUS

ADV

ANCED

OPERA

TIONS

ENGLISH

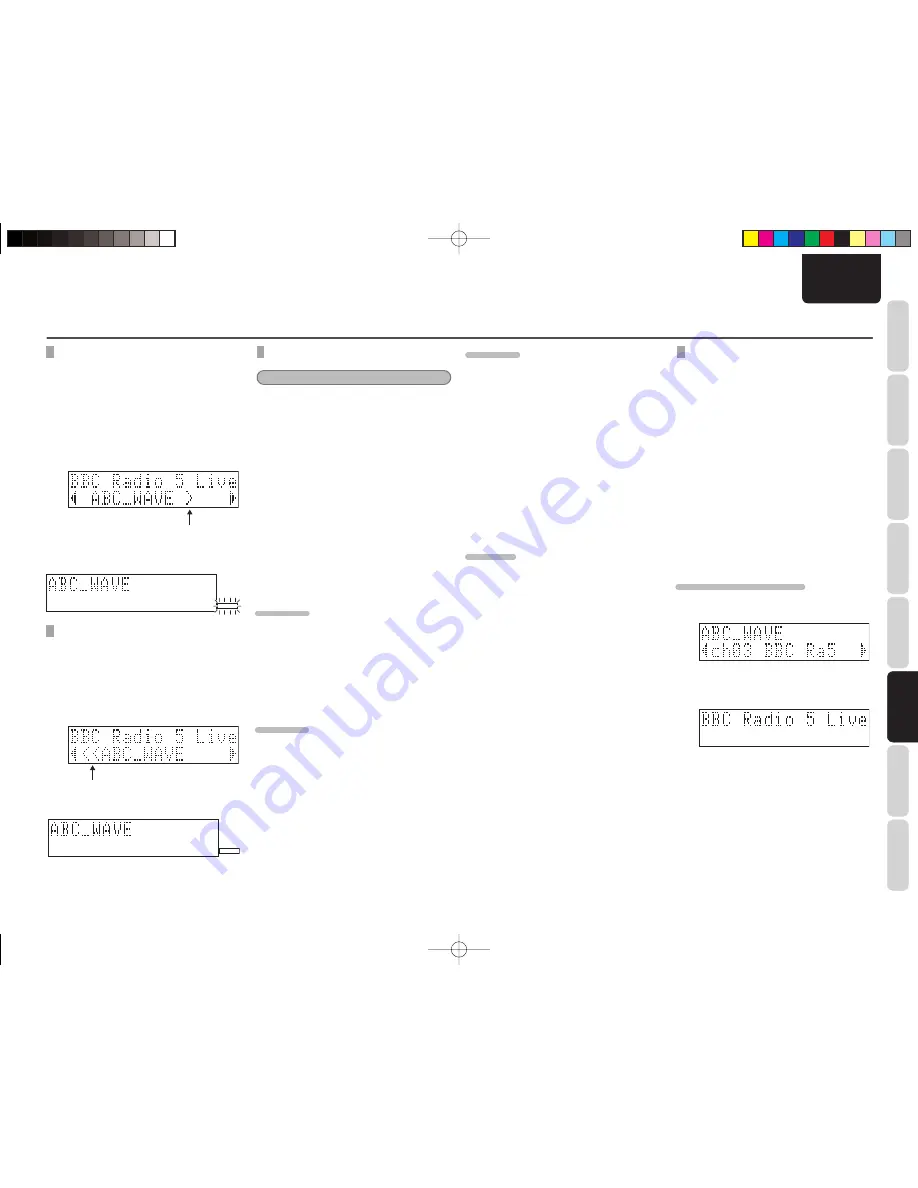
SELECTING A PRIMARY SERVICE THAT 
INCLUDES A SECONDARY SERVICE


1.


Select the broadcast station that you 
want with the 

1

/

2

 buttons on the unit or 

the TUNING 

3

/

4

 buttons on the remote 

controller.


2.


When a Primary service that includes 
a Secondary service is selected, ">" is 
displayed.


3.


Press the ENTER button.


  The SECONDARY indicator fl ashes for 5 

seconds and then turns off.

SECONDARY

SELECTING A SECONDARY SERVICE


1.


Select the broadcast station that you 
want with the 

1

/

2

 buttons on the unit or 

the TUNING 

3

/

4

 buttons on the remote 

controller.


2.


When a Secondary service is selected, "<<" 
is displayed.


3.


Press the ENTER button.


  The SECONDARY indicator lights.

SECONDARY

DAB SET UP MODE

Note:

DAB set up mode can only be selected when DAB 
input is selected.

In DAB set up mode, “Sort Mode”, “Auto Scan”, 
“Tuning aid” or “DRC Value” can be set.


1.


Press the MODE button on the unit for 3 or 
more seconds, or press the SET UP button 
on the remote controller.


2.


Select “DAB SET UP” in the menu with the 

1

/

2

 buttons on the unit or the VOLUME 

button on the remote controller and press 
the ENTER button.


3.


Select the item that you want in the menu 
with the 

1

/

2

 buttons on the unit or the 

VOLUME button on the remote controller 
and press the ENTER button.

SORT MODE

The DAB stations can be sorted by Alphanumeric 
or Ensemble.


1.


Select “Sort Mode” in DAB set up mode 
and press the ENTER button.


2.


Select “Alphanumeric” or “Ensemble” and 
press the ENTER button.

AUTO SCAN


1.


Select “Auto Scan” in DAB set up mode 
and press the ENTER button.


2.


Select “Full Scan” or “Local Scan” with 
the 

1

/

2

 buttons on the unit or the VOLUME 

button on the remote controller and press 
the ENTER button.

Full Scan:


Scans the entire Band 

III

 frequency 

range. When the scan detects a new 
station, it is added to the DAB channel 
list.

Local Scan:


Scans between 218.640 MHz and 
229.072 MHz.

ADVANCED OPERATIONS

TUNING AID

You can adjust the antenna to the best reception 
position for the channel to which you want to 
listen.


1.


Select “Tuning aid” in DAB set up mode 
and press the ENTER button.


2.


Select the station for which you want to 
perform Tuning aid with the 

1

/

2

 buttons 

on the unit or the VOLUME button on the 
remote controller and press the ENTER 
button.


3.


Install the DAB antenna in the position with 
the most > marks on the display.


4.


Press the ENTER button to complete Tuning 
aid.

DRC VALUE

The DRC (Dynamic Range Control) function lets you 
change the dynamic range of the received sound 
depending on the content of the broadcast so that 
the sound is easier to hear even when the volume 
is low.


1.


Select “DRC Value” in DAB set up mode 
and press the ENTER button.


2.


Select “OFF”, “1” or “2” with the 

1

/

2


buttons on the unit or the VOLUME button 
on the remote controller and press the 
ENTER button.


OFF:

  DRC OFF mode


1:

  DRC medium level


2:

  DRC maximum level

MANUALLY PRESETTING DAB 
BROADCAST STATIONS


1.


Select “DAB” with the INPUT button on the 
unit or the TUNER button on the remote 
controller.


2.


Select the broadcast station that you want 
to preset with the 

1

/

2

 buttons on the unit 

or the TUNING 

3

/

4

 buttons on the remote 

controller and press the ENTER button.


3.


Press the ENTER button again to display 
the preset number.


4.


Enter the preset number with the 

1

/

2


buttons on the unit or the number buttons 
on the remote controller and then press the 
ENTER button.

•  A preset number between 1 and 99 can 

be registered.

SELECTING A PRESET NUMBER


1.


Display the preset number that you want to 
select by pressing the 

/

§

 buttons.


2.


P r e s s   t h e   E N T E R   b u t t o n   t o   s t a r t 
broadcasting the station that corresponds 
to the selected number.

M-CR502̲T̲DAB̲01̲ENG.indd   27

M-CR502̲T̲DAB̲01̲ENG.indd   27

09.2.4   1:35:41 PM

09.2.4   1:35:41 PM

Содержание M-CR502

Страница 1: ...CD Receiver M CR502 DAB ENGLISH FRAN AIS DEUTSCH M CR502 T DAB 00 cover indd 3 M CR502 T DAB 00 cover indd 3 09 2 4 1 41 49 PM 09 2 4 1 41 49 PM...

Страница 2: ...ots and especially the top panel Contact with hot areas can cause burns Do not expose the unit and batteries to excessive heat such as direct sunlight fire or the like Fran ais AVERTISSEMENTS Ne pas e...

Страница 3: ...tenna DAB antenna AC Power cord User Guide FEATURES 2 BEFORE USING 2 USAGE OF REMOTE CONTROLLER 3 NAMES AND FUNCTIONS 4 FRONT PANEL 4 DISPLAY PANEL 4 REMOTE CONTROLLER 5 REAR PANEL 6 BASIC CONNECTIONS...

Страница 4: ...the habit of disconnecting the power plug before leaving home DO NOT ATTEMPT REPAIRS YOURSELF Refrain from lubricating the player doing so can cause malfunctioning Only qualified engineers with specia...

Страница 5: ...may have different voltages Do not use different types of batteries together If electrolyte has leaked thoroughly wipe the inside of the battery compartment and then insert new batteries When batterie...

Страница 6: ...on Used to confirm an item See page 16 22 23 27 31 TUNER mode Used to register a broadcast station See page 21 i INPUT button Selects the input source o MODE button SET UP mode Calls up the SETUP menu...

Страница 7: ...6 c z n 0 1 x v 2 3 b m 5 4 8 9 1 2 3 0 6 8 MENU button Performs the same operations as the click wheel MENU button on an iPod 4 SET UP button Calls up the SETUP menu See page 22 23 27 31 5 TIMER but...

Страница 8: ...o the speakers o Speaker B output terminals Connect to the speakers 0 REMOTE IN terminal Connect to the REMOTE CONTROL output terminal of Marantz products REAR PANEL q e w r t y u 0 o i 2 FOLDER CURSO...

Страница 9: ...ofer a sub woofer with built in powered amp For details on making connections see the instruction manual for your sub woofer Do not touch speaker terminals when the power is ON as there is a risk of e...

Страница 10: ...ush pins or other such implement to secure the antenna in the location with the least noise CONNECTING THE SUPPLIED DAB ANTENNA Be sure to use the supplied DAB antenna indoors Adjust the antenna up an...

Страница 11: ...e connected to the AUX IN external input terminal of the unit using a commercially available audio cable with 3 5 mm diameter stereo mini plugs Marantz CD Recorder IS201 Music Junction for the iPod To...

Страница 12: ...lug the supplied power cable into AC power cord connector socket on the unit Plug the power cable into a power outlet BASIC CONNECTIONS Note When making connections take care that the audio volume lev...

Страница 13: ...When changing the input source to CD using the INPUT button on the unit be sure to put the remote controller into CD USB mode by pressing its CD button 2 Open the disc tray by pressing the 0 button an...

Страница 14: ...listen to FAST FORWARD Hold down the button on the unit or the 6 button on the remote controller during playback until you find the track section you want to listen to Start playback by releasing the...

Страница 15: ...y mode or when the input source is set to other than USB Data stored on the USB device may be destroyed if the USB device is connected or disconnected while power is on and the input source is set to...

Страница 16: ...tion as turning the iPod click wheel clockwise Note The audio volume of an iPod cannot be adjusted SELECT button Performs the same operation as the select button on the iPod click wheel MENU button Pe...

Страница 17: ...ehand if the input source for the timer is set to CD Be sure that a USB device that contains MP3 or WMA music files has already been connected beforehand if the input source for the timer is set to US...

Страница 18: ...by pressing the TONE button 2 Adjust the bass using the VOLUME buttons 10 dB to 10 dB ADJUSTING LEFT RIGHT BALANCE 1 Select BALANCE by pressing the TONE button 2 Adjust the left right balance using th...

Страница 19: ...his way Marantz DVD player Remote control Remote control switch SETTING THE REMOTE CONTROL 3 2 1 Put the power of the unit into standby mode 2 Turn on the power while holding down the 7 button 3 Selec...

Страница 20: ...er is pressed twice MP3 WMA SINGLE TRACK REPEAT MP3 WMA single track repeat play results when the REPEAT button on the remote controller is pressed while playing an MP3 WMA track MP3 WMA FOLDER REPEAT...

Страница 21: ...of specified tracks is displayed ADVANCED OPERATIONS 8 Press the 2 button on the remote controller or the 6 button on the unit to play your favorite speci ed track Note The specified track order is ca...

Страница 22: ...FO button on the remote controller while playing a music CD or music MP3 WMA file MUSIC CDS Information displayed on the display panel changes as given below each time the TIME INFO button is pressed...

Страница 23: ...rs Japanese language display is not supported in the case of ID3 tag information and file names displayed when playing MP3 data The unit only supports MP3 ID3 Tag Version 1 Sometimes the time is not d...

Страница 24: ...1 Call up the broadcast station you want to give a name to 2 Press the MODE button on the unit 3 Specify the name using alphanumeric letters A to Z and numbers 0 to 9 using the 1 2 buttons and confir...

Страница 25: ...ntifies programs that carry traffic announcements This allows you to easily receive updates on the latest traffic conditions in your area before you leave home RADIO TEXT RT RT allows the RDS station...

Страница 26: ...and the RDS indicator ashes If no station broadcasting the designated program type is found all bands being received are searched The station name is displayed on the display after the search ends 9...

Страница 27: ...e automatically from an RDS station broadcasting Clock Time CT information If CT ON is set the unit automatically sets its clock to match the Clock Time information being received 1 2 4 6 3 5 7 2 4 6...

Страница 28: ...en in mobile objects DAB is a new generation radio which can provide data service and supplementary multi media services DAB broadcasts multiple services under one Ensemble that are called service com...

Страница 29: ...e ENTER button Full Scan Scans the entire Band III frequency range When the scan detects a new station it is added to the DAB channel list Local Scan Scans between 218 640 MHz and 229 072 MHz ADVANCED...

Страница 30: ...the quality of the received broadcast SETTING AMP CHARACTERISTICS SPEAKER A B Amp properties can be changed according to the location speakers are installed Five types of characteristics can be select...

Страница 31: ...eaker A and Speaker B when listening to music on speakers connected using bi wiring See SETTING AMP CHARACTERISTICS on page 27 R channel speaker L channel speaker Note Be sure to remove the short plat...

Страница 32: ...e speaker output of the unit to BI AMP Maximum amp output switches from 50 W to 25 W per channel BI AMP mode is canceled for speaker output if SPKR A or SPKR B is set The default setting is SPKR A Not...

Страница 33: ...t or the VOLUME buttons on the remote controller and then press the ENTER button PERFORMING RESET All settings can be returned to default status Reset is selected on the unit 1 Put the power of the un...

Страница 34: ...oller You are out of the operating range of the remote controller Refer to the operating range for the remote controller Page 3 and use it only inside the proper operating range The receiver for remot...

Страница 35: ...DAB coverage exists in your area Check that antenna is connected I can not access Secondary services At the time of publishing this manual not many Secondary services are available this will increase...

Страница 36: ...able frequencies 522 to 1620kHz S N ratio 45dB Sensitivity S N 20dB 55dB V m DAB TUNER SECTION Frequency range 174 928 5A 239 200 13F MHz BAND III Sensitivity 90 dBm Signal to noise ratio 95 dB THD N...

Страница 37: ...Discs that can be played Mark logo Disc size Music CDs 12 cm 8 cm discs CD R 12 cm 8 cm discs CD RW 12 cm 8 cm discs Notes Some CD R CD RW discs may not be able to be played depending on the recordin...

Страница 38: ...your nearest authorized distributor or dealer on our website is a registered trademark Printed in China 02 2009 541110294098M mzh d M CR502 T DAB 00 cover indd 2 M CR502 T DAB 00 cover indd 2 09 2 4...

Отзывы: