background image

ENGLISH

24

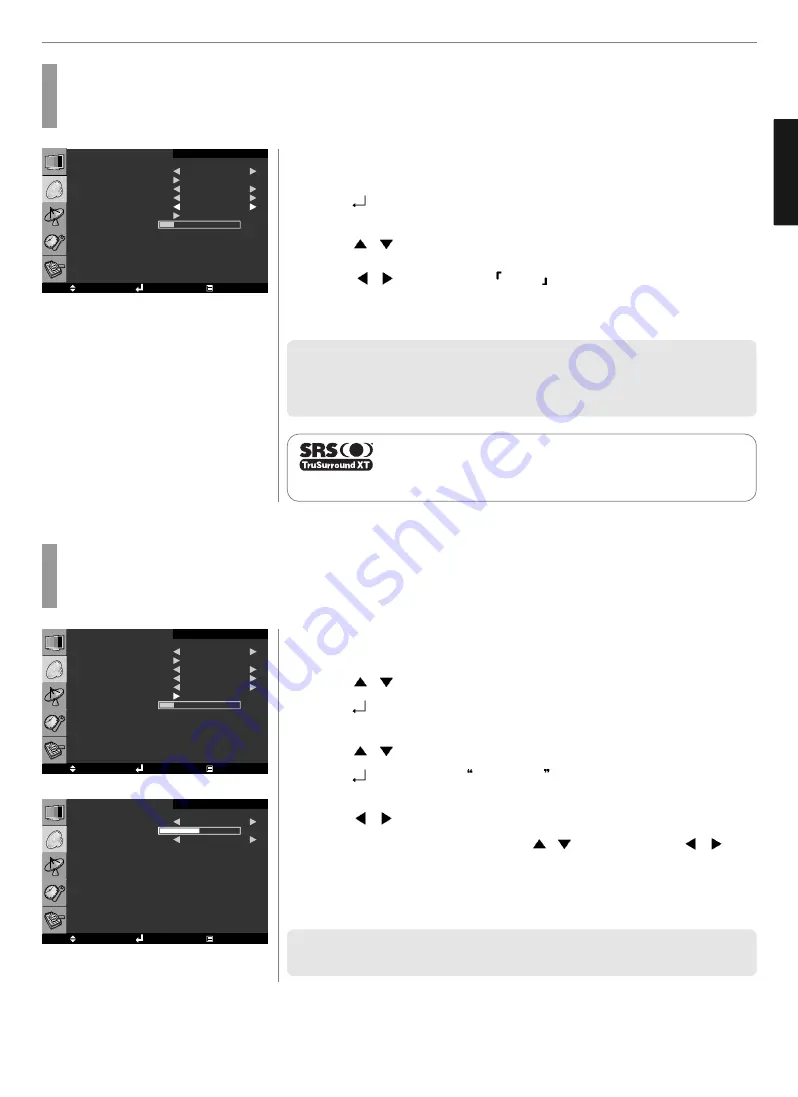
Sound Setup

How to Set the Output of Subwoofer

You can set this function when you wish to install your subwoofer speaker system.

Press MENU button.
Menu items appear on the screen.

Press 

buttons to move to “SOUND” icon.

Press 

button to select “SOUND” icon.

“SOUND MODE” is highlighted.

Press 

buttons to move to “SUBWOOFER”.

Press 

buttons to select  SUBWOOFER . 

SUBWOOFER menu appears.

Press 

button to set to “ON”.

Select required option by pressing the 

buttons, then Press 

buttons to adjust.

Press EXIT button to TV viewing or press MENU button to return to the previous
menu

✓ 

The frequencies in the entry are the subwoofer’s frequency range.

✓ 

Make sure to use a subwoofer speaker system with built-in amplifier.

1

3
4
5
6
7
8

2

S O U N D   M O D E
S O U N D   C U S T O M E
A V L
S . M O D E
T R U S U R R O U N D   X T

S U B W O O F E R

E A R P H O N E

M O V E

S E L E C T

E X I T

S T A N D A R D

O N

S T E R E O

O N

@

RP

S O U N D

S U B W O O F E R   M O D E

V O L U M E

F R E Q U E N C E

M O V E

S E L E C T

E X I T

O N

2 2 0 H z

@

UP

S O U N D

How to Select TruSurround XT

This function processes multi-channel surround sound through two speakers.

Press MENU button.
Menu items appear on the screen.

Press 

button to select “SOUND” Icon.

“SOUND MODE” is highlighted.

Press 

buttons to move to “S.MODE”.

Press 

buttons to set to  ON/OFF .

Press EXIT button to TV viewing or press MENU button to return to the previous
menu.

✓ 

If you want to connect a device with only one RCA audio output terminal (white-

colored), connect it to the white audio input terminal (also white-colored!) and turn
TruSurround XT “ON”. If not, you will hear just one speaker. 

✓ 

You can’t adjust sound mode, AVL and S.mode after selecting TruSurround XT.

1

3
4
5

2

S O U N D   M O D E
S O U N D   C U S T O M E
A V L
S . M O D E

T R U S U R R O U N D   X T

S U B W O O F E R
E A R P H O N E

M O V E

S E L E C T

E X I T

S T A N D A R D

O N

S T E R E O

O N

@

RP

S O U N D

is a trademark of SRS Labs, Inc.

TruSurround XT technology is incorporated under license from SRS Labs, Inc.

Содержание LC2601

Страница 1: ...p How to Select the Audio Mode 22 How to Adjust the Desired Audio Mode 22 How to Select AVL 23 How to Select S Mode 23 How to Select TruSurround XT 24 How to Set the Output of Subwoofer 24 How to Select Earphone 25 Channel Setup Automatic Program Searching 26 Manual Program Searching 26 How to Set the Program Edit 27 Using the LNA Low Noise Amplifier Feature 28 Function Setup How to Set PIP TWIN 2...

Страница 2: ...at occurs after displaying a still image in a certain period of time Since it may take several minutes to several hours to remove image sticking it is recommendable to display motion pictures during 2 3 minutes every hour when keeping displaying a still image As image sticking is influenced by the brightness of a still image being displayed and its display time it is recommended to reduce the brig...

Страница 3: ...e unit size of grounding conductors location of antenna discharge unit connection to grounding electrodes and requirements for the grounding electrode Example of Grounding According to National Electrical Code Instruction Do not use or store a flammable spray or inflammable things near the TV They may cause explosion or fire Do not install the TV in a bookshelf closet or a place with poor air circ...

Страница 4: ...ater may be sprinkled on it This may cause electric shock or fire Do not install on an unstable place or small support This may cause the TV to fall resulting in serious injury especially to children Never attempt to open fix or modify your TV When there is a need for fixing call a service center Fire or electric shock may be caused Do not put a metallic object like chopstick wire or puncher or in...

Страница 5: ...f dust is stacked on the TV electric shock or fire may be caused from heat fire or deterioration of insulation When moving the TV two or more people are advised to carry it This may cause damage to the unit or personal injury Never touch the power plug or outlet with wet hands This may cause electric shock In connection with the selling of batteries or rechargeable batteries or with the supply of ...

Страница 6: ...re due to leakage or contamination In the event of damaging or dropping the product switch off the power and remove the plug Using a damaged product may cause an electric shock or a fire Contact your local service center Before moving the product ensure to switch off the power and unplug all the electrical cords and the external connection cords such as an antenna cable and other source connection...

Страница 7: ... Separately If you want to purchase the following accessories consult a service center electronics shops or parts seller Power Cord Antenna Cable coaxial cable User s Guide Remote Control 2 batteries 1 5V AAA Audio Cable PC Audio Cable DVI DVD PC signal Cable D SUB S video Cable Component Cable Y Pb Pr Composite Cable Video Audio Scart cable ...

Страница 8: ...nsion hooks are securely locked as shown in Figure below 5 Repeat step 2 4 for the left speaker The right and left speakers are labeled R Right and L Left on their rear The provided speakers are designed for this product only It is recommended not to connect the speakers to other devices When connecting an other amplifier the amplifier output should be within 10W Output which exceeds 10 W may caus...

Страница 9: ...on standard security lock to prevent theft You should purchase the Kensington lock device personally if you need The security lock is available at an electronics shop For more information please refer to the following contact information Kensington Technology Group Address 2000 Alameda de las Pulgas 2F san mateo California 94403 1289 Tel 1 650 572 2700 Fax 1 650 572 9675 Web site www kensington co...

Страница 10: ...mode Select button Use this button to select each item from the menu mode Menu button Use this button to display or exit from the menu mode Source button Use this button to switch among inputs connected to the TV Power button Use this button to turn on or off the TV Remote sensor and power LED Point the remote control toward LED It displays standby or operation status Speakers See page 7 for infor...

Страница 11: ...al Full Scart ingangsterminal Antenna ingangsterminal Digitale audio uitgangsterminal voor coaxiale kabel Subwoofer uitgangsterminal Uitbreiding audio uitgangsterminal S Video ingangsterminal Video CVBS ingangsterminal Audio CVBS ingangsterminal Koptelefoon uitgangsterminal Half Scart ingangsterminal Uitbreiding RS 232 ingang voor ATV communicatie SPDF audio uitgangsterminal Uitbreiding RS 232 ing...

Страница 12: ...e this button to switch the input source from analog to digital 6 Other external device selection 42 P 7 MENU SELECTION Use this button to select menu items 8 LEFT RIGHT MOVE ADJUST Use these buttons to move between menu items or adjust each item 9 MENU Use this button to call the OSD on the screen 10 EXIT Use this button to end the OSD 11 DTV CHANNEL SELECTION 12 STILL 13 Use this buttons to use ...

Страница 13: ...ite channel lists in the channel list menu ATV To sort channels in the Program Edit menu 6 YELLOW rubber DTV To move favorite channel lists in the channel list menu ATV To edit channel names in the Program Edit menu 7 BLUE rubber DTV To delete a channel from the channel List menu To show extended program information in the EPG menu 8 S MODE To adjust the subtitle and audio condition status of the ...

Страница 14: ... cable Connecting Indoor Outdoor TV Antenna UHF VHF Antenna or Cable service without cable box connections For on optimum picture quality adjust the direction of antenna if needed VCR Cable Receiver Connecting Antenna Input Connection to External Equipments 1 Connect an antenna cable to VCR Cable Satellite Receiver with the antenna input 2 Use a coaxial cable to connect VCR Cable Satellite Receive...

Страница 15: ... or Set Top Box supports DVI D SUB see Connecting to a PC page 15 for connection You can enjoy more clear picture quality DTV receiver DVD Player Audio cable Video Y Pb Pr cable How to Connect a DTV Receiver or DVD Player 1 Connect the Video cable Y Pb Pr between output terminals Y Pb Pr of DTV receiver or DVD player and the input terminals Y Pb Pr of DTV DVD 576i 576p 720p 1080i on the rear of TV...

Страница 16: ...an unsupported resolution in PC or DVI mode the screen won t be displayed properly How to Connect a VCR Cable Receiver Camcoder Game Player 1 Connect the Video cable or S Video cable between Video S Video output terminals of VCR or Cable receiver and Video S Video input terminal of TV Connect the jacks to terminals in the same color 2 Connect the Audio cable Left white Right red between Audio outp...

Страница 17: ...R SET TOP BOX VIDEO CVBS Audio L R F SCART TV OUT TV IN Scart Connection to the External Input Output If you have a second VCR and wish to copy casettes tape Connect the source VCR to F Scart and the target VCR to H Scart so that you can redirect the signal from F Scart to H Scart F Scart sends the TV broadcast signal received through an antenna to a set top box and receives the descrambled signal...

Страница 18: ...signal F SCART For supporting composite video and RGB video signals SCART connectors is used with many European video equipments H SCART Basically the same as Full SCART in function but not supporting RGB Video signals ANALOG TV Terrestrial broadcasting for supporting analog PAL SECAM system MOVE SELECT EXIT AUTO PROGRAM MANUAL PROGRAM PROGRAM EDIT LNA OFF C H A N N E L MOVE SELECT EXIT AUTO SCAN ...

Страница 19: ...the Desired Picture Users can manually adjust their desired picture Press MENU button Menu items appear on the screen Press button to select Picture Icon PICTURE MODE is highlighted Press buttons to select USER Select required option by pressing the button then Press button to adjust Press EXIT button to TV viewing or press MENU button to return to the previous menu CONTRAST Adjust the brightness ...

Страница 20: ...tton Menu items appear on the screen Press button to select Picture Icon PICTURE MODE is highlighted Press buttons to move to COLOR TONE Press buttons then the menu changes in the following order STANDARD WARM COOL Press EXIT button to TV viewing or press MENU button to return to the previous menu STANDARD For a general Color Tone WARM For warm colors with reddish tone COOL For cool colors with bl...

Страница 21: ...ollowing order WIDE ZOOM1 ZOOM2 4 3 14 9 Press EXIT button to TV viewing or press MENU button to return to the previous menu 1 3 4 5 2 PICTURE MODE CONTRAST BRIGHTNESS SHARPNESS SATURATION COLOR TONE SCALE NOISE REDUCT MOVE SELECT EXIT STANDARD STANDARD ZOOM1 OFF UP UP UP UP P I C T U R E General broadcast picture is adjusted to 16 9 WIDE Picture enlarged to 16 9 format letter box format ZOOM 1 Zo...

Страница 22: ...ow to Set Image Adjust in PC Mode Press MENU button Menu items appear on the screen Press button to select PC Icon H POSITION is highlighted Select required option by pressing the button then Press button to adjust Press EXIT button to TV viewing or press MENU button to return to the previous menu H POSITION To adjust the horizontal position of the picture V POSITION To adjust the vertical positio...

Страница 23: ... OFF RP S O U N D VOLUME BALANCE EQUALIZER 120Hz 200Hz 500Hz 1 2KHz 3 0KHz 7 5KHz 12KHz MOVE SELECT EXIT RP P UP UP UP UP UP UP UP S O U N D 1 5 6 7 8 Press MENU button Menu items appear on the screen Press buttons to move to SOUND icon Press button to select SOUND Icon SOUND MODE is highlighted Press buttons then the menu changes in the following order STANDARD MUSIC MOVIE NEWS USER Press EXIT bu...

Страница 24: ... sound conditions better 1 2 23 Sound Setup How to Select S Mode Depending on the particular program being broadcast you can select stereo or mono 3 4 5 SOUND MODE SOUND CUSTOME AVL S MODE TRUSURROUND XT SUBWOOFER EARPHONE MOVE SELECT EXIT STANDARD ON STEREO OFF RP S O U N D How to Select AVL This function will automatically give a similar volume size to each channel Press MENU button Menu items a...

Страница 25: ...EXIT STANDARD ON STEREO ON RP S O U N D SUBWOOFER MODE VOLUME FREQUENCE MOVE SELECT EXIT ON 220Hz UP S O U N D How to Select TruSurround XT This function processes multi channel surround sound through two speakers Press MENU button Menu items appear on the screen Press button to select SOUND Icon SOUND MODE is highlighted Press buttons to move to S MODE Press buttons to set to ON OFF Press EXIT bu...

Страница 26: ...SOUND icon SOUND MODE is highlighted Press buttons to move to EARPHONE Press buttons to adjust volume Press EXIT button to TV viewing or press MENU button to return to the previous menu Check the audio cable when the sound outputs in just one speaker only 1 3 4 5 6 2 SOUND MODE SOUND CUSTOME AVL S MODE TRUSURROUND XT SUBWOOFER EARPHONE MOVE SELECT EXIT STANDARD ON STEREO ON RP S O U N D ...

Страница 27: ...s MENU button Menu items appear on the screen Press Buttons to move to CHANNEL icon Press button to select CHANNEL Icon AUTO PROGRAM is highlighted Press buttons to select AUTO PROGRAM Auto program menu appears then COUNTRY is highlighted Press buttons to select your country Press Buttons to move to PAL SECAM or SECAM L Press Buttons to start automatic program searching Press EXIT button to TV vie...

Страница 28: ... If you need to erase press button which is the same feature as back space b To store the setting press the Yellow button once again Sorting the Stored Channels a Place the cursor on TO press the buttons to choose the swapping PR number b Place the cursor on SORT press the Green button An OK message will appear and sort the stored channels Skipping Unwanted Channels Place the cursor on DEL press t...

Страница 29: ...n PIP FUNCTION ON OFF Press PIP button TWIN To watch two screens in half and half PIP To watch the Sub screen in the main screen at once After setting this go to step 6 to set the SOURCE 1 3 4 5 2 MOVE SELECT EXIT F U N C T I O N PIP TWIN KEY LOCK OFF MOVE SELECT EXIT F U N C T I O N MODE SOURCE SWAP SIZE POSITION CHANNEL PIP PC SMALL LEFT TOP 2 Press MENU button Menu items appear on the screen Pr...

Страница 30: ...lowing order LEFT TOP RIGHT TOP RIGHT BOTTOM LEFT BOTTOM How To Directly Set the POSITION Press POSITION button In case the Input source in Sub picture is TV go to step 15 when you wish to change the channels of Sub picture Press buttons to move to CHANNEL then press buttons to select channel number Press EXIT button to TV viewing or press MENU button to return to the previous menu 6 8 9 7 10 11 1...

Страница 31: ...s Using the TV for the first time users must select thier prefered language preference in order to display main menus and sub menus etc Press MENU button Menu items appear on the screen Press button to select OSD Icon LANGUAGE is highlighted Press buttons then the menu changes in the following order ENGLISH DEUTSCH FRANÇAIS NEDERLAND ITALIANO ESPAÑOL SUOMI Press EXIT button to TV viewing or press ...

Страница 32: ...re Page Return to List or FLOF mode Selecting Teletext Display Options in ATV Mode When users have displayed a teletext page they can have various options to suit their requirements DISPLAY ACTION Hidden Text Answers to Quiz Games for Example The Normal Screen A Second Page Normal screen Double Size Letters in the Upper half of the screen Lower half of the screen Normal Screen Stops the automatic ...

Страница 33: ...the preset Sleep Time TURN OFF AFTER 1 MIN message will appear Go to step 8 if you need to set the ON OFF TIME Press buttons to move to ON OFF TIME Press buttons to select ON OFF TIME On Off time menu appears then PROGRAM is highlighted Press buttons to select program number Press buttons to move to ON TIME or OFF TIME Press buttons to move between Hour Minute and AM PM and Press buttons to set Ho...

Страница 34: ...n see the following information on the screen After the scanning process the first program of the last scanned channel will be displayed on the back screen Press EXIT button to TV viewing or press MENU button to return to the previous menu Now you have completed all steps needed for watching programs If you could not see the program after finishing these procedures please contact your engineer or ...

Страница 35: ... to DTV CHANNEL icon Press button to select DTV CHANNEL Icon AUTO SCAN is highlighted Press Buttons to move to CHANNEL STATE icon Press buttons to select CHANNEL STATE Tuner State menu appears Press buttons to select the channel you want Press EXIT button to TV viewing or press MENU button to retune to the previous menu Level Indicating selected network signal strength level Quality Indicating sig...

Страница 36: ... information respectively Press YELLOW button You can see the program schedule list of the selected channel If you want to see the program information of a program in the schedule list Press buttons to select the program You will see the information in the right window Press BLUE button You will see extended information of the selected program Press EXIT button to TV viewing or press MENU button t...

Страница 37: ... button to return to the previous menu 1 3 4 5 6 7 8 2 MOVE SELECT EXIT AUTO SCAN MANUAL SCAN CHANNEL STATE GUIDE CHANNEL LIST FACTORY SET D T V C H A N N E L How to Set Favorite Channel Users can store frequently watched channels to quickly access a preferred channel Press MENU button Menu items appear on the screen Press buttons to move to DTV CHANNEL icon Press button to select DTV CHANNEL Icon...

Страница 38: ...l List Mode Users can see variant channel lists which may enable them to edit and select channels more conveniently 3 4 5 How to Lock Channel This menu enables users to prevent children from viewing programs unsuitable for their age Press CH LIST button Channel list menu appears on the screen Press or buttons to select the channel you want to lock Press GREEN button Then the selected channel is lo...

Страница 39: ...channels will move automatically to the programmed position Press MENU EXIT or button to finish the process 1 2 How to Delete Channel Users can delete channels from the channel list Press CH LIST button Channel list menu appears on the screen Press or buttons to select the channel you want to remove Press BLUE buttons Then you need to confirm the deletion If you definitely want to delete press but...

Страница 40: ...function Press MENU button Menu items appear on the screen Press Buttons to move to DTV CHANNEL icon Press button to select DTV CHANNEL Icon AUTO SCAN is highlighted Press Buttons to move to FACTORY SET Press buttons to select FACTORY SET Factory Set is highlighted Press button to select Factory Set A window will appear asking you to confirm When the menu asks you to confirm the reset press if you...

Страница 41: ...fect Image Sticking at the begining of the manual How to Subtitle Audio Users can adjust the subtitle and audio condition status of the current channel Press S MODE button Subtle and audio related window will be displayed on the screen Select required option by pressing the buttons then Press buttons to select you want If Dig Output is supported you can select MPEG Stereo or Dolby Digital AC3 Thes...

Страница 42: ...ocal time settings are correct or infor mation is not sent by the channel provider 41 DTV Channel Setup How to Set Teletext in DTV You can use Teletext service in iDTV mode The icon on the screen means your TV is receiving Teletext service Press TTX MIX button and wait If the sign pops up left upside of the screen as the following picture wait until the teletext service menu is displayed means it ...

Страница 43: ...e same time for two seconds 4 Enter an appropriate 3 digit number of the manufacturer from the DVD Setting Number Table If the product brand you want to set has multiple setting numbers attempt to enter the setting numbers repeatedly until the product is turned off 5 When the product has turned off press the button again The appropriate button associated with the product will flash 3 times to show...

Страница 44: ...43 Appendix ENGLISH DVD Setting Number Table Satellite Receiver Setting Number Table ...

Страница 45: ...r is on Check whether the power is cut or whether the power cord is properly connected Try to plug another product s power cord to the same outlet to check the outlet itself This symptom is not a malfunction This delay is designed to prevent the distorted and noisy picture when the power is on However if the picture does not appear more than 5 minutes after the power is on call a service center Th...

Страница 46: ...er channels for sound Check the volume settings on the cable broadcasting receiver Try to press volume up volume down buttons of your remote control Select sound balance and make proper adjustment Page 22 Check the speaker connection cables Possible solution Check whether there is a blocking object between the remote control and PDP Make sure your PDP is Power On Normally the LED on the front pane...

Страница 47: ... Control type LC2601E 1EA A V 1EA A V 1EA A V audio common 1EA Audio included 2EA Audio included 1EA D SUB 1366 X 768 75 Hz L R 1EA 1EA Audio included 1EA 1EA 1EA PAL SECAM L FM NTCAM B B Component S Video Composite PC DVI AC 100 240 V 50 60 Hz Typical 120W Typical 3W 640 x 230 x 485 17 5 Kg Remote control Key control 46 Appendix ENGLISH LC3201E 1EA A V 1EA A V 1EA A V audio common 1EA Audio inclu...

Отзывы: