DMJOIC201EN - v2
VISIO C2H OPERATOR -
INSTALLATION MANUAL
39
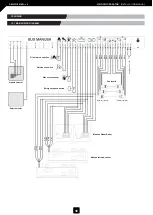
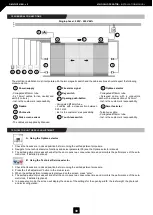
12.2 GENERAL CONNECTIONS
The electrical installation must incorporate a 6A thermomagnetic switch and the cable sections should respect the following
measurements.
Power-supply
-
Corrugated Ø16mm tube.
-
3 x 1.5mm² cables, for live, neutral and
earth (3 colours).
-
Inst. is the customer’s responsability.
Radars
Photocells
Side screen sensor
-
The cables are supplied by Manusa.
Fire alarm signal
Key switch
Opening push-button
-
Corrugated Ø16mm tube.
-
2 cables with a cross-section between
0.25-1mm².
-
Inst. is the customer’s responsability.
Touch-less switch
Optima selector
-
Corrugated Ø16mm tube.
-
Screened cable, with 4 conductors,
each with a cross-section of 0.25mm².
-
Inst. is the customer’s responsability.
Smart selector
-
Telephone cable.
-
Corrugated Ø16mm tube.
-
Inst. is the customer’s responsability.
1
2
3
4
5
6
7
8
9
10
1
2
3
3
4
4
5
6
7
8
9
10
Single-phase = 220V - 240V ±6%
A. Using the Optima selector
1. Check that leaves are in closed position before running the self-adjustment procedure.
2. Navigate to the technical service functions and select parameter F8 (see the Optima selector manual).
3. The self-adjustment process will end after the door opens two consecutive times and monitors the performance of the auto-
matic lock, if installed (optional).
B. Using the Technical Service selector
1. Check that leaves are in closed position before running the self-adjustment procedure.
2. Press the “self-adjustment” button in the main screen.
3. When the self-adjustment message is displayed on the screen, press “enter”.
4. The self-adjustment process will end after the door opens two consecutive times and monitors the performance of the auto-
matic lock, if installed (optional).
5. In a sequence mode, the screen will display the values of the settings for the opening width, the leaf weight, the photocell
and lock configuration.
12.3 HOW TO RUN THE SELF-ADJUSTMENT


