Mantis BHTRIM40-5425 Series Скачать руководство пользователя страница 11

GB-6

Cordless Hedge Trimmer Operating Instructions

charging the battery block to protect against electric 

shock and risk of injury/fire.

NOTE!  Read  the  operating  instructions 

carefully before use!

5. Inserting/removing  the  battery


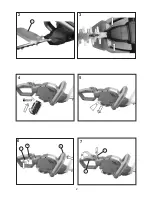
(not included in the scope of delivery) (fig. 4 and 5)

•  Press the battery release buttons to remove the bat-

tery from the hedge trimmer. 

•  The charged battery can be inserted into the battery 

mounting on the hedge trimmer with a light press. The 

locking  mechanism  will  ‘click’  when  the  battery  is  in 

place.

WARNING! 

Always remove the battery from the 

hedge trimmer before making adjustments (fitting 

the safety guard, adjusting the rear handle)

ATTENTION!


Never  use  the  hedge  trimmer 

without the hand guard being in place.

6. Fitting the hand guard

 (fig. 2 and 3)

Note:


The  hand  guard  may  have  been  fitted  to  the 

hedge trimmer ex works.
•  Always remove the blade guard before fitting the hand 

guard. 

•  Insert the hand guard into the mounting on the hedge 

trimmer  casing  and  secure  it  using  the  2  bolts  (sup-

plied).

7. Switching the hedge shears on/off


(fig. 6)

Before switching on: remove the blade guard.

•  Insert the battery.
•  When  switching  the  hedge  shears  on  take  a  safe 

stand. 

•  Hold the hedge trimmers with both hands on the re-

spective handles.

•  Concurrently push both switches at the front (1) and 

rear  (2)  handles  [the  rear  switch  will  be  released  by 

pushing the switch-on lock button (8)].

•  Attention:  These  battery-operated  hedge  trimmers 

have double safety turning-on feature. They can only 

be started if both switches are pressed.

•  To turn the machine off, all you have to do is to release 

the switches. The hedge trimmers are turned off even 

if only one switch is released.

•  After turning off the machine and before taking further 

steps, make sure that the blade has stopped.

WARNING!


Never  attempt  to  use  the  hedge 

trimmer if parts are damaged or missing. Always 

replace  or  repair  parts  first.  Failure  to  do  so  can 

lead to severe injury.

8. Adjusting the turning handle


(Fig. 7)

To facilitate your work the hedge trimmer are equipped 

with a turning rear handle that can be set in 5 different 

positions [ right (90°), left (90°) and normal (0°)]. The pur-

pose  of  this  mechanism  is  that  especially  for  cutting  in 

vertical direction the hedge shears can be held in their 

ergonomically most favourable position whereby an early 

fatigue of the user is avoided.
Please proceed as follows to change the position of the 

handle:
Release switch (1). Press the locking pin (8). The handle 

is now unlocked and can be turned to the desired posi-

tion. In the desired end position, the pin locks back into 

place and securing the handle and avoiding an accidental 

change of the position.
Please bear in mind that the locking pin (8) can only be 

pulled  back  when  the  switch  (1)  is  not  activated  (held 

down).  Make  sure  that  the  locking  pin  locks  into  place 

again after repositioning the turning handle. Only then the 

switch can be activated anew.

9. Holding the hedge trimmer when 

in use


(fig. 8) 

This equipment will enable you to cut or trim bushes and 

hedges easily and comfortably.

Important tips for hedge trimming

•  Ensure that you have a stable foothold and hold the 

hedge trimmer with both hands. Stepladders must be 

secure and set up on firm ground and, when working 

at height, secured to a thick branch as an additional 

precaution.

•  Keep persons and animals out of the working area.

Blade guard


•  Always  remove  the  blade  guard  before  using  the 

hedge trimmer.

•  Always re-fit the blade guard after use, during trans-

port and for storage of the hedge trimmer.

9.1 Trimming of hedges

 - Young shoots are best cut in a scythe movement.
 - Older  and  stronger  hedges  are  best  cut  in  a  sawing 

movement.

 - Branches, which are too thick for the hedge trimmer, 

should be cut with a saw.

 - Sides of hedges should be cut upwards in a taper.

Содержание BHTRIM40-5425 Series

Страница 1: ...ns of these operating instructions Taille haies à batterie Traduction du mode d emploi d origine Attention Lisez attentivement la notice d utilisation et respectez en les consignes Cette notice vous permettra de vous familiariser avec l appareil avec son utilisation correcte et avec les prescriptions de sécurité Akku Heckenschere Originalbetriebsanleitung Achtung Lesen Sie diese Hinweise zur Handh...

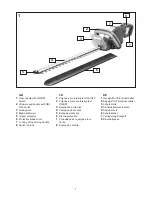
Страница 2: ...avec interrupteur ON OFF 2 Poignée étrier avec interrupteur ON OFF 3 Bouclier de protection 4 Couteaux de sécurité 5 Butée de protection 6 Etui de protection 7 Verrouillage de la poignée tour nante 8 Bouton de sécurité DE 1 Handgriff mit Ein Ausschalter 2 Bügelgriff mit Ein Ausschalter 3 Schutzschild 4 Sicherheitsmesserbalken 5 Anstoßschutz 6 Schutzköcher 7 Verriegelung Drehgriff 8 Einschaltsperre...

Страница 3: ...2 3 2 3 1 7 5 4 7 1 8 2 6 ...

Страница 4: ...3 8 9 10 ...

Страница 5: ...lies with the relevant safety standards 8 Wear a dust mask 9 Always remove the battery before inspection maintenance cleaning and adjustment work 4 FR 1 Porter des protections pour les yeux et les oreilles 2 Attention 3 Lire le mode d emploi 4 Ne pas laisser cet outil électrique sous la pluie 5 Attention Protection de l environnement Le présent appareil ne peut en aucun cas être éliminé avec les o...

Страница 6: ...instructions for hedge trimmers Additional safety instructions for hedge trimmers Battery 5 Inserting removing the battery GB 6 6 Fitting the hand guard GB 6 7 Switching the hedge shears on off GB 6 8 Adjusting the turning handle GB 6 9 Holding the hedge trimmer when in use GB 6 9 1 Trimming of hedges 9 2 In order to achieve an even height 10 Maintenance GB 7 10 1 Sharpening of the blades 10 2 Cha...

Страница 7: ...g the work time All phase of the operating cycle must be considered in this regard for example times when the power tool is switched off and times when the power tool is switched on but is not running under load Always keep hands and feet away from the cutting tools particularly when switching on the motor A tingling feeling or numbness in the hands is sign of excessive vibration Limit the operati...

Страница 8: ... when you are operating the power tool Distractions may result in the operator loosing control over the tool 4 2 Electrical safety The mains plug of the power tool s power adapter must fit into the mains socket The plug must not be modified in any way Do not use adapter plugs connectors in combination with tools with protec tive earthing Unmodified plugs and fitting sockets reduce the risk of elec...

Страница 9: ...y bridge the contacts A short circuit between the battery contacts may lead to burns or fire Improper use may result in fluid leaking out of the battery Avoid any contact with battery fluid Flush with water in case of contact If battery fluid should get into your eyes seek medical advice ad ditionally Leaking battery fluid may lead to irritations of the skin or burns 4 6 Service Have the power too...

Страница 10: ...n can lead to eye injury 23 The battery must be charged before first use It will reach its full capacity only after several charge and discharge cycles 24 Only charge the battery block in chargers that have been subject to separate inspection and have been certified as complying with EN 60335 2 29 Always read the operating instructions for the charger before Keep your hands away from the running b...

Страница 11: ... Never attempt to use the hedge trimmer if parts are damaged or missing Always replace or repair parts first Failure to do so can lead to severe injury 8 Adjusting the turning handle Fig 7 To facilitate your work the hedge trimmer are equipped with a turning rear handle that can be set in 5 different positions right 90 left 90 and normal 0 The pur pose of this mechanism is that especially for cutt...

Страница 12: ...increase the service life of the device Please use a lubricator that is not harmful to the environ ment e g our service spray Then put the shears in their case with the cutting blades first 12 Repair service ATTENTION Electrical repairs may only be carried out by a skilled electrician or a customer service workshop If you send the machine to us for repair please describe the fault Europe Mantis Fr...

Страница 13: ...ration of Conformity We MOGATEC Moderne Gartentechnik GmbH Im Grund 14 09430 Drebach OT Grießbach Germany declare under our sole responsibility that the product Cordless Hedge Trimmer BHTRIM40 5425 to which this declaration relates correspond to the relevant basic safety and health requirements of Directives 2006 42 EC Machinery Direc tive 2014 30 EU EMC Guideline 2011 65 EU RoHS Guideline and 200...

Страница 14: ...haies Consignes de sécurité supplémentaires du taille haie Batterie 5 Mise en place retrait de la batterie FR 6 6 Montage de la protection pour les mains FR 6 7 Activation et désactivation du taille haies FR 6 8 Réglage de la poignée tournante FR 7 9 Maintien du taille haies pendant l utilisation FR 7 9 1 Coupe de la haie 9 2 Afin d obtenir une hauteur égale 10 Maintenance FR 7 10 1 Affûtage des l...

Страница 15: ... pendant lesquelles l outil électrique est arrêté et celles pendant lesquelles il est allumé mais fonctionne sans charge Éloigner toujours les pieds et les mains des outils de coupe notamment lors du démarrage du moteur Une sensation de picotement ou d insensibilité dans vos mains est un signe de vibrations excessives Limitez la du rée d utilisation aménagez vous des pauses de travail suffisamment...

Страница 16: ...un câble secteur CONSERVEZ SOIGNEUSEMENT CES CONSIGNES 4 1 Lieu de travail Maintenez votre espace de travail propre et rangé Des espaces de travail désordonnés et mal éclairés peuvent conduire à des accidents N utilisez pas l appareil dans un environnement présentant des risques d explosion dans lequel se trouvent des liquides des gaz ou des poussières Les outils électriques produisent des étincel...

Страница 17: ...mmagées avant d utiliser l appareil De nombreux accidents sont provoqués par une mauvaise maintenance des outils électriques Maintenez les outils coupants aiguisés et pro pres Les outils tranchants entretenus avec soin et à l arête coupante se coincent moins et sont plus faciles à manier Utilisez les outils électriques les accessoires les outils de rechange etc conformément aux pré sentes instruct...

Страница 18: ...a batterie éloignée des flammes des fours et autres sources de chaleur Protégez la batterie du rayonnement direct du soleil et ne l utilisez pas ou du taille haies Une manipulation soigneuse de l ap pareil réduit le risque de blessure lié à la lame Tenez l appareil sur les surfaces de poignée iso lées si vous réalisez des opérations pour les quelles l outil d insertion peut entrer en contact avec ...

Страница 19: ...batterie en traîne des lésions oculaires 23 Avant d utiliser la batterie pour la première fois chargez la La batterie n atteint sa pleine capacité qu à l issue de plusieurs cycles de chargement et de déchargement 24 Ne chargez les blocs batteries que dans des char geurs ayant fait l objet de contrôles particuliers et pour lesquels il a été établi qu ils étaient conformes à la norme EN 60335 2 29 P...

Страница 20: ...tre coupées à l aide d une scie Les côtés de la haie devront être amincis vers le haut 9 2 Afin d obtenir une hauteur égale Tendre une corde à la hauteur désirée Couper droit au dessus de cette ligne Veillez à adopter une position sûre afin d éviter un glis sement et un éventuel accident Maintenez toujours les lames de coupe à distance du corps 10 Maintenance fig 9 et 10 Avant tous travaux sur la ...

Страница 21: ...ec les ordures ménagères Conformément à la directive européenne 2012 19 CE sur les anciens appareils électriques et électroniques et à la mise en oeuvre de la législation nationale les outils électriques usés doivent être triés à part et remis à un centre de recyclage Alternative de recyclage aux exigences de retour Au lieu d un renvoi le propriétaire de l appareil électrique est tenu d assurer un...

Страница 22: ...ions en matière de sécurité et de santé stipulées dans les Directives de la CE il a été tenu compte des normes et ou des spécifications techniques suivantes EN 60745 2 15 2009 A1 2010 EN 60745 1 2009 A11 2010 EK9 BE 77 V3 2015 EK9 BE 91 2015 EK9 BE 89 2014 PAK Anforderung für GS PAH requirement for GS AfPS GS 2014 01 PAK EN 50581 2012 EN 55014 1 2006 A1 2009 A2 2011 EN 55014 2 1997 A1 2001 A2 2008...

Страница 23: ...heitshinweise für Heckenscheren Weitere Sicherheitshinweise für Heckenscheren Akku 5 Einsetzen Herausnehmen des Akkus DE 6 6 Montage des Handschutzes DE 6 7 Ein Ausschalten der Heckenschere DE 6 8 Einstellung des Drehgriffs DE 6 9 Halten der Heckenschere zum Gebrauch DE 7 9 1 Schneiden von Hecken 9 2 Um eine gleichbleibende Höhe zu erreichen 10 Wartung DE 7 10 1 Schärfen der Messer 10 2 Auswechsel...

Страница 24: ...rowerkzeug verwendet wird Achtung legen Sie zum Schutz vor vibrationsbedingten Durchblutungsstörungen der Hände rechtzeitige Arbeitspausen ein Versuchen Sie die Belastung durch Vibrationen so gering wie möglich zu halten Beispielhafte Maßnahmen zur Verringerung der Vibrationsbelastung sind das Tragen von Handschuhen beim Gebrauch des Werkzeugs und die Begrenzung der Arbeitszeit Dabei sind alle Ant...

Страница 25: ...e Elektrowerkzeuge ohne Netz kabel Bewahren Sie diese Hinweise und Anleitungen sorgfältig auf 4 1 Arbeitsplatzsicherheit Halten Sie Ihren Arbeitsbereich sauber und aufge räumt Unordnung und unbeleuchtete Arbeitsberei che können zu Unfällen führen Arbeiten Sie mit dem Gerät nicht in explosions gefährdeter Umgebung in der sich brennbare Flüssigkeiten Gase oder Stäube befinden Elektro werkzeuge erzeu...

Страница 26: ...n ein Elektrowerkzeug das eingeschaltet ist kann zu Unfällen führen Laden Sie die Akkus nur in Ladegeräten auf die vom Hersteller empfohlen werden Für ein Lade gerät das für eine bestimmte Art von Akkus geeignet ist besteht Brandgefahr wenn es mit anderen Akkus verwendet wird Verwenden Sie nur die dafür vorgesehenen Akkus in den Elektrowerkzeugen Der Gebrauch von anderen Akkus kann zu Verletzungen...

Страница 27: ...n 16 Die zulässigen Temperaturen für das Laden des Akkus liegen zwischen 0 und 40 C die für das Ent laden zwischen 0 und 60 C Nach längerem Gebrauch können zugängliche Metall teile und Zubehörteile sehr heiß sein Setzen Sie das Werkzeug niemals Regen oder Feuch tigkeit aus Die Heckenschere wird während des Arbeitens warm Dies ist normal und kein Hinweis auf eine Fehlfunk tion Bereiten Sie sich auf...

Страница 28: ...n die Ak kuaufnahme der Heckenschere genügt ein leichter Druck Die Verriegelung muss hörbar einrasten WARNUNG Vor jeder Einstellung Montage des Sicherheitsschutzes Einstellung des hinteren Handgriffs den Akku aus dem Gerät entfernen ACHTUNG Verwenden Sie das Gerät niemals ohne Handschutz 6 Montage des Handschutzes Abb 2 und 3 HINWEIS Der Handschutz der Heckenschere kann bereits werkseitig montiert...

Страница 29: ...rt und eventuelle Verletzungen aus zuschließen sind Halten Sie die Schermesser immer vom Körper weg 10 Wartung Abb 9 und 10 Vor allen Arbeiten an der Maschine stets den Akku aus der Heckenschere ziehen WICHTIG Nach jedem größeren Einsatz der Hecken schere sollten die Messer gereinigt und eingeölt werden Dadurch wird die Lebensdauer des Gerätes entschei dend beeinflusst Beschädigte Schneideinrichtu...

Страница 30: ... Hausmüll Gemäß europäischer Richtlinie 2012 19 EU über Elektro und Elektronik Altgeräte und Umsetzung in nationales Recht müssen verbrauchte Elektrowerkzeuge getrennt gesammelt werden und einer umweltgerechten Wieder verwertung zugeführt werden Recycling Alternative zur Rücksendeaufforderung Der Eigentümer des Elektrogerätes ist alternativ anstelle Rücksendung zur Mitwirkung bei der sachgerechten...

Страница 31: ...nien genannten Sicherheits und Gesundheitsanforderungen wurden folgende Normen und oder technische Spezifikation en herangezogen EN 60745 2 15 2009 A1 2010 EN 60745 1 2009 A11 2010 EK9 BE 77 V3 2015 EK9 BE 91 2015 EK9 BE 89 2014 PAK Anforderung für GS PAH requirement for GS AfPS GS 2014 01 PAK EN 50581 2012 EN 55014 1 2006 A1 2009 A2 2011 EN 55014 2 1997 A1 2001 A2 2008 gemessener Schallleistungsp...

Страница 32: ......

Отзывы: