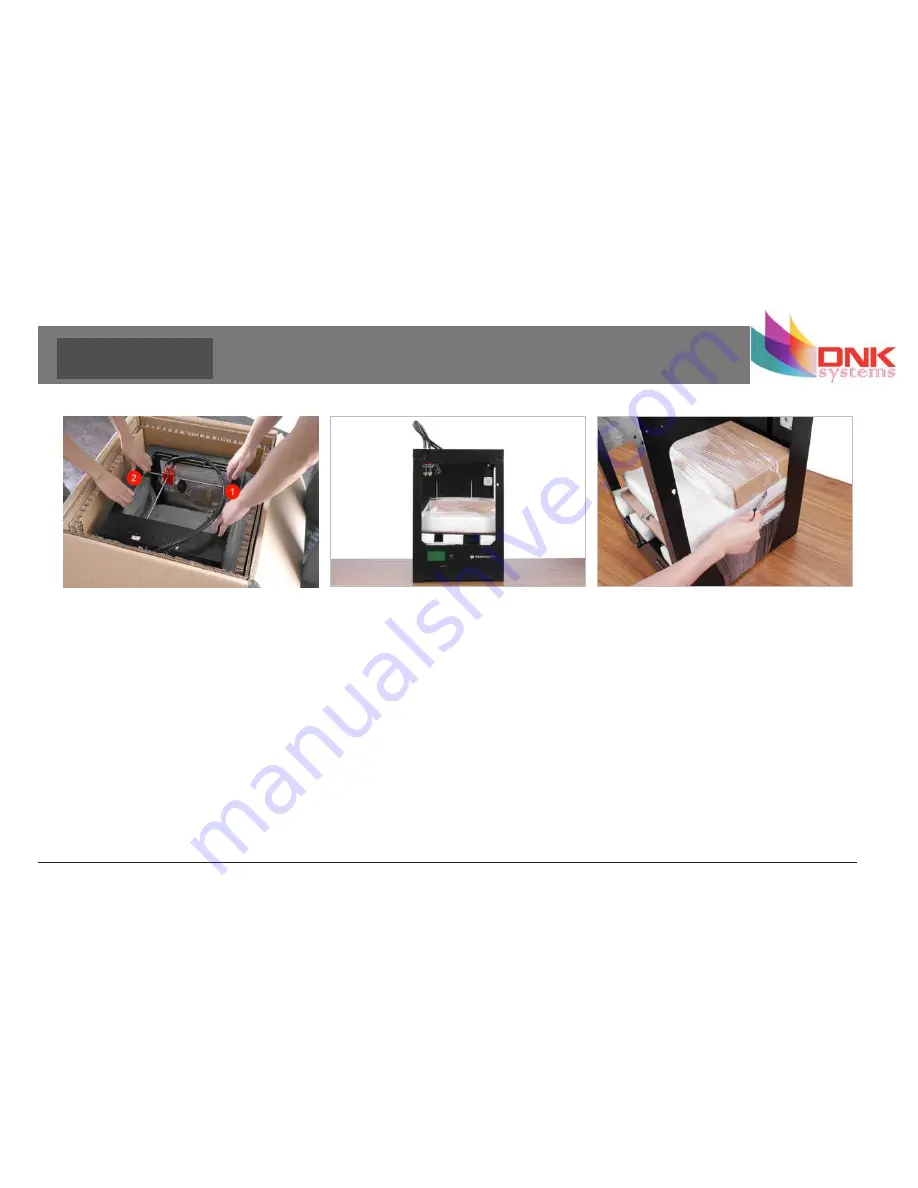
Mankati Fullscale XT Скачать руководство пользователя страница 9

www.mankati.com

7

Unpacking 

6. 

Remove the stretch film around the 3D printer. You 

can see all the accessories, tools and filaments.

5. 

Place it on a stable surface, and leave enough space 

surrounding it to check accessories.

4. 

Now it’s time to take out your Mankati Fullscale 

XT from the box. Lift it out by grasping the frame 

firmly but gently at the left

 and right

 of the 

Mankati Fullscale XT.

Caution: 

Be careful NOT to grip the belt or shaft of 

the motion system.

Содержание Fullscale XT

Страница 1: ...Fullscale XT a Fast High Resolution Huge Printing Volume 3D Printer User Manual ...

Страница 2: ...6 LCD Menu Structure 17 LCD Menu 18 SOFTWARE 20 Download and Install 21 Interface 22 Parameter Definition 23 FIRST RUN 29 Stick the Kapton tape 30 Leveling Build Plate 33 Feed the Filament 35 Print from SD Card 36 Unload the Filament 37 MAINTENANCE 38 Maintenance 39 TROUBLESHOOTING 41 Setting and Calibration Problems 42 Hardware Problems 43 Printing Problems 45 Contents ...

Страница 3: ... the beginning This User Manual will guide you to start your journey with the Mankati Fullscale XT easily and quickly Forget your existing knowledge of other 3D printers take the time to learn about your Mankati Fullscale XT it will show you a completely new experience Print your idea right from now on ...

Страница 4: ...o keep feeding smoothly in case of tangles Monitor your print periodically CAUTION The melt filament will emit the plastic odor during printing Please keep ventilation in the work place CAUTION In case of emergency disconnect power supply from wall socket CAUTION Refit and modification privately may destroy the working and safty performance So any refits and modifications not expressly approved by...

Страница 5: ...ment Type ABS PLA Spec PVA PS Nylon Filament Diameter 3mm Filament Temperature 150 270Deg Filament Colors Black White Red Yellow Green Blue etc Hardware Controller Arduino ATmega2560 R3Micro Controller Mother Board Mankati Stable Main Board V3 x Stepper Motor X Y axis 42 48 1 3A Z axis 42 63 1 5A Geared Motor E42 42 Ratio 1 10 Power Input 110 220V 1 5A Power Output 24V 10 5A Software Operating Sys...

Страница 6: ...eparing the model Use a 3D modeling software to output stl or obj format 3D model file MankatiUM MankatiUM is a software to prepare the gcode file for your Fullscale XT In MankatiUM you can set printing parameters for your model such as layer thickness printing speed and nozzle temperature then output a gcode file for printing Transfer the GCode file Save the GCode file into the SD card and insert...

Страница 7: ...SETUP 2 Your Mankati 3D Printer was built and packaged very carefully at the Mankati factory Please take your time and carefully unpacking it and getting set up ...

Страница 8: ...e the first cardboard layer Open the plastic bag 2 Your Mankati Fullscale XT is packed multiply by carton cardboard foam and sealed bag to ensure the machine to your hands in perfect status NOTE You can download a PDF copy of this User manual under manual at the support page http www mankati com download html ...

Страница 9: ... 5 Place it on a stable surface and leave enough space surrounding it to check accessories 4 Now it s time to take out your Mankati Fullscale XT from the box Lift it out by grasping the frame firmly but gently at the left and right of the Mankati Fullscale XT Caution Be careful NOT to grip the belt or shaft of the motion system ...

Страница 10: ...d plate supporter Let s take them out following the next 3 steps 1 Connect power wire to printer 2 Turn on the printer 3 Go to the LCD menu Prepare Autohome and the two holders will go to the top of Z axis 4 Take out the two spools of PLA filament and the two feeding devices 7 Take all the accessories out ...

Страница 11: ...ol 2 1 Build platform It is packed in the white EPE 3 1 tool box including the necessary tools for installation and other accessories 4 2 feeding devices constituted by gear motor and feeder with the advantages of high accuracy and easy to operate 5 3 enclosure covers installed on 3 sides front left right to keep the temperature constant inside printing space ...

Страница 12: ...ts 4 to install on feeding device 1 for backup 9 1 fuse Backup for power interface 10 1 power switch Backup for broken power switch 11 1 button Backup for broken button 12 1 Heating tube Backup for broken heating tube 13 1 temperature controller Backup for broken temperature controller 14 1 Bottle lubricant oil XY axis and guide rails need to lubricate terminally 15 1 Kapton tape Stick on the buil...

Страница 13: ...rs installation position 2 You need a screwdriver four screws and two holders 3 Use the screwdriver to fix the two holders on left and right of the printer top side Note Please confirm you have tightened the screw to avoid accident of getting loose when moving the printer 4 Holders installation done ...

Страница 14: ...ring Z axis a little for example 30mm to avoid collision between nozzle and build platform while installation 3 Take out the nuts and screwdriver from the tool box to fix the platform and platform holder firmly Note After installing the platform installation please tighten the four black screws a little bit more under the build plate to lower it to avoid knocking the extruders in next operation 2 ...

Страница 15: ...g Up Mankati Fullscale XT 3 Feeding Device Installation 1 Feeding motor using small wrench to fix No 1 feeding motor on position 1 3 Connect the data cable with feeding devices 2 Insert the end of feeding tube into the socket of feeding motor and tighten firmly ...

Страница 16: ...he guide rails before sending the printer out so please lubricate the guide rails before the first printing 1 Lubricate the two cross guide rails 2 Lubricate the four guide rails around the printer framework Notice Lubrication is very important for good printing performance or else you might encounter printhead stuck problem 2 Install filament spool s holder ...

Страница 17: ...tlook 1 SD card slot 2 Push and rotate button 3 Display 4 Build plate screws 5 Build plate 10 Power Socket 11 Name plate 12 Spool holder 13 Material feeder 14 USB Socket 6 Print head 7 Filament guide tube 8 Printer holder 9 Power switch ...

Страница 18: ...LCD INSTRUCTION 3 In this chapter you will learn about detailed introductions of the LCD menus ...

Страница 19: ...truder 2 1 4 Preheat PLA 1 4 1 Preheat PLA 1 1 4 2 Preheat PLA 2 1 4 3 Preheat ALL 1 4 4 Preheat PLA Bed 1 5 Preheat ABS 1 5 1 Preheat ABS 1 1 5 2 Preheat ABS 2 1 5 3 Preheat ALL 1 5 4 Preheat ABS Bed 1 6 Leveling Bed 1 7 Cool Down 2 Control 2 1 Temperature 2 1 1 Nozzle 2 1 2 Nozzle 2 2 1 3 Bed 2 1 4 Fan Speed 2 1 5 Auto Temp 2 2 Motion 2 3 Restore Failsafe 2 4 Save Memory 2 5 Restore Factory 2 6 ...

Страница 20: ...rude the filament in each step of 1mm Move 0 1mm Move 0 1mm each step Move X The extruder will move 0 1mm each step in X direction Move Y The extruder will move 0 1mm each step in Y direction Move Z The build plate will move 0 1mm each step in Y direction Extruder The feeding motor of left nozzle will extrude the filament in each step of 0 1mm Extruder2 The feeding motor of right nozzle will extru...

Страница 21: ...otor Ysteps mm Transmission ratio of Y motor Zsteps mm Transmission ratio of Z motor Esteps mm Transmission ratio of feeding motor 2 3 Restore Failsafe Please do NOT change any data setting here in this menu 2 4 Save memory Record the coordinate of printing stop 2 5 Restore factory Restore the manufacturer default settings 2 6 Firmware version Current firmware version LCD Menu Menus in Printing Pr...

Страница 22: ...SOFTWARE 4 This chapter will guide you how to download and install the software And show you detailed introduction of parameters in the software ...

Страница 23: ...html Choose the appropriate version of Mankati UM according to your computer operation system Our software apply to Windows MacOS Ubuntu operating system Right click the software installation program select run as administrator and install it following the prompts Download and Install ...

Страница 24: ...consume 5 Simulate the printing process under different modes 5 1 Normal Default state 5 2 Overhang Measure the angle of overhang and judge if it is necessary to generate the support structure 5 3 X Ray X ray vision 5 4 Layers Layer by layer to simulate the printing process Five options for choice Center on platform Delete object Multiply object 6 Rotate the model 8 Mirror image of the model 9 Oth...

Страница 25: ... 100 means solid fill Speed and Temperature Printing Speed Means the extruder s moving speed Printing speed decides the quality of printing model quality Mankati Fullscale XT s default speed is 30mm s High speed printing can be set as 50 70mm s Higher speed printing needs a balance by increasing nozzle temperature otherwise may easily cause shortage of filament s feeding Printing speed also depend...

Страница 26: ... of overlapping extrusion on dual extrusion prints This makes the different colors filament jointed better Default 0 1 Support Support type For the model has parts hanging in the air support structure is a must when printing to ensure the parts hanging in the air will not collapse None No support if you print model with parts hanging in the air but choose structure as none the parts hanging in the...

Страница 27: ...an reach speeds of 150mm s at most But it may cause the motor stop missing problem Bottom layer speed The bottom print speed Recommended 20 set as 0 means the same as other layer Reducing the bottom layer speed can help model stick more closely to platform Outer shell speed Speed at which outer shell is printed If set to 0 then the print speed is used Printing the outer shell at a lower speed impr...

Страница 28: ...el but disable retraction If combing is disabled Parameter Definition Expert Setting the printer head moves straight from the start point to the end point and it will always retract Default enable coming but it will increase printing time Minimal extrusion before retracting The minimal extrusion that needs to be done before retracting again If a retraction needs to happen before this minimal is re...

Страница 29: ...s connect firmly to the infill Recommended setting as 10 with best performance Too big will influence quality of model surface Support Fill amount Support print density Recommended setting as 15 with best performance More density makes the support not easy to remove Less density influences print quality Distance X Y Distance of the support material from the print in the X Y directions 0 7mm gives ...

Страница 30: ... want to cancel this plugin click X on the right top of parameter setting interface Change Filament At Z You can change the filament in the printing process at a certain height of the print Pause at height You can pause printing at a certain height of the print and you can percisely locate the print head position Tweak At Z You can reset the printing parameters at a certain height of the print thi...

Страница 31: ...FIRST RUN 5 This chapter guides you through the steps and the first run of the Mankati Fullscale XT ...

Страница 32: ...ensure the clean and tidy it will help you aviod bubbles after applying the tape on it Take the tape out 15 If covering the plate completely it will need 3 lines of the tape 2 Uncover one side of the tape and then try to stick it on the plate Please ensure the tape is smooth enough without any bubbles 3 You can use the yellow board in tool box to push and press it while sticking ...

Страница 33: ...www mankati com 31 Stick the Kapton tape 4 Cut the tape off at the same width of the plate 5 Stick the second line in the same way 6 Cut off the parts on the screws when sticking the third line 6 1 6 2 ...

Страница 34: ...bbles just use needle 21 stick into them Then smooth them with yellow board 8 After sticking the tape on the plate please uncover the other side of the tape Note After several printing the stickiness is not strong enough please change the tape 8 1 8 2 ...

Страница 35: ...The nozzle will scratch the build plate Frequent build plate leveling will help to ensure that objects always stick well to the hot bed Notice Tightening the black screw turning them to the right to reduce plate height Loosening the black screw turning them to the left to increase platform height The gap between the nozzle and the build plate should be about 75 of the layer thickness you set in th...

Страница 36: ...zles without tearing or damaging the card If the friction is too big it means the gap between nozzle and plate is too small you need to reduce plate height by loosening the screw On the contrary if almost no friction it means the gap is too big you need to increase plate height by tightening the screw 4 Adjust next three corners in anti clockwise direction by same method 5 Do adjust all four corne...

Страница 37: ...fter the nozzle is preheated enough the filament will flow out from nozzle naturally 4 Tighten the black screw to fix the filament with the clamp not too loose or too tight Caution 1 Ensure the clamp is not too tight or too loose otherwise filament feeding will have problem causing failure prints 2 After feeding successfully check if filament has twining and knotting to ensure filament feeding smo...

Страница 38: ...your 3D print finished the build plate will move down and be heated to 50 automatically so as to take out the model more easily Use a shovel to take it out gently to avoid the damage of the model Note If the model is difficult to be removed you can raise the build plate temperature to 60 Warning Do not touch the nozzle until it is cooled down totally The temperature on LCD must be lower than 30 de...

Страница 39: ...on of perpendicular to the feeder motor hardly and quickly Note 1 If the filament is stuck please find solution in troubleshooting chapter 2 If the printer stops working for a long time please switch off the printer to avoid the filament carbonized which will cause the nozzle clogged Clean the dust on the build plate It can extend the lifetime of the kapton tape ...

Страница 40: ...ENANCE 6 To keep your Mankati Fullscale XT in perfect performance some basic periodical maintenance is a must This chapter shows you some practical tips which will help you to take care of your printer well ...

Страница 41: ...sure that the plate is clean Bubbles scratches dust and oil from your hands are avoided 1 Use tweezer to remove filament residue 2 Do not touch the platform glass with sharp things 3 If do not use the printer for a long time please clean up the tape clean the glass and fully release the four black screws under the build plate After a lot of printing the wheel in the filament feeder might accumulat...

Страница 42: ...40 Maintenance Lubricating the guide rails 1 Clean the X Y axis and guides rails 2 Lubricate the X Y axis and rail guides periodically no overflow is appropriate ...

Страница 43: ...TROUBLESHOOTING 7 In case something goes wrong with your Mankati Fullscale XT the following chapter will help you From diagnosing and fixing the problem yourself to contacting support ...

Страница 44: ... the nozzle diameter is 0 4mm the layer thickness setting can t be over 0 32mm 2 The maximum temperature of the nozzle is 270 and the build plate is 110 The parameters of materials from different manufacturers could be different so it is better to consult the relevant material manufacturers about the temperature setting There is the crack on the model or the joint problem among the layers 1 Build ...

Страница 45: ... If the above cannot solve the problem it means it should be the problem of the power tube on the main board please replace it MAXTEMP MINTEMP 1 Nozzle temperature is too high Hardware Problems Q A Q A Q A Q A Q A Q A Please reduce the nozzle preset temperature 2 Temperature controller damage Please replace the temperature controller 3 LCD cable loose LCD damaged Print Head Stuck Cannot move 1 The...

Страница 46: ... problem still exist the main cause is deformation is not enough of the hot bed s corners it can be removed by tensile processing The Z axis movement of the build plate is abnormal 1 The top of the Z axis screw is loose Please reinforced screw at the top of the Z axis screw 2 Z axis motor loose connections Please open the base to re plug the motor cables 3 Z axis screw need lubrication Please add ...

Страница 47: ...Printing Problems Q The edge is lifted or the print cracked while printing with ABS filament Please keep the build plate heated continuously Change a new Kapton tape Slow down the printing speed of first layer Use the enclosure plate to keep the constant temperature while printing Avoid air condition s blowing directly Inside ventilation should not be so strong Q Model surface is loose with crack ...

Страница 48: ... coordinate in MankatiUM Machine Machine settings Extruder 2 Q Hard to remove the support structure A Turn the direction of model properly in MankatiUM The support density should not be set too high Divide the model into different parts to print if necessary Q Failed prototyping of small model A If printing a small model the extruder will always move in a small space so the heat will be concentrat...

Страница 49: ...For Sales Service and Support Call DNK Systems on 1300 309 529 ...

Страница 50: ......

Отзывы: