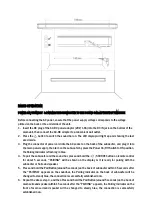
background image


BASIC OPERATION 


POWER ON/STANDBY  & PAIRING THE SUBWOOFER TO THE SOUND BAR AT THE FIRST TIME USE  

 
Before connecting the AC power, ensure that the power supply voltage corresponds to the voltage 
printed on the back or the underside of the unit. 
1.


Insert the DC plug of the AC-DC power adaptor (20V/1.8A) into the DC IN jack on the bottom of the 
main unit, then connect the AC-DC adapter to a convenient wall outlet.  

2.


Press the      button to switch the sound bar on. The LED display will light up and showing the last 
used mode. 

3.


Plug the connector of power cord into the AC socket on the back of the subwoofer, and plug it into 
the main power supply, then turn on the subwoofer by press the Power On/Off Switch to ON position, 
the Pairing Indicator is flashing in blue. 
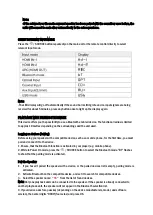
4.


To pair the subwoofer and the sound bar, press and hold the   /SOURCE button on remote control 
for about 5 seconds, "PAIRING" will be shown on the display & it is ready for pairing with the 
subwoofer or Surround speaker. 

5.


Press and hold the Pair Button(around 5 seconds) on the back of subwoofer within 15 seconds after 
the "PAIRING" appears on the soundbar, the  Pairing Indicator  on the back of subwoofer  will be 
changed to steady blue, the connection is successfully established now. 

6.


Repeat the above step 4, and then Press and hold the Pair Button(around 5 seconds) on the back of 
main surround speaker within 15 seconds after the "PAIRING" appears, the Pairing Indicator on the 
front of main surround speaker will be changed to steady blue, the connection is  successfully 
established now. 
 

Содержание S5

Страница 1: ...k you for purchasing your new 5 1 sound bar system We recommend that you spend some time reading this instruction manual in order that you fully understand all the operational features it offers Read all the safety instructions carefully before use and keep this instruction manual for future reference ...

Страница 2: ...accordance with the manufacturer s instructions 3 Power sources This product should be operated only from the type of power source indicated by the marking adjacent to the power cord entry 4 Power cord protection Power supply cords should be routed so that they are not likely to be walked on kinked or pinched by items placed on or against them paying particular attention to cords from plugs recept...

Страница 3: ... speaker may be damaged when a peak level section is suddenly played 16 The only means of completely disconnecting the product from the power supply is by removing the power cord from the wall outlet or the product The wall outlet or the power cord entry to the product must remain freely accessible at all times while the product is in use 17 ESD hints The normal function of the product may be dist...

Страница 4: ...ifferent operating modes BT AUX USB OPTICAL COAXIAL HDMI 3 Button Press to decrease the volume level 4 Button Press to increase the volume level 5 LED Display 6 Remote Control Sensor 7 DC in Jack 8 USB Port 9 3 5mm Aux in Jack 10 Optical Input Socket 11 Coaxial Input Socket 12 HDMI 1 Input Jack 13 HDMI 2 Input Jack 14 HDMI OUT ARC Jack ...

Страница 5: ... Blue Linked Flashing Blue Unlinked 3 AC Socket 4 Power On Off Switch 5 Subwoofer Speaker Surround Speaker Main Speaker R 1 Mounting hole 2 DC in Jack 3 Pair Button 4 Audio Out Jack To the Surround speaker L 5 Pairing Indicator Steady Blue Linked Flashing Blue Unlinked ...

Страница 6: ...EPARATIONS Prepare the Remote Control Insert Replace Battery in Remote Control Open the battery compartment on the underside of the remote control Insert 2pcs AAA R03 1 5 V type batteries Pay attention to the correct polarity see bottom of battery compartment Close the battery compartment If the remote is not in use for a lengthy period of time please remove the battery to prevent the battery acid...

Страница 7: ...the HDMI OUT jack on your digital device HDMI OUT TO TV ARC Connect an HDMI cable not supplied from the HDMI OUT TO TV ARC jack on the back of the product to the HDMI IN jack on your TV ARC Audio Return Channel Function The ARC function allows digital audio to output via the HDMI OUT ARC port It can be enabled only when the Sound bar is connected to a TV that supports the ARC function Note This fu...

Страница 8: ...hat the Optical cable or Coaxial cable is properly connected B Try setting the TV output to PCM or C Connect directly to your Blu ray other source some TVs do not pass through digital audio PLACING THE SOUNDBAR ON A TALBE If your TV is placed on a table you can place the soundbar on the table directly in front of the TV stand centered with the TV screen As long as the surface of the table is flat ...

Страница 9: ...y press the Power On Off Switch to ON position the Pairing Indicator is flashing in blue 4 To pair the subwoofer and the sound bar press and hold the SOURCE button on remote control for about 5 seconds PAIRING will be shown on the display it is ready for pairing with the subwoofer or Surround speaker 5 Press and hold the Pair Button around 5 seconds on the back of subwoofer within 15 seconds after...

Страница 10: ...ng your speaker with a compatible device such as a mobile phone for the first time you must pair and connect it to the device 1 Ensure that the Bluetooth function is activated in your player e g mobile phone 2 While in Power On mode press the SOURCE button to select the Bluetooth mode BT flashes to show that the pairing mode is activated Pair the Speaker 1 If you haven t paired the speaker with a ...

Страница 11: ...ll connected to the player 5 If the connection is lost follow the instructions above to pair your device to the player again OPTICAL COAXIAL DIGITAL INPUTS OPERATION 1 Ensure that the unit is well connected to the TV or other audio device via Optical cable included or Coaxial cable excluded 2 While in Power On mode press the SOURCE button on the main unit or remote control to select the OPTICAL or...

Страница 12: ...e level Unit gets warm after extended play at high volume This is normal Turn the unit off for a period of time or lower volume Speaker cannot be connected via Bluetooth Bluetooth is switched off at the audio source The speaker has already connected with another device via Bluetooth Switch on the Bluetooth function in the audio source Press and hold the button on remote control for 3 seconds to br...

Страница 13: ...ubwoofer 60W Standby Power Consumption Sound bar 0 5W Standby Power Consumption Subwoofer and rear speaker 2W Power of Remote Control 2 x AAA R03 Batteries not included Remote Control Distance up to 6m Angle 30 Protection Class II Unit Dimension Soundbar 998 W x 115 D x 56 H mm Unit Dimension Subwoofer 250 W x 300 D x 312 H mm Unit Dimension Rear Speaker 90 W x 90 D x 150 H mm Working Temperature ...

Страница 14: ...frequency energy and if not installed and used in accordance with the instructions may cause harmful interference to radio communications However there is no guarantee that interference will not occur in a particular installation If this equipment does cause harmful interference to radio or television reception which can be determined by turning the equipment off and on the user is encouraged to t...

Отзывы: