background image

– 2 –

IMPORTANT: READ THE INSTRUCTIONS CAREFULLY BEFORE USE
AND KEEP THEM FOR FUTURE REFERENCE. YOUR CHILD MAY BE

HURT IF YOU DO NOT FOLLOW THESE INSTRUCTIONS

The correct use and maintenance of your Perfect Height Swing will ensure it gives long and
trouble-free use. When somebody else is using your Perfect Height Swing, ensure they also know
how to use it. The safety of your child is your responsibility.

BEFORE ASSEMBLY

• Read the instructions thoroughly before attempting construction.
• Follow each stage of construction and operation step-by-step.

• Unpack all the components and identify them against the components list.

• Do not discard any packaging until you are certain you have all the correct components.

• If any items are damaged or missing please contact your retailer, or call our Customer Care

Helpline on: 01484 438222.

AFTER SALES SERVICE:

If when you receive your Mamas & Papas product you need

assistance, spare parts or you are unhappy with any aspect of the goods please

contact our Customer Care Helpline on: 01484 438222

, or e-mail us at

[email protected] 

where one of our trained advisors will be able to

help you, in order to avoid you having to return your product to the retailer. You can also visit
our website at 

www.mamasandpapas.com 

for the latest product information.

INSTRUCTIONS FOR SAFE USE

PERFECT HEIGHT SWING

• The Perfect Height Swing must be assembled by an adult.

• WARNING: A CHILD’S SAFETY IS YOUR RESPONSIBILITY.

• NEVER LEAVE YOUR CHILD UNATTENDED.

• IT IS DANGEROUS TO PLACE THIS PRODUCT ON AN ELEVATED SURFACE.

• Never rock the swing manually.

• Do not allow older children to rock or play with the swing.

• Always use the safety harness. Fit the harness securely to the child.

• Ensure that all hazards such as small objects, electrical flexes and sharp or hot items are

kept out of your child’s reach.

• Always ensure the swing is on a level stable surface before use.

• Make sure your child is clear of moving parts before making adjustments.

• Clean the swing with a damp cloth or sponge and a mild detergent. Do not use bleach or

solvent based cleaners as these may damage the fabric.

• Check the swing regularly for damage and ensure that the harness is secure and performs

correctly. No lubrication is necessary.

• Exposed edges of the covers are often the first to wear. Remember this as you transport,

handle and store your swing.

• Never adjust the height of the swing when your child is in the seat.

• Only use the swing in the reclined position until your child can sit up by themselves.

• Discontinue use of the swing when your child attempts to climb out or becomes too active

to safely use the swing or weighs 11kg.

• Do not raise or lower the seat, fold or move swing while occupied by your child.

• DO NOT lift by the play centre. Do not use toys if any plastic parts are loose, cracked or

broken.

• Lock swing legs in place before use.

• DO NOT allow other children to play around swing while in use.

• DO NOT use the swing without the seat cover.


Содержание GO1M-R1 perfect height swing

Страница 1: ... 1 instructions perfect height swing IMPORTANT Please read instructions carefully and keep for future reference GO1M R1 ...

Страница 2: ...t be assembled by an adult WARNING A CHILD S SAFETY IS YOUR RESPONSIBILITY NEVER LEAVE YOUR CHILD UNATTENDED IT IS DANGEROUS TO PLACE THIS PRODUCT ON AN ELEVATED SURFACE Never rock the swing manually Do not allow older children to rock or play with the swing Always use the safety harness Fit the harness securely to the child Ensure that all hazards such as small objects electrical flexes and sharp...

Страница 3: ...on for infants Variable swing speed control Seat lock for feeding Padded seat cover and head support which can both be easily removed for cleaning Includes a three point safety harness Always fit the harness when your child is in the swing Removable snack tray for easy baby loading Detachable play centre with toys lights sounds and tunes Swing frame folds easily for storage Rear leg B Front leg B ...

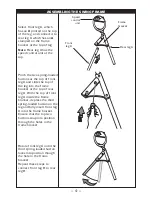
Страница 4: ...he leg into the frame bracket at the top of rear leg A With the top of front leg A inside the frame bracket depress the third spring loaded button on the leg and fully insert front leg A into the frame bracket Ensure that the top two buttons snap into position through the holes in the frame bracket Rotate front leg A until the third spring loaded button locks into position though the hole in the f...

Страница 5: ... components together After attaching the rear legs to the rear feet select the front feet and position them so that the plastic feet are flat on the floor and the leg ends point upwards at an angle Slot the front legs onto the top of the front feet Depress the spring loaded buttons on the top of the front feet and slot the components together Ensure that the buttons snap into position Ensure that ...

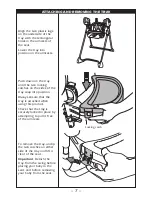
Страница 6: ...tion Make sure the spring loaded buttons lock into place through the holes in the seat connectors The seat should be level when fitted to the frame Align the velcro strips on the back of the head support with the velcro pads on the seat cover and press them together Position the head support so that your baby s head is resting on the middle top section of the cushion Note Use the head support unti...

Страница 7: ...hes on the sides of the tray snap into position Always ensure that the tray is attached when using this product Check that the tray is securely locked in place by attempting to pull it free of the armrests To remove the tray unclip the two catches on either side of the tray and lift it clear of the seat Important Detach the tray from the swing before placing your baby in the seat and before removi...

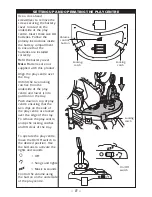
Страница 8: ...re over the tray Unfold the two locking catches from the underside of the play centre and lower it into position on the tray Push down on top of play centre ensuring that the two clips on the side of the play centre are locked over the edge of the tray To remove the play centre unclip the locking catches and lift clear of the tray To operate the play centre move the On Off switch to the desired po...

Страница 9: ...uckles Tighten the harness until it fits snugly around your child Locking the harness Push the tongues on the ends of the waist straps into the buckle on the crotch strap 1 The harness will automatically lock when the tongues have been fully pushed in Unlocking the harness Squeeze the tongues on the ends of the waist straps 2 and then slide them out of the buckle on the crotch strap 3 Your child c...

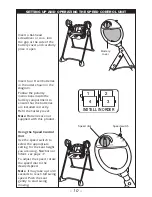
Страница 10: ...battery compartment to ensure that the batteries are installed correctly Refit the battery cover Note Batteries are not supplied with this product Using the Speed Control Unit Use the speed switch to select the appropriate setting for the seat height you are using Newborn or Infant see page 11 To adjust the speed rotate the speed dial to the desired speed Note It may take up to 30 seconds to reach...

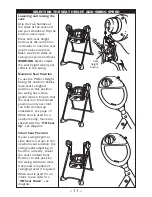
Страница 11: ...ewborn babies raise seat to highest position In this position the swing has a slow gentle motion Ensure that the seat is in the reclined position until your child can hold its head up unassisted see page 12 When seat is used for a newborn baby move the speed switch to ON Seat Up see diagram Infant Seat Position If your swing begins to slow down or stops in the newborn seat position the swing needs...

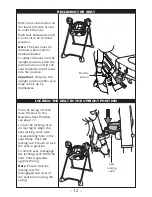
Страница 12: ...e the upright position when your baby can sit up by themselves Turn the swing off then raise the seat to the Newborn Seat Position see page 11 Locate the locking catch on rear leg A Align the seat locking catch with corresponding hole in the seat frame Push the locking catch down to lock the seat in position To unlock seat disengage the locking catch from the seat Fold it upwards against the leg N...

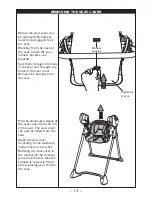
Страница 13: ...ough the holes in the seat cover Remove the harness from the seat Pull the elasticated edges of the seat cover from the rim of the seat The seat cover can now be lifted from the seat Wash the seat cover according to the washcare instructions on the label Refitting the seat cover is the reverse of the removal procedure Ensure that the harness is correctly fitted before placing your child in the sea...

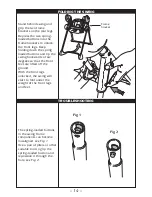
Страница 14: ... swing backwards a few degrees so that the front feet are lifted off the ground With the front legs unlocked the swing will start to fold under the weight of the front legs and feet The spring loaded buttons in the swing frame components can become misaligned see Fig 1 Use a pair of pliers or other suitable tool to grip the spring loaded button and reposition it through the hole see Fig 2 TROUBLES...

Страница 15: ...nformation Only an adult should access the battery compartment Ensure that the battery compartment is securely closed before the Perfect Height Swing is used by your child Use only the batteries recommended and insert them correctly Battery terminals are not to be shorted Do not mix old and new batteries Do not mix batteries of different types Do not recharge non rechargeable batteries Remove exha...

Страница 16: ... 16 www mamasandpapas com Mamas Papas Colne Bridge Road Huddersfield HD5 0RH customer care helpline 01484 438222 customer care e mail customer care mamasandpapas co uk ...

Отзывы: