Mamas & Papas 03 Sport Скачать руководство пользователя страница 3

PRODUCT INFORMATION

2

This pushchair has been designed and tested to comply with the latest British safety standards.

• This pushchair is designed for children from birth up to 15kgs (3 years of age approx).

• The pushchair comes equipped with a five-point safety harness. Always use the harness when

your child is in the pushchair.

• Pneumatic tyres for increased comfort and improved grip.

• Supplied with a hand pump, hood and PVC raincover.

• The angle of the backrest can be adjusted for the added comfort of your child.

• A shower resistant removable fabric hood.

• A fitted basket.

• Easy to remove front and rear wheels for a more compact storage solution.

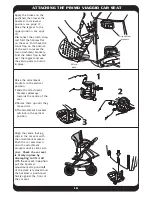
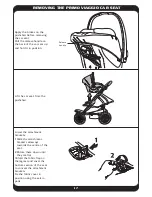
• The Primo Viaggio Car Seat can be attached to the pushchair.

• Easy to remove, hard wearing fabric cover that is machine washable.

ACCESSORIES

Babycosy

Sun canopy

Primo Viaggio Car Seat 

The Primo Viaggio Car Seat is suitable from
birth to 13 kgs (12-15 months approximately).

Footmuff to keep
your baby warm in
colder weather.

03 Accessory Pack

Head-hugger

Gives extra support to
your child and a more
comfortable ride.

Rucksack and Travel bags

Several different bag styles are available
according to your preference and the fabric
colour of your pushchair.

Footmuff 

To keep your child
warm in colder
weather.

Coordinating sun canopy to help protect your
child from the sun.

Содержание 03 Sport

Страница 1: ...instructions 03 Sport swivel wheel pushchair IMPORTANT Please read instructions carefully and keep for future reference 10279 V7 01 06 Mamas Papas Holdings Ltd 2006...

Страница 2: ...e attachment system Product Information 2 Accessories 2 Instructions For Safe Use 3 Pushchair Features 4 General Operation Fitting the wheels 5 Opening the pushchair for the first time 6 Selecting swi...

Страница 3: ...fitted basket Easy to remove front and rear wheels for a more compact storage solution The Primo Viaggio Car Seat can be attached to the pushchair Easy to remove hard wearing fabric cover that is mach...

Страница 4: ...s always remove the raincover Always ensure your child is clear of moving parts before adjusting the position of the backrest hood or sun canopy When you change the angle of the backrest always ensure...

Страница 5: ...t strap Hood Hand pump Hand pump Use the hand pump to keep your pushchair tyres correctly inflated Raincover Fully waterproof PVC raincover to prevent your child and the pushchair from getting wet Fra...

Страница 6: ...Fitting the front wheel Place the folded pushchair on a flat work surface with the forks facing up Align the holes in the plastic hubs with the ends of the forks and slot them together Ensure the sus...

Страница 7: ...disengage it from the stud Grip the front wheel and pull it up to unfold the pushchair When the pushchair is almost fully open pull the wheel up sharply to lock the frame open Adjusting the handlebars...

Страница 8: ...hair only ever use the wheel in the fixed wheel mode The pushchair can be operated in swivel wheel mode or fixed wheel mode Turn the swivel knob at the front of the footrest to switch between these mo...

Страница 9: ...o press studs on the back of the hood B to the studs on the pushchairs backrest Push the tabs on the end of the hood pivots onto the frame Push the tensioning bars on the hood down To remove the back...

Страница 10: ...l go Do not use excessive force when releasing the brakes Applying the brakes Press the brake pedal down as far as it will go Do not use excessive force when applying the brakes Important Always check...

Страница 11: ...ADJUSTING THE LEGREST 10 Lowering the legrest 1 Lift the two catches either side of the legrest 2 Lower the legrest Raising the legrest Lift the legrest up into the horizontal position 2 1 1...

Страница 12: ...e end of the adjustment strap onto the velcro strip on the backrest Important Do not adjust the backrest when your child is pressed against it Lowering the backrest Feed the backrest adjustment strap...

Страница 13: ...nlocking the harness Squeeze the ends of the tongues together 2 and then slide them out of the buckle 3 Your child can now be removed from the pushchair IMPORTANT Every time you place your child in th...

Страница 14: ...the crotch strap through hole 1 in the back pad of the footmuff or babycosy Slot the shoulder straps through the hole 2 in the back pad Slot the waist straps through the side holes 3 in the sides of t...

Страница 15: ...ding the locks open push the handlebars forward and down until the pushchair starts to fold Release both of the locks and continue to push down until the pushchair is folded flat Release the locking c...

Страница 16: ...r wheel release levers to unlock the wheel and pull it from the rear wheel housing Repeat for the second rear wheel Removing the front wheel Lay the pushchair on its side or back Push the two locking...

Страница 17: ...attachment brackets to the vertical position 1Slide the attachment brackets sideways towards the centre of the seat 2Rotate them up until they are vertical 3The attachment brackets will lock in the ve...

Страница 18: ...n position Lift the car seat from the pushchair Lower the attachment brackets 1Slide the attachment brackets sideways towards the centre of the seat 2Rotate them down until they are flat Unfold the fa...

Страница 19: ...rom the stud Grip the handlebars and lift them up until the frame is fully open and the locking catches on the frame have engaged Adjust the handlbars as required see page 6 Important Check that the l...

Страница 20: ...basket frame to access the two rear basket ties The basket can now be cleaned according to the instructions on the washcare label attached to the pushchair The basket is attached to the basket frame b...

Страница 21: ...ts in the seat base Detach the two clips that secure the backrest to the back legs C A B Unfasten the four press studs that attach the cover to the underside of the seat The cover can now be removed f...

Страница 22: ...to prevent damage to the valve FITTING THE RAINCOVER 1Slot the centre section of the hood cover between the handlebars Then fasten the four velcro pads together 2Fasten the velcro straps under the foo...

Страница 23: ...d detergent Washing instructions Remove the fabrics following the information given in these instructions Clean the fabrics according to the instructions on the washcare labels Do not use abrasives or...

Страница 24: ...www mamasandpapas com Mamas Papas Colne Bridge Road Huddersfield HD5 0RH customer services helpline 0870 8307700 customer services email customer services mamasandpapas com...

Отзывы: