background image

All Sky User Manual


October 11, 2014


All Sky User Manual 

Page 4 


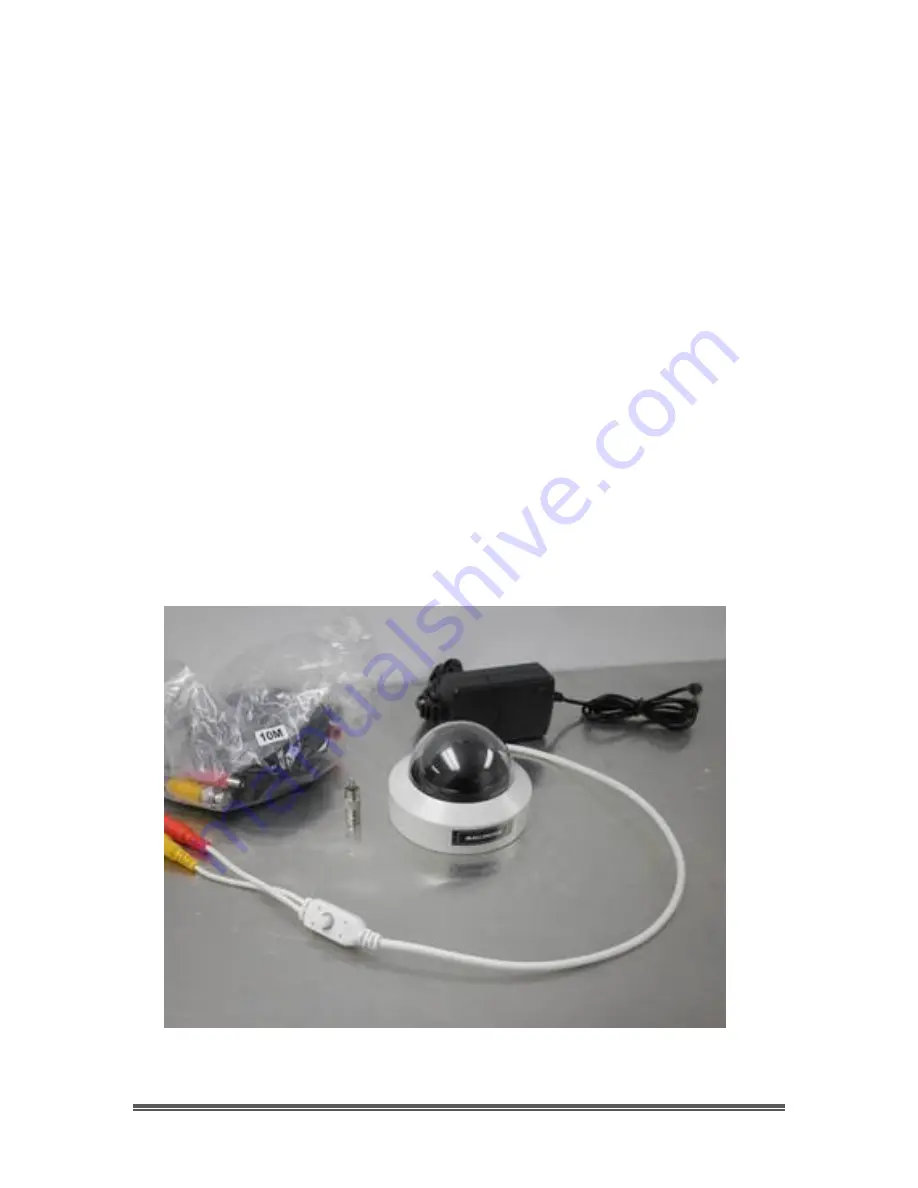
The Contents of the All Sky Package 

Depending upon the All Sky Model purchased, the contents may vary, but all All 
Sky Deluxe cameras include the following standard equipment: 
 

MallinCam All Sky Deluxe Package


All Sky camera body fully enclosed in a metal jacket with a Lexan Dome 


10 meter (32 feet) video/power cable 


120 Volts  AC to 12 Volts DC regulated power supply 


BNC to RCA adapter 


These attachments will provide you with the ability to connect the All Sky Video 
camera to your telescope, power it using to a 120V AC power source, and 
displaying your image on any device that accepts analog video via a 
composite connection. The optional cables will allow you to control the All Sky 
either through your computer. See the 

Appendix

 for a list of other accessories 

available for the All Sky Camera.  


Содержание All Sky

Страница 1: ...the camera s various settings Imaging techniques with the various hardware and software options will be covered along with how to broadcast the output of the All Sky camera on the Internet The standard Composite Video output will be discussed along with hints and suggestions on how to resolve any problems that you encounter with this camera Enjoy the adventure with Rock Mallin s All Sky Video came...

Страница 2: ...Revision Sheet All Sky User Manual Page ii Revision History Version Date Revision Description 1 0 10 11 2014 Template Creation and All Sky Wired ...

Страница 3: ...our Computer for Video 8 Software Requirements 8 Hardware Requirements 8 Attaching the Video Cable to All Sky Camera 9 Checking out the All Sky for the First Time Day Time 10 3 Operating the All Sky 15 Imaging Methods 15 E SHUTTER vs SENSE UP 26 Controlling the All Sky by Hand 27 The All Sky Camera OSD Settings 27 4 Understanding the OSD 32 On Screen Display OSD Menu 32 MENU MAIN 32 EXPOSURE MAIN ...

Страница 4: ...B Y GAIN 44 DAY NIGHT MAIN 44 D N MODE 45 BURST 45 AUTO 45 DAY NIGHT 46 NIGHT DAY 47 DWELL TIME 47 C_SUP 48 A_SUP 48 FUNCTION MAIN 48 MIRROR 49 SHARPNESS 49 MONITOR 49 GAMMA 50 USER 50 LSC 50 LSC ON 51 MOTION MAIN 51 PRIVACY MAIN 52 SETUP MAIN 52 TITLE 53 MANUAL DPC 53 AUTO DPC 54 OLPF 54 OSD COLOR 54 SYSTEM MAIN 55 EXIT MAIN 55 FACTORY SET 56 SAVE EXIT 56 EXIT 56 ...

Страница 5: ...mping all over the place 67 When I have my Video Software connect to my Mallincam through my MCV 1 adapter I only see a Blue screen 67 My ALL SKY Camera is frozen or the commands do not seem to be working correctly the camera is acting strangely 67 Appendix D Setting Template 68 Jack Huerkamp s recommended Settings 69 Appendix E Installing All Sky Camera Outside 70 Appendix F Applications of All S...

Страница 6: ... discovery and adventure as you view record share and broadcast the wonders of the entire Night or Day Sky The Mallincam All Sky Camera captures images that range from brighter Deep Sky Objects to local Solar System favorites from Meteors to Satellites from Aurora to Lightning this camera does it all and in near Real Time You will discover that this camera can be used in urban skies where light po...

Страница 7: ... a Lexan Dome 10 meter 32 feet video power cable 120 Volts AC to 12 Volts DC regulated power supply BNC to RCA adapter These attachments will provide you with the ability to connect the All Sky Video camera to your telescope power it using to a 120V AC power source and displaying your image on any device that accepts analog video via a composite connection The optional cables will allow you to con...

Страница 8: ...e Connector with RCA adapter Gain Control Auto Manual Exposure Control Auto Manual Auto Iris AES Rolling Shutter ALC Fix Shutter seconds 1 60 1 100FLK 1 120 1 250 1 500 1 1000 1 2000 1 4000 1 10000 1 100000 Extended Shutter seconds 1 32s 1 16s 1 8s 1 4s 1 2s 1s 2 1s 4 2s 8 4s 17s Gamma Selection 0 45 0 6 1 0 User Gamma 0 20 0 25 0 30 0 35 0 40 0 45 0 50 0 55 0 60 0 65 0 70 0 75 0 80 0 85 0 90 0 95...

Страница 9: ...2014 All Sky User Manual Page 6 The Camera its Anatomy The Mallincam All Sky camera is a circular based camera with a transparent dome on top It has a radius of 3 68 and is 2 5 tall The camera weighs in at about 11 5 ounces 300 grams ...

Страница 10: ... the All Sky to the Composite Video In Adapter on your monitor since in most monitors the Composite Video In connector is a RCA style MallinCam provides a BNC to RCA adapter to facilitated that connection To connect just align the two little openings on the BNC cable male with the two notches on the adapter s BNC female connector push and twist so the notches slide into place This locks the connec...

Страница 11: ...our video capture device Some suggestions are AMCAP SharpCap SplitCam ManyCam WebCamMax Each software has its pros and cons depending upon what you require the software do Using SplitCam ManyCam or WebCamMax will make it easier to broadcast your images on Night Skies Network see section Connecting the Night Skies Network NSN if that will be a direction you are thinking of taking Hardware Requireme...

Страница 12: ...o allow for capture of the video signal Now all we need to do is start the video display software of your choice to display the image Remember what ever software choice you made to display the image from the All Sky Camera it will have an option that allows you to choose the Video Capture Adapter s driver x2828 for MCV Once you chosen the driver you should now see an image of what the All Sky Came...

Страница 13: ...All Sky Camera to see if you can obtain a video signal This walk through assumes you have a monitor with a Composite input capabilities or a Laptop with a Video Capture Device attached and configured along with Video Display Software Place your All Sky Camera on a flat platform so that the Dome is facing upwards and power up your All Sky Camera and monitor start your Video Display Software if you ...

Страница 14: ...LC was selected the second menu will appear that will allow you to adjust the ELC parameters With the EXPOSURE selection highlighted icon is blue press the Centre button on the All Sky Camera control adapter and the camera will display the Exposure Settings We will learn how to move through the menu system to adjust the Brightness and Exposure settings The Button Adapter has a Centre Knob which wh...

Страница 15: ...cts our image From the current EXPOSURE Menu with LENS highlighted press inwards on the Control Button to again go into the LENS Sub Menu With the E SHUTTER control heighted it should say AUTO Press the Control Button to the RIGHT and its value should change to 1 60 The image brightness will also change as we have just told the camera to use 1 60 of a second exposure Press LEFT or RIGHT on the Con...

Страница 16: ...round brightness when encountering a bright object We have experimented with a few different ways to adjust the image on the screen Now it is time to save the new settings and exit from the On Screen Menu With the Main Icons of the screen push LEFT or RIGHT on the Control Button to select EXIT icon Press INWARD on the Control Button to display the EXIT Menu Press DOWN on the Control Button to sele...

Страница 17: ... step in your learning should be to read the OSD MENU Chapter in this manual to get an understanding what the settings do and how they react to each other This will save you hours of frustration when you are just adjusting the setting to try to improve your image If you do not press any of the buttons on the All Sky for about 3 minutes the ICON menu will turn off and the camera will return to the ...

Страница 18: ...seeing conditions makes it impossible to determine the precise setting for the All Sky Camera What we can do is provide suggestions that will get you started in the right direction We recommend that you experiment and tweak the settings that we offer to see what works best for you Patience will be your best friend as you learn what the All Sky can do and what you can adjust Do not be afraid to vis...

Страница 19: ...erve for the image changes as you make the following setting adjustments Set ELC to AUTO The ELC setting is located in the EXPOSURE ICON so activate the On Screen Menu by pressing INWARD on the Control Button The Main Menu Icons will appear over your image with EXPOSURE being highlighted in Blue Press INWARD on the Command Button to activate the EXPOSURE Menu With the LENS command highlighted in B...

Страница 20: ...ing highlighted in Blue Press INWARD on the Command Button to activate the EXPOSURE Menu With the AGC command highlighted in Blue press LEFT or RIGHT on the Control Button to change the setting value to HIGH Set 3D DNR to HIGH The 3D DNR setting is located in the EXPOSURE ICON so activate the On Screen Menu by pressing INWARD on the Control Button The Main Menu Icons will appear over your image wi...

Страница 21: ...Set SENSE UP to X64 The 3D DNR setting is located in the EXPOSURE ICON so activate the On Screen Menu by pressing INWARD on the Control Button The Main Menu Icons will appear over your image with EXPOSURE being highlighted in Blue Press INWARD on the Command Button to activate the EXPOSURE Menu With the SENSE UP command highlighted in Blue press LEFT or RIGHT on the Control Button to change the se...

Страница 22: ...l Button Once COLOR Icon is highlighted press INWARD on the Command Button to activate the COLOR Menu With the WB MODE control selected press LEFT or RIGHT on the Control Button to change the setting value to ATW Set D N to AUTO The D N Mode setting is located in the D N ICON so activate the On Screen Menu by pressing INWARD on the Control Button The Main Menu Icons will appear over your image wit...

Страница 23: ...sing INWARD on the Control Button The Main Menu Icons will appear over your image with EXPOSURE being highlighted in Blue With the Main Menu Icons on the screen select the FUNCTION Icon by pressing LEFT on the Control Button Once FUNCTION Icon is highlighted press INWARD on the Command Button to activate the FUNCTION Menu With the FUNCTION control selected press DOWN on the Control Button to selec...

Страница 24: ...being highlighted in Blue With the Main Menu Icons on the screen select the FUNCTION Icon by pressing LEFT on the Control Button Once FUNCTION Icon is highlighted press INWARD on the Command Button to activate the FUNCTION Menu With the FUNCTION control selected press DOWN on the Control Button to select the MONITOR Control With the MONITOR Control selected press LEFT or RIGHT on the Control Butto...

Страница 25: ... being highlighted in Blue With the Main Menu Icons on the screen select the FUNCTION Icon by pressing LEFT on the Control Button Once FUNCTION Icon is highlighted press INWARD on the Command Button to activate the FUNCTION Menu With the FUNCTION control selected press DOWN on the Control Button to select the GAMMA Control With the GAMMA Control selected press LEFT or RIGHT on the Control Button t...

Страница 26: ... FUNCTION Icon by pressing LEFT on the Control Button Once FUNCTION Icon is highlighted press INWARD on the Command Button to activate the FUNCTION Menu With the FUNCTION control selected press DOWN on the Control Button to select the LSC Control With the LSC Control selected press LEFT or RIGHT on the Control Button to change the LSC value to ON Note you can enter into the ON Menu press INWARD on...

Страница 27: ...RE being highlighted in Blue With the Main Menu Icons on the screen select the SETUP Icon by pressing LEFT on the Control Button Once SETUP Icon is highlighted press INWARD on the Command Button to activate the SETUP Menu With the SETUP control selected press DOWN on the Control Button to select the MANUAL DPC Control With the MANUAL DPC Control selected press LEFT or RIGHT on the Control Button t...

Страница 28: ...URE being highlighted in Blue With the Main Menu Icons on the screen select the SETUP Icon by pressing LEFT on the Control Button Once SETUP Icon is highlighted press INWARD on the Command Button to activate the SETUP Menu With the SETUP control selected press DOWN on the Control Button to select the AUTO DPC Control With the AUTO DPC Control selected press LEFT or RIGHT on the Control Button to c...

Страница 29: ...ique is to determine which is best you re your outside situation Setting E SHUTTER manually to a value say to x1024 will always give you that exposure for x1024 that would be 17s The E SHUTTER s exposure rate will always be at that value and a new image will appear when that exposure time is done ie every 17s no matter what the sky conditions are Setting E SHUTTER to AUTO or 1 60 will allow you ac...

Страница 30: ...s INWARD on the Control Button The All Sky Camera OSD Settings The following table will guide you in locating a specific OSD or On Screen Display image control Once you get the hang of locating the settings it will be worth your time to peruse the Chapter Understanding the OSD to get a deeper comprehension how the adjustments will affect your image Always remember the suggested settings are a reco...

Страница 31: ...1 250 1 500 1 1000 1 2000 1 4000 1 10000 1 100000 BRIGHT 1 to 100 DC E SHUTTER X1024 X512 X256 X128 X64 X32 X167 X8 X4 X2 AUTO 1 60 1 100FLK 1 120 1 250 1 500 1 1000 1 2000 1 4000 1 10000 1 100000 BRIGHT 1 to 100 DC REF 0 to 20 HBLC D WDR OFF BLC BLC MODE AUTO MANUAL TOP 0 to 15 BOTTOM 0 to 15 LEFT 0 to 15 RIGHT 0 to 15 BLC WEIGHT OFF LOW MID HIGH HLI HBLC HBLC LEVEL OFF LOW MID HIGH TOP 0 to 15 B...

Страница 32: ... D WDR D WDR LEVEL 0 to 20 AGC OFF LOW MID HIGH 3D DNR AUTO OFF LOW MID HIGH SENSE UP AUTO OFF X2 X4 X8 X16 X32 X64 X128 X256 X512 COLOR WB MODE ATW MANUAL M WB R 0 to 128 M WB B 0 to 128 AWC PUSH R Y GAIN 0 to 255 B Y GAIN 0 to 255 DAY and NIGHT D N MODE AUTO BURST OFF ON DAY NIGHT 0 to 30 NIGHT DAY 0 to 29 DWELL TIME 0 to 15 COLOR B W EX CD BURST OFF ON DAY NIGHT 0 to 255 NIGHT DAY 0 to 255 SMAR...

Страница 33: ...0 30 0 35 0 40 0 45 0 50 0 55 0 60 0 65 0 70 0 75 0 80 0 85 0 90 0 95 1 00 LSC OFF ON SET LEVEL 0 to 30 MOTION MOTION OFF ON AREA SEL AREA 1 to AREA 4 MASK MODE OFF ON TOP 0 to 190 BOTTOM 0 to 190 LEFT 0 to 190 RIGHT 0 to 190 SENSITI 0 to 30 DISPLAY OFF ICON TRACE HOLD TIME 3 to 15 ALARM OFF ON PRIVACY MASK1 to MASK8 OFF ON DOT SEL L_TOP R_TOP L_BOT R_BOT DOT XY MOVE XY COLOR SET BLACK WHITE RED G...

Страница 34: ...0 to 255 BLACK THR 0 to 255 DPC LEVEL 0 to 255 AUTO DPC OFF AUTO DPC LEVEL 1 to 50 DPC RUN OLPF 650 850 OSD COLOR BLUE MAGENTA CYAN GRAY BLACK WHITE RED GREEN SYSTEM CAMERA ID 000 TO 255 COMMUNI OFF ON PROTOCOL PELCO D BAUDRATE 2400 4800 9600 19200 LANGUAGE ENGLISH CHINA EXIT FACTORY SET NO YES SAVE EXIT EXIT ...

Страница 35: ...ave to use the SAVE EXIT command to save the setting adjustments you have made else they will revert to the previously saved values after about 1 minute MENU MAIN This is the main menu for the All Sky It is from here that you select which setting you would like to adjust Menu selections include EXPOSURE COLOR DAY NIGHT FUNCTION MOTION PRIVACY SETUP SYSTEM and EXIT EXPOSURE MAIN This setting is use...

Страница 36: ...o select from X1024 16 8s X512 8 4s X256 X128 X64 X32 X167 X8 X4 X2 AUTO 1 60 1 100FLK 1 120 1 250 1 500 1 1000 1 2000 1 4000 1 10000 and1 100000 of a second For most of your viewing you will most likely use AUTO Shutter setting will automatically make adjustment from 1 60 to 1 100000 of a second E SHUTTER This control allows you to adjust the Electronic shutter and the Brightness of the image X2 ...

Страница 37: ...00 with the default being 50 HBLC D WDR This selections will provide options for enhancing the visibility of objects on the screen specifically when there are different illumination settings in the background This Menu will provide you the following controls OFF BLC Back Light Compensation HLI HighLight Inverse D WDR The object visibility enhancement mode is turn OFF and no adjustments are made OF...

Страница 38: ...n will allow you to enhance the visibility of objects located in the foreground specifically when they are surrounded by a strongly illuminated background You will be provided with a choice of AUTO or MANUAL Mode along with the ability to select the level of BCL enhancement BLC ...

Страница 39: ...P BOTTOM LEFT and RIGHT locations of the shaded box which indicates the enhancement area AUTO This selections allows the Mallincam All Sky camera to make the enhancement adjustment AUTOMATICALLY based on the current image This selection allows you to adjust the BLC Level applied to the enhancements to the visibility of the foreground objects to the background illumination You are provided with 4 c...

Страница 40: ...t thus allowing the observation of other objects on the screen You will be provided with 5 control options within this menu HBLC MODE SET LEVEL GRAY MODE MASK SEL HLI This is an extra feature of HLI It is Highlight Backlight Compensation and what this will do is intensify the area around the bright object to help you see the object better If you leave this off regular HLI will do its job and will ...

Страница 41: ...s adjustments allow the effect to be applied to the 4 masks on the screen The 4 masks can be individually size and moved through the HLI Menu The D WDR Digital Wide Dynamic Range control allows you to effectively observe the scene with different illumination levels by correcting the Gamma Curve This control effectively improves the dark parts of the image without the saturation from the white part...

Страница 42: ...ge 39 AGC AGC or Auto Gain Control is used to set the AGC level When activated AGC will automatically increase the sensitivity of the All Sky Camera by amplifying the video signal received This Menu will provide you with the following settings OFF LOW MID HIGH ...

Страница 43: ...le this setting at night time If you notice a nice clear picture at night with this setting as being off then please leave it like that However if you notice a great deal of noise you can toggle between the strength settings to see what best suits your seeing conditions 3D Digital Noise Reduction allows the Mallincam All Sky Camera to display an improved image in low light conditions by reducing t...

Страница 44: ...NS ELC E SHUTTER control is set to AUTO or 1 60s You use this command in conjunction with E SHUTTER and the AGC controls The combination of these controls allows you to push the exposure duration to the maximum and thus see more faint objects such as faint stars Note E SHUTTER gives you more manual controls up to 17s of exposure The available settings for SENSE UP are OFF AUTO X2 1 32 second expos...

Страница 45: ...to you adjust the color for various light conditions This command provides the following adjustments ATW Auto Tracing White Balance MANUAL White Balance AWC PUSH AWC This is a specific form of AWC ATW continually tracks and adjusts the White Balance making it suitable for use in cameras in which the image content and lighting are subject to changes You will be able to adjust the R Y Gain Red Tint ...

Страница 46: ...tting You can set either the M WB R Manual White Balance Red or the M WB B Manual White Balance Blue settings from a low of 0 to a high of 128 MANUAL The AWC PUSH control when activated will adjust the White Balance to the current image and adjust red and blues accordingly To control this be sure to push the middle button while this feature is selected Use this is your colors look way off AWC PUSH...

Страница 47: ... Red Gain starting point We recommend leaving at default value of 128 It ranges from 0 to 255 B Y GAIN This control allows you to adjust the BLUE component value That is it lets you define the Blue Gain starting point We recommend leaving at default value of 128 It ranges from 0 to 255 DAY NIGHT MAIN The Day and Night control allows the All Sky Camera to adjust from the colors of the daytime to th...

Страница 48: ...ipped with the EX CDS feature choose AUTO instead AUTO the camera make a best guess as to display in COLOR or B W based on the parameters set in the AUTO Control and the current light levels BURST The Control is set to ON if you are using a long video cable and the current image is of poor quality AUTO AUTO Mode in the D N Control provide you with 4 options BURST DAY NIGHT NIGHT DAY DWELL TIME The...

Страница 49: ...al Page 46 DAY NIGHT This setting 1 to 30 will tell the All Sky Camera when to switch over from DAY Mode to NIGHT Mode The lower the value the quicker the process will be This settings runs in conjunction with NIGHT DAY so don t make both values the same ...

Страница 50: ...s settings runs in conjunction with DAY NIGHT so don t make both values the same DWELL TIME This setting 1 to 15 tells the ALL Sky Camera how long to switchover when it senses enough light level to make the switch The lower the setting the less time it takes to make the switch If the light levels are constantly changing you enter a larger number so that the switch will be delayed until you have a ...

Страница 51: ...e more the suppression Not available when 3D DNR is set to ON A_SUP This setting sets the Aperture Suppression for Night Mode You have a range from 0 to 100 to choose from The more Edge sharpness will be reduced in Night Mode when a higher value is chosen Not available when 3D DNR is set to ON FUNCTION MAIN This section contains commands that allow you to control the view of the image These includ...

Страница 52: ...st the sharpness of the image You can adjust from a sharpness value of 0 all the way thru to 30 We have found 14 to be a good value for the sky Just adjust to your requirements MONITOR This control allows you to select from one of two modes MODE1 MODE2 MODE2 seems to produce a slightly brighter image than MODE1 We recommend that you choose MODE2 when imaging the sky specifically when using a LCD m...

Страница 53: ...alue the brighter the image will appear on your screen We have found that a GAMMA value of 0 6 is best for the sky USER The USER control within GAMMA allows you a more precise setting of the GAMMA value It ranges from 0 20 to 1 00 in steps of 0 05 LSC LSC or Lens Shading Compensation is a form of AGC that is useful if part of the image gets temporarily shaded by a cloud for example The control wil...

Страница 54: ... that there is motions on the screen It can monitor up to 4 fixed areas on the image This menu contains 6 Settings MOTION AREA SEL SENSITI DISPLAY HOLD TIME ALARM Since the only application of this menu may be during a meteor shower we will not discuss the Menu Choices But you can select one of 4 fixed areas to monitor and instruct the camera how it should inform you when it detects motion red squ...

Страница 55: ...u to set up to 8 blacked out areas on the image This has no application in the astronomy area so this menu is not discussed SETUP MAIN This menu contains settings that control the All Sky Camera s internal operations You can adjust the 5 following controls TITLE MANUAL DPC AUTO DPC OLPF OSD COLOR ...

Страница 56: ...the EXIT Menu your message will then be displayed on the upper left corner of your screen MANUAL DPC Manual DPC or Dead Pixel Compensation instructs the camera to compensate for any dead pixels by filling in that dead pixel with the color from nearby pixels We recommend using the Automatic DPC command rather than this control If you do set this setting to ON you will be able to adjust the White Th...

Страница 57: ...d setting this control to AUTO OLPF OLPF or Optical Low Pass Filter is a feature that is used when you place different filters over the lens But since the lens on the All Sky Camera is fixed changing the value to either 850 or 650 will have no effect on your image OSD COLOR The OSD or On Screen Display that is activated when you press INWARD on the Control Button can be displayed in different colo...

Страница 58: ...justed since the All Sky Camera has no RS485 Communication controls EXIT MAIN It is here that you can reset the All Sky Camera back to the factor defaults and where you save the changes to the settings that you have made in the camera Remember you need to use the SAVE EXIT to make the adjustment permanent for the next camera reboot else in about 1 minute the All Sky Camera will revert to the previ...

Страница 59: ...and then press INWARD on the Control Button to activate the RESET process and the settings will revert The FACTORY SET will change back to NO then select SAVE EXIT to save these FACTORY RESET settings SAVE EXIT To keep the changes to the settings you have made on the All Sky Camera press INWARD on the Control Button The changes will be saved and the On Screen Display will close EXIT Selecting this...

Страница 60: ... I will not have multiple versions of the drivers for multiple USB ports you are just teasing the windows gods if you mix and match and they will get even The MCV 1 and MCV 1e are heavy and depending upon your computer s manufacturer the MCV may put some strain on the USB port Therefore I use a small 6 USB cable extender and plug the extender into the USB port for and plug the MCV into the other e...

Страница 61: ...downloaded When you see the green USB 2 0 HD HV Grabber screen CLICK on the option Install Drivers You may receive a Windows warning asking you if you want to allow the installation to run Click Yes Follow the instructions on the Installation of USB Video Audio Device Driver Wizard that is displayed on the desktop The installation takes under a minute Once complete you will be presented with a not...

Страница 62: ...ce called USB 2828x Device This is the driver for either the MCV 1 or MCV 1e device This is the one we want Select it Power up your Signature and you should be able to see the camera s images on the video window of your software Oh No the video is not working correctly strange stuff is happening and it is not my camera After you have checked all of the obvious Power to the All Sky Software AMCAP i...

Страница 63: ...mallincam messages One of the most important decisions you will need to make with broadcasting the image of the ALL SKY is what Video capture software are you going to use Some simple suggestions You can have NSN grab the image directly off your Video Capture Device MCV but I find it more convenient to either use a Video Capture Software such as AMCAP or SMARTCAP to display my image and then captu...

Страница 64: ...am WebcamMax choose Desktop Capture as the source Adjust the Resolution and frames second fps value on Manycam Splitcam WebcamMax This will be trial and error it all depends upon resolution bandwidth and what over members on NSN experience from your broadcasted image You will end up adjusting both on the Manycam Splitcam WebcamMax side as well and on the NSN side to get the best image For me I sta...

Страница 65: ...will next be presented with the Channel Line Up screen for Night Skies network Click on the Login selection on the upper right hand side of the screen You will be presented with the Channel Launch Sign In screen for NSN Again enter your Username and Password and click on Publish Channel button Allow Adobe Flash to use your Manycam Splitcam WebcamMax The Adobe Flash Player Settings window will pop ...

Страница 66: ...he other NSN views understand what you are doing When initially setting up which usually takes longer when you are learning I usually type the message Setting Up the Camera then CLICK on the SEND button to have it displayed When you are us and running and everything is working as it should you will change the message to indicate what telescope mount and camera you are using For that is the most fr...

Страница 67: ... Pull Down list to select your camera of choice CLICK on CLOSE to Continue NSN will remember what camera you chose from the last visit So usually you only have to go through this process whenever you want to change what camera device you would like the NSN flash driver to use Choose your Camera Settings We will now select the settings for our camera We have the option of changing The Bandwidth Pic...

Страница 68: ...em CLICK on the green OK symbol to accept these settings That s it you are done If everything is working well and the Window s gods are in a good mood you should be broadcasting whatever object the ALL SKY is capturing You should now enter another Message and SEND it out to indicate what system you are using and what object you are viewing There is a time delay on what you say if you have you micr...

Страница 69: ...ideo device USB 2828x Device directly Splitcam can adjust brightness contrast etc I can also call up the USB 2828x Device control panel located in File Video settings which gives you some more control of the MCV s image output or by using the Options Tab thus allowing you to change the brightness contrast sharpness over and above what the All Sky camera does Since I place Splitcam on its own monit...

Страница 70: ...nothing at the MCV 1 source Cure Set the video to use the Composite port on the x2828 MCV video driver Note Miloslick Splitcam AmCap Miloslick can change the port choice of the MCV 1 Just go into the Video Tab and in the Drop Down list choose Video Input Inside this drop down will be the choice of input ports My ALL SKY Camera is frozen or the commands do not seem to be working correctly the camer...

Страница 71: ... 68 Appendix D Setting Template Menu Parameter Setting Comments 1 Exposure ELC E Shutter Bright HVLC D WDR AGC 3D DNR Senseup 2 Color WB Mode R Y Gain B Y Gain 3 Day Night D N Mode 4 Function Mirror Sharpness Monitor Gamma LSC 5 Setup DPC Auto DPC Manual 6 Other ...

Страница 72: ...ed Settings Menu Parameter Setting Comments 1 Exposure ELC AUTO E Shutter Bright HVLC D WDR AGC HIGH 3D DNR HIGH Senseup X64 2 Color WB Mode ATW R Y Gain B Y Gain 3 Day Night D N Mode AUTO 4 Function Mirror Sharpness 14 Monitor 2 Gamma 0 6 LSC ON 5 Setup DPC Auto AUTO DPC Manual OFF 6 Other ...

Страница 73: ...e of you who want a more permanent installation you can unscrew the dome off the base of the Mallincam All Sky Camera then you have access to three holes threaded I believe 10 32 You then can either use the threads attaching the camera to a base or wood screws for attaching base to a wooded platform The choices of platform ideas are unlimited but two that I have seen include a 4x4 fence post with ...

Страница 74: ... cap on the pipe The base of the All Sky Camera is then attached to the Cap which in turn is attached to the PCV Pipe This way the cap and camera can be removed from the pipe for easy access Options include cutting a notch in the pipe to run the cable thru the pipe With another notch and an access box with the Control button in that notch ...

Страница 75: ...ber 11 2014 All Sky User Manual Page 72 Appendix F Applications of All Sky Camera All image courtesy of Jack Huerkamp Day Time Rainbow International Space Station Tracking Constellations Iridium Flares Meteor during Full Moon ...

Страница 76: ..._____________________ _______________________________________ _______________________________________ _______________________________________ _______________________________________ _______________________________________ _______________________________________ _______________________________________ _______________________________________ _______________________________________ __________________...

Страница 77: ......

Отзывы: