


12 ENGLISH
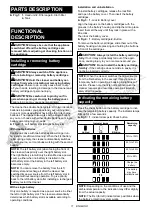
Battery indicators on control panel
The remaining battery capacity can be read on the
control panel at any time. Press the check button, and
the left and right indicators will show the battery charge
levels correspondingly.
►
Fig.6:
1.
Battery indicators
2.
Check button
►
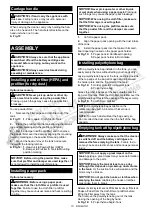
Fig.7
Battery indicator status
Remaining
battery
capacity
On
Off
Blinking
50% to 100%
20% to 50%
0% to 20%
Charge the
battery
Battery not
inserted
NOTE:
The battery indicators will also be activated
when the cleaner starts functioning or switches its
power source from one to another.
Appliance / battery protection
system
The appliance is equipped with an appliance/battery
protection system. This system automatically cuts off
power to the motor to extend appliance and battery life.
The appliance will automatically stop during operation
if the appliance or battery is placed under one of the
following conditions:
Overload protection
When the appliance/battery is operated in a manner
that causes it to draw an abnormally high current, the
appliance automatically stops. In this situation, turn the
appliance off and stop the application that caused the
appliance to become overloaded. Then turn the appli
-
ance on to restart.
Overheat protection
On
Blinking
When the appliance is overheated, the appliance stops
automatically, and both left and right battery indicators
blink. In this situation, let the appliance cool down
before turning the appliance on again.
On
Blinking
When the battery is overheated, the appliance stops
automatically, and one of the indicators for overheated
battery blinks. In this situation, let the battery cool down
before turning the appliance on again.
Overdischarge protection
When the battery capacity becomes low, the appliance stops auto
-
matically. If the appliance does not run along with the switch opera
-
tion, remove the batteries from the appliance and recharge them.
Protections against other causes
Protection system is also designed for other causes that could dam
-
age the appliance and allows the appliance to stop automatically.
Take all the following steps to clear the causes, when the appliance
has been brought to a temporary halt or stop in operation.
1. Turn the appliance off, and then turn it on again to restart.
2. Charge the battery(ies) or replace it/them with
recharged battery(ies).
3. Let the appliance and battery(ies) cool down.
If no improvement can be found by restoring protection
system, then contact your local Makita Service Center.
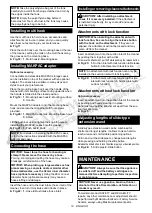
Switch action
Turning cleaner on
1. Turn the stand-by switch in the "I" (ON) position to
have the cleaner ready in stand-by mode.
2. Press the power button.
To switch back to stand-by mode, press the power
button again.
Turning cleaner off
Perform one of the following steps.
•
Press the power button to set the cleaner back in
stand-by mode, and then turn the stand-by switch
in the "O" (OFF) position.
•
Turn the stand-by switch in the "O" (OFF) position.
Adjusting suction power
The suction power can be adjusted according to your work needs.
•
Turn the suction force adjusting knob to the left to
reduce the suction power.
•
Turn the suction force adjusting knob to the right
to increase the suction power.
►
Fig.8:
1.
Stand-by switch
2.
Power button
3.
Suction
force adjusting knob
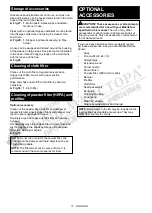
Locking and unlocking casters
Front casters can be locked with stoppers to help the
cleaner stand still.
Lower the stopper lever by hand to lock the caster, and
raise it up to release.
►
Fig.9:
1.
Caster
2.
Stopper lever
3.
Unlocked posi
-
tion
4.
Locked position
NOTE:
When moving the cleaner, make sure that the
caster is unlocked. Moving the cleaner with the caster
in a locked position may cause damage to the caster.
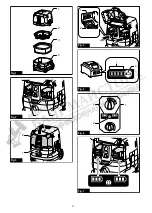
Содержание VC005GLZ
Страница 2: ...1 2 3 4 Fig 1 2 1 Fig 2 1 2 Fig 3 1 2 Fig 4 1 2 Fig 5 1 1 2 Fig 6 Fig 7 2 ...
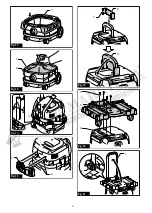
Страница 3: ...1 3 2 Fig 8 1 2 3 4 Fig 9 Fig 10 1 2 3 Fig 11 1 2 3 4 5 6 6 6 Fig 12 1 4 2 3 Fig 13 1 2 3 Fig 14 3 ...
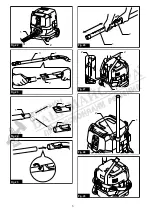
Страница 4: ...1 Fig 15 1 2 Fig 16 Fig 17 1 2 Fig 18 1 2 3 Fig 19 2 3 1 Fig 20 1 2 Fig 21 4 ...
Страница 5: ...1 2 Fig 22 1 3 2 Fig 23 1 2 3 Fig 24 Fig 25 2 1 Fig 26 1 2 2 Fig 27 2 1 Fig 28 Fig 29 5 ...
Страница 6: ...1 Fig 30 Fig 31 6 ...