


11 ENGLISH
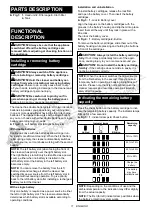
PARTS DESCRIPTION
►
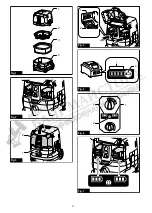
Fig.1:
1.
Head unit
2.
Filter cage
3.
Cloth filter
4.
Tank
FUNCTIONAL
DESCRIPTION
CAUTION:
Always be sure that the appliance
is switched off and the battery cartridges are
removed before adjusting or checking function on
the appliance.
Installing or removing battery
cartridge
CAUTION:
Always switch off the appliance
before installing or removing battery cartridges.
CAUTION:
Hold the cleaner and battery car-
tridges firmly when installing or removing battery
cartridges.
Failure to do so may cause them to slip
off your hands, resulting in damage to the cleaner and
battery cartridges or personal injury.
CAUTION:
Be careful not to pinch your fin
-
gers when opening or closing the battery cover.
Failure to do so may cause personal injury.
The cleaner has double battery slots. With two identical
batteries in parallel, you can extend your running time
in one or more uses without having to stop to recharge
batteries. The cleaner also works with a single battery,
so you can choose with either double batteries or single
battery according to your needs.
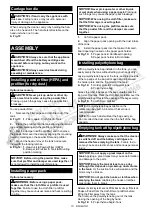
►
Fig.2:
1.
Left battery slot
2.
Right battery slot
With double batteries
Continuous drive with two batteries allows longer run
-
time and more efficient cleaning. When the first battery
is becoming empty, the cleaner automatically switches
a power source, so it continues working with the second
battery.
NOTE:
The left battery slot (when facing the front of
the cleaner) has priority over the right battery slot.
The right battery slot will only be identified as a power
source, either when no battery is installed in the
left battery slot or the battery in the left battery slot
becomes empty.
NOTE:
You can remove the battery from the left
battery slot and recharge it after the cleaner has
switched its power source from the left battery slot to
the right without ceasing operation. To give priority
back to the left battery slot after installing a recharged
battery, restart the cleaner.
With a single battery
Only one battery is required as a power source in either
the left or right battery slot. The cleaner automatically
determines which battery slot is available according to
operating conditions.
Installation and uninstallation
To install battery cartridges, release the lock first,
and open the battery cover. Then insert the battery
cartridges.
►
Fig.3:
1.
Lock
2.
Battery cover
Align the tongues on the battery cartridges with the
grooves in the battery housing and slip them into place.
Insert them all the way until they lock in place with a
little click.
Then lock the battery cover.
►
Fig.4:
1.
Battery cartridge
2.
Button
To remove the battery cartridges, slide them out of the
battery housing while pressing and holding the buttons
in front of the cartridges.
CAUTION:
Always install the battery cartridge
fully.
If not, it may accidentally fall out of the appli
-
ance, causing injury to you or someone around you.
CAUTION:
Do not install the battery cartridge
forcibly.
If the cartridge does not slide in easily, it is
not being inserted correctly.
NOTE:
When the cleaner switches the power source
from the first battery to the second, it may require a
temporary halt in operations, causing a slight loss of
suction. Please note that it is not malfunction so the
cleaner recovers and resumes operations immedi
-
ately after the pause.
Indicating the remaining battery
capacity
Press the check button on the battery cartridge to indi
-
cate the remaining battery capacity. The indicator lamps
light up for a few seconds.
►
Fig.5:
1.
Indicator lamps
2.
Check button
Indicator lamps
Remaining
capacity
Lighted
Off
Blinking
75% to 100%
50% to 75%
25% to 50%
0% to 25%
Charge the
battery.
The battery
may have
malfunctioned.
NOTE:
Depending on the conditions of use and the
ambient temperature, the indication may differ slightly
from the actual capacity.
NOTE:
The first (far left) indicator lamp will blink when
the battery protection system works.
Содержание VC005GLZ
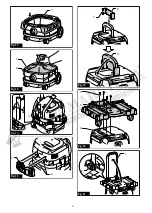
Страница 2: ...1 2 3 4 Fig 1 2 1 Fig 2 1 2 Fig 3 1 2 Fig 4 1 2 Fig 5 1 1 2 Fig 6 Fig 7 2 ...
Страница 3: ...1 3 2 Fig 8 1 2 3 4 Fig 9 Fig 10 1 2 3 Fig 11 1 2 3 4 5 6 6 6 Fig 12 1 4 2 3 Fig 13 1 2 3 Fig 14 3 ...
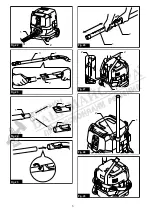
Страница 4: ...1 Fig 15 1 2 Fig 16 Fig 17 1 2 Fig 18 1 2 3 Fig 19 2 3 1 Fig 20 1 2 Fig 21 4 ...
Страница 5: ...1 2 Fig 22 1 3 2 Fig 23 1 2 3 Fig 24 Fig 25 2 1 Fig 26 1 2 2 Fig 27 2 1 Fig 28 Fig 29 5 ...
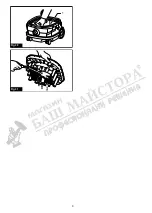
Страница 6: ...1 Fig 30 Fig 31 6 ...