Makita VC004GL Скачать руководство пользователя страница 22

22 ENGLISH

State of abnormality

Probable cause (malfunction)

Remedy

Cannot erase all tool registrations in 

the cleaner.

Pressing the wireless button on the tool. Press the wireless button on the cleaner for erasing 

all tool registrations.

The stand-by switch on the cleaner is 

not set to "AUTO".

Set the stand-by switch on the cleaner to "AUTO".

The wireless activation button is not 

held down correctly.

Hold down the wireless activation button for more 

than 6 seconds and then release it when the wire-

less activation lamp blinks in red. Hold down the 

wireless activation button for more than 6 seconds 

again until the wireless activation button rapidly 

blinks in red and then release the button.

MAINTENANCE

CAUTION:


Always be sure that the appliance 

is switched off and the battery cartridges are 

removed before attempting to perform inspection 

or maintenance.

NOTICE:


Never use gasoline, benzine, thinner, 

alcohol or the like. Discoloration, deformation or 

cracks may result.

To maintain product SAFETY and RELIABILITY, 

repairs, any other maintenance or adjustment should 

be performed by Makita Authorized or Factory Service 

Centers, always using Makita replacement parts.

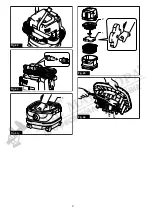
Storage of accessories

Accessories and attachments not in use, such as noz

-

zles and brushes, can be hooked and stored in the multi 

hook at the rear of the cleaner.

► 

Fig.40:


1.

 Multi hook 

2.

 Accessories and attach

-

ments not in use

Pipes (with an optional stopper installed) can be placed into 

the pipe holder when not using the cleaner for a short time.

► 

Fig.41:


1.

 Stopper (optional accessory) 

2.

 Pipe holder

A hose can be wrapped and stored around the housing 

or handle of the cleaner in large loops. Connect its both 

ends together to make loops and hook the loops onto 

the handle raised up. Alternatively, keep its root end 

installed in the hose inlet and hang the loops on the 

multi hook with the loose end tied up.

► 

Fig.42

► 

Fig.43

Cleaning of powder filter (HEPA) and 

prefilter

Clean out the powder filter, prefilter and damper at 

regular intervals since clogged filters and damper may 

result in poor suction performance.

Routinely wipe and shake dust off filters and damper 

by hand.

► 

Fig.44:


1.

 Prefilter

► 

Fig.45:


1.

 Damper 

2.

 Powder filter (HEPA)

Occasionally wash the powder filter in water, rinse and 

dry thoroughly in the shade before use. Never wash 

filters in a washing machine.

► 

Fig.46

NOTE:

 Do not rub or scratch the powder filter, the 

prefilter and the damper with hard objects such as a 

brush and a paddle.

NOTE:

 The filters wear out in course of time. It is 

recommended to have some spares for them.

OPTIONAL 

ACCESSORIES

CAUTION:


These accessories or attachments 

are recommended for use with your Makita tool 

specified in this manual.

 The use of any other 

accessories or attachments might present a risk of 

injury to persons. Only use accessory or attachment 

for its stated purpose.

If you need any assistance for more details regard

-

ing these accessories, ask your local Makita Service 

Center.

• 

Hose

• 

Front cuffs (22, 24, 38)


Straight pipe


Extension wand


Corner nozzle


Round brush

• 

Powder filter, HEPA (for dry dust)


Damper

• 

Prefilter


Nozzle assembly

• 

Bent pipe


Polyethylene bag


Paper pack

• 

MAKPAC adapter


Wireless unit


Makita genuine battery and charger

NOTE:

 Some items in the list may be included in the 

tool package as standard accessories. They may 

differ from country to country.

Содержание VC004GL

Страница 1: ...SANLEITUNG 39 IT Aspirapolvere a batteria ISTRUZIONI PER L USO 55 NL Accustofzuiger GEBRUIKSAANWIJZING 71 ES Aspiradora Inalámbrica MANUAL DE INSTRUCCIONES 87 PT Aspirador de Pó a Bateria MANUAL DE INSTRUÇÕES 103 DA Akku støvsuger BRUGSANVISNING 119 EL Φορητή σκούπα αναρρόφησης ΕΓΧΕΙΡΙΔΙΟ ΟΔΗΓΙΩΝ 133 TR Akülü Süpürge KULLANMA KILAVUZU 150 ...

Страница 2: ...2 1 2 3 4 5 Fig 1 2 1 Fig 2 1 2 Fig 3 1 2 Fig 4 1 2 Fig 5 1 1 2 Fig 6 Fig 7 ...

Страница 3: ...3 1 3 2 Fig 8 1 2 3 4 Fig 9 Fig 10 1 2 3 4 5 6 6 6 Fig 11 1 4 2 3 Fig 12 1 2 3 Fig 13 ...

Страница 4: ...4 1 Fig 14 1 2 Fig 15 Fig 16 1 2 Fig 17 1 2 3 Fig 18 2 3 1 Fig 19 1 2 Fig 20 ...

Страница 5: ...5 1 2 Fig 21 1 2 3 4 Fig 22 Fig 23 1 3 2 Fig 24 1 2 3 Fig 25 2 1 Fig 26 Fig 27 1 Fig 28 ...

Страница 6: ...6 1 2 3 4 Fig 29 1 2 3 Fig 30 1 Fig 31 2 1 2 1 Fig 32 Fig 33 1 Fig 34 ...

Страница 7: ...7 2 1 Fig 35 1 Fig 36 2 1 2 1 Fig 37 3 2 1 Fig 38 2 1 Fig 39 1 2 2 Fig 40 1 2 Fig 41 ...

Страница 8: ...8 Fig 42 Fig 43 1 Fig 44 1 2 Fig 45 Fig 46 ...

Страница 9: ...x 475 mm Rated voltage D C 36 V 40 V max Net weight 8 3 11 4 kg 8 6 11 7 kg Protection degree IPX4 Due to our continuing program of research and development the specifications herein are subject to change without notice Specifications and battery cartridge may differ from country to country The weight does not include accessories but battery cartridge s The lightest and heaviest combination weight...

Страница 10: ...rating cycle such as the times when the tool is switched off and when it is running idle in addition to the trigger time Vibration The vibration total value tri axial vector sum deter mined according to EN60335 2 69 Model VC002GL Vibration emission ah M 2 5 m s 2 or less Uncertainty K 1 5 m s 2 Model VC004GL Vibration emission ah M 2 5 m s 2 or less Uncertainty K 1 5 m s2 NOTE The declared vibrati...

Страница 11: ...he maintenance staff and others 22 The machine should be technically inspected by the manufacturer or an instructed person at least annually consisting of for example inspection of filters for damage air tightness of the machine and proper function of the control mechanism 23 When carrying out service or repair opera tions all contaminated items which cannot be satisfactorily cleaned are to be dis...

Страница 12: ...ngerous Goods Legislation requirements For commercial transports e g by third parties forwarding agents special requirement on pack aging and labeling must be observed For preparation of the item being shipped consult ing an expert for hazardous material is required Please also observe possibly more detailed national regulations Tape or mask off open contacts and pack up the battery in such a mann...

Страница 13: ...n 22 Do not leave the wireless unit in a dusty or powdery place or in a place corrosive gas could be generated 23 Sudden change of the temperature may bedew the wireless unit Do not use the wireless unit until the dew is completely dried 24 When cleaning the wireless unit gently wipe with a dry soft cloth Do not use benzine thin ner conductive grease or the like 25 When storing the wireless unit k...

Страница 14: ...y accidentally fall out of the appli ance causing injury to you or someone around you CAUTION Do not install the battery cartridge forcibly If the cartridge does not slide in easily it is not being inserted correctly NOTE When the cleaner switches the power source from the first battery to the second it may require a temporary halt in operations causing a slight loss of suction Please note that it...

Страница 15: ...emporary halt or stop in operation 1 Turn the appliance off and then turn it on again to restart 2 Charge the battery ies or replace it them with recharged battery ies 3 Let the appliance and battery ies cool down If no improvement can be found by restoring protection system then contact your local Makita Service Center Switch action Turning cleaner on 1 Turn the stand by switch in the I ON or AUT...

Страница 16: ...r pack holder 4 Dust intake Installing polyethylene bag With a polyethylene bag installed in the tank you can easily empty the tank without letting your hands dirty Lay a polyethylene bag over the tank and slip one side of the top edge of the bag at its open end in between the holder plate and the front wall of the tank Fig 13 1 Holder plate 2 Front wall of tank 3 Polyethylene bag Spread the other...

Страница 17: ...rk tools Country specific By connecting the vacuum cleaner to any available work tools compatible with the cleaner it works as a dust extractor for your power tools Select one of the front cuffs or joints optional acces sories as most suitable for your tool model Place the cuffs or joint as necessary between the front end of the cleaner hose and a dust extraction port of your tool Fig 22 1 Front c...

Страница 18: ...the wireless unit Dust or dirt may cause malfunction if it comes into the slot of the wireless unit NOTICE To prevent the malfunction caused by static touch a static discharging material such as a metallic part before picking up the wireless unit NOTICE When installing the wireless unit always be sure that the wireless unit is inserted in the correct direction and the lid is completely closed 1 Op...

Страница 19: ...y vary depending on the location and surrounding circumstances NOTE When two or more tools are registered to one cleaner the cleaner may start running even if you do not turn on the tool because other user is using the wireless activation function Cancelling tool registration for the cleaner Perform the following procedure when cancelling the tool registration for the cleaner 1 Install the wireles...

Страница 20: ...peration is performed for 2 hours When the tool is running The wireless activation of the cleaner is available and the tool is running Tool registration Green 20 seconds Ready for the tool registration Searching the tool to be registered 2 seconds The tool registration has been finished The wireless activation lamp will start blinking in blue Cancelling erasing tool registration Red slow 2 times s...

Страница 21: ...ation cancellation the switch of the tool is turned on or the power button on the cleaner is turned on Push the wireless activation button briefly and perform the tool registration cancellation procedures again The tool registration procedures for the tool or the cleaner has not finished Perform the tool registration procedures for the tool and the cleaner at the same timing Radio disturbance by o...

Страница 22: ...r A hose can be wrapped and stored around the housing or handle of the cleaner in large loops Connect its both ends together to make loops and hook the loops onto the handle raised up Alternatively keep its root end installed in the hose inlet and hang the loops on the multi hook with the loose end tied up Fig 42 Fig 43 Cleaning of powder filter HEPA and prefilter Clean out the powder filter prefi...

Отзывы: