9
FUNCTIONAL DESCRIPTION
CAUTION:
• Always be sure that the tool is switched off and
unplugged before adjusting or checking function on the
tool.
Shaft lock (Fig. 1)
CAUTION:
• Never actuate the shaft lock when the spindle is
moving. The tool may be damaged.
Press the shaft lock to prevent spindle rotation when
installing or removing accessories.
Switch handle mounting positions (Fig. 2)
The switch handle can be rotated to either 90° left or right
to fit your work needs. First, unplug the tool. Press the
lock button and rotate the switch handle to left or right
fully. The switch handle will be locked in that position.
CAUTION:
• Always make sure that the switch handle is locked in
the desired position before operation.
Switch action
CAUTION:
• Before plugging in the tool, always check to see that
the switch trigger actuates properly and returns to the
“OFF” position when released.
• Switch can be locked in “ON” position for ease of
operator comfort during extended use. Apply caution
when locking tool in “ON” position and maintain firm
grasp on tool.
(Fig. 3)
For tool with the lock-on switch
To start the tool, simply pull the switch trigger (in the B
direction). Release the switch trigger to stop. For
continuous operation, pull the switch trigger (in the B
direction) and then push in the lock lever (in the A
direction). To stop the tool from the locked position, pull
the switch trigger fully (in the B direction), then release it.
For tool with the lock-off switch
To prevent the switch trigger from accidentally pulled, a
lock lever is provided. To start the tool, push in the lock
lever (in the A direction) and then pull the switch trigger (in
the B direction). Release the switch trigger to stop.
For tool with the lock on and lock-off switch
To prevent the switch trigger from accidentally pulled, a
lock lever is provided. To start the tool, push in the lock
lever (in the A direction) and then pull the switch trigger (in
the B direction). Release the switch trigger to stop.
For continuous operation, push in the lock lever (in the A
direction), pull the switch trigger (in the B direction) and
then push the lock lever (in the A direction) further in.
To stop the tool from the locked position, pull the switch
trigger fully (in the B direction), then release it.
NOTE:
Models GA7030S, GA9030S, GA7040S, GA9040S,
GA7030SF. GA9030SF, GA7040SF and GA9040SF
begin to run slowly when they are turned on. This soft
start feature assures smoother operation.
ASSEMBLY
CAUTION:
• Always be sure that the tool is switched off and
unplugged before carrying out any work on the tool.
Installing side grip (handle) (Fig. 4)
CAUTION:
• Always be sure that the side grip is installed securely
before operation.
Screw the side grip securely on the position of the tool as
shown in the figure.
Installing or removing wheel guard (For
depressed center wheel, multi disc, wire
wheel brush/abrasive cut-off wheel,
diamond wheel)
WARNING:
• When using a depressed center grinding wheel/Multi-
disc, flex wheel or wire wheel brush, the wheel guard
must be fitted on the tool so that the closed side of the
guard always points toward the operator.
• When using an abrasive cut-off/diamond wheel, be
sure to use only the special wheel guard designed for
use with cut-off wheels. (In European countries, when
using a diamond wheel, the ordinary guard can be
used.)
For tool with locking screw type wheel guard (Fig. 5)
Mount the wheel guard with the protrusion on the wheel
guard band aligned with the notch on the bearing box.
Then rotate the wheel guard to such an angle that it can
protect the operator according to work. Be sure to tighten
the screw securely.
To remove wheel guard, follow the installation procedure
in reverse.
For tool with clamp lever type wheel guard (Fig. 6 & 7)
Loosen the lever on the wheel guard. Mount the wheel
guard with the protrusion on the wheel guard band aligned
with the notch on the bearing box. Then rotate the wheel
guard around to the position shown in the figure. Tighten
the lever to fasten the wheel guard. If the lever is too tight
or too loose to fasten the wheel guard, loosen or tighten
the nut to adjust the tightening of the wheel guard band.
To remove wheel guard, follow the installation procedure
in reverse.
Installing or removing depressed center
grinding wheel/Multi-disc (optional
accessory) (Fig. 8)
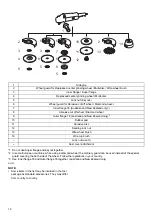
Mount the inner flange onto the spindle. Fit the wheel/disc
on the inner flange and screw the lock nut onto the
spindle.
To tighten the lock nut, press the shaft lock firmly so that
the spindle cannot revolve, then use the lock nut wrench
and securely tighten clockwise.
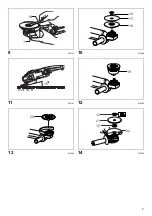
(Fig. 9)
To remove the wheel, follow the installation procedure in
reverse.
WARNING:
• Never use a more than 6.5 mm thick grinding wheel.
Содержание GA9030S
Страница 3: ...3 9 006738 10 010948 11 006741 12 010950 13 010949 14 010828 16 1 12 17 18 A B 15 19 20 12 21 15 22 ...
Страница 4: ...4 15 010946 16 006744 17 001146 18 006745 12 23 21 24 45 78 78 22 25 26 27 28 29 30 31 ...
Страница 38: ...38 5h6 5h6 6 Makita Z Z 4 7 Makita 7 56 Makita 5 7 56 7 B 7 56 5 56 6 Makita 5 ...
Страница 40: ...ALA Makita Corporation 3 11 8 Sumiyoshi cho Anjo Aichi 446 8502 Japan 884649C379 www makita com ...


