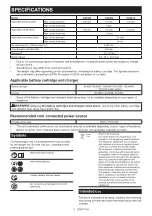
Makita GA041GZ02 Скачать руководство пользователя страница 2

2

ENGLISH

SPECIFICATIONS

Model:

GA039G

GA040G

GA041G

Applicable grinding wheel

Max. wheel diameter

100 mm

115 mm

125 mm

Max. wheel thickness

6 mm

Applicable cut-off wheel

Max. wheel diameter

100 mm

115 mm

125 mm

Max. wheel thickness

1.6 mm

Applicable wire wheel brush

Max. wheel diameter

-

115 mm

Max. wheel thickness

-

16 mm

No load speed (n

0

) / Rated speed (n)

8,500 min

-1

Overall length (with BL4040)

433 mm

Net weight

3.0 - 5.3 kg

Rated voltage

D.C. 36 V - 40 V max

• 

Due to our continuing program of research and development, the specifications herein are subject to change 

without notice.

• 

Specifications may differ from country to country.

• 

The weight may differ depending on the attachment(s), including the battery cartridge. The lightest and heavi

-

est combination, according to EPTA-Procedure 01/2014, are shown in the table.

Applicable battery cartridge and charger

Battery cartridge

BL4020 / BL4025* / BL4040* / BL4050F* / BL4080F

* : Recommended battery

Charger

DC40RA / DC40RB / DC40RC

• 

Some of the battery cartridges and chargers listed above may not be available depending on your region of 

residence.

WARNING:


Only use the battery cartridges and chargers listed above.

 Use of any other battery cartridges 

and chargers may cause injury and/or fire.

Recommended cord connected power source

Portable power pack

PDC01 / PDC1200

• 

The cord connected power source(s) listed above may not be available depending on your region of residence.

• 

Before using the cord connected power source, read instruction and cautionary markings on them.
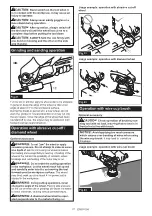
Symbols

The followings show the symbols which may be used 

for the equipment. Be sure that you understand their 

meaning before use.


Read instruction manual.

Wear safety glasses.

Always operate with two hands.

Do not use the wheel guard for cut-off 

operations.


Ni-MH

Li-ion

Only for EU countries

Due to the presence of hazardous com-
ponents in the equipment, waste electrical 
and electronic equipment, accumulators 

and batteries may have a negative impact 

on the environment and human health.
Do not dispose of electrical and electronic 
appliances or batteries with household waste!
In accordance with the European Directive 
on waste electrical and electronic equipment 
and on accumulators and batteries and 
waste accumulators and batteries, as well as 
their adaptation to national law, waste elec-
trical equipment, batteries and accumulators 

should be stored separately and delivered 

to a separate collection point for municipal 
waste, operating in accordance with the 
regulations on environmental protection.

This is indicated by the symbol of the 

crossed-out wheeled bin placed on the 
equipment.

Intended use

The tool is intended for grinding, sanding, wire brushing 
and cutting of metal and stone materials without the use 
of water.

Содержание GA041GZ02

Страница 1: ...INSTRUCTION MANUAL Cordless Angle Grinder GA039G GA040G GA041G ENGLISH Original instructions Read before use...

Страница 2: ...table power pack PDC01 PDC1200 The cord connected power source s listed above may not be available depending on your region of residence Before using the cord connected power source read instruction a...

Страница 3: ...tool is switched off and when it is running idle in addition to the trigger time Vibration The vibration total value tri axial vector sum determined according to EN62841 2 3 Work mode surface grindin...

Страница 4: ...d power tools Unmodified plugs and matching outlets will reduce risk of electric shock 2 Avoid body contact with earthed or grounded surfaces such as pipes radiators ranges and refrigerators There is...

Страница 5: ...s etc in accordance with these instructions tak ing into account the working conditions and the work to be performed Use of the power tool for operations different from those intended could result in...

Страница 6: ...y from work area Anyone entering the work area must wear personal protective equipment Fragments of workpiece or of a broken accessory may fly away and cause injury beyond immediate area of operation...

Страница 7: ...t off wheel from the cut while the wheel is in motion otherwise kickback may occur Investigate and take corrective action to eliminate the cause of wheel binding 4 Do not restart the cutting operation...

Страница 8: ...oring battery cartridge in a con tainer with other metal objects such as nails coins etc 3 Do not expose battery cartridge to water or rain A battery short can cause a large current flow overheating p...

Страница 9: ...10 The wireless unit is an accurate instrument Be careful not to drop or strike the wireless unit 11 Avoid touching the terminal of the wireless unit with bare hands or metallic materials 12 Always re...

Страница 10: ...ausing injury to you or someone around you CAUTION Do not install the battery cartridge forcibly If the cartridge does not slide in easily it is not being inserted correctly Indicating the remaining b...

Страница 11: ...ita Service Center Switch action CAUTION Before installing the battery car tridge into the tool always check to see that the slide switch actuates properly and returns to the OFF position when the rea...

Страница 12: ...ture Soft start feature reduces starting reaction ASSEMBLY CAUTION Always be sure that the tool is switched off and the battery cartridge is removed before adjusting or checking function on the tool I...

Страница 13: ...g to the work so that the oper ator can be protected Align the lock lever with one of the holes in the wheel guard and then release the lock lever to lock the wheel guard 2 1 A C C Fig 9 1 Wheel guard...

Страница 14: ...ng wheel Not available in some countries Fig 12 Installing wire cup brush Optional accessory CAUTION Do not use wire cup brush that is damaged or which is out of balance Use of dam aged brush could in...

Страница 15: ...not put your finger near the release lever while installing the X LOCK wheel It may pinch your finger NOTE No additional parts such as inner flanges or lock nuts are required to install or remove the...

Страница 16: ...ing wheel guard and a vacuum cleaner Refer to the instruction manual attached to the dust collecting wheel guard for assembling and using it 1 2 Fig 20 1 Dust collecting wheel guard 2 Hose of the vac...

Страница 17: ...depth of cut Overstressing the wheel increases the loading and susceptibility to twisting or binding of the wheel in the cut and the possibility of kickback wheel breakage and overheating of the motor...

Страница 18: ...t optional accessory A vacuum cleaner which supports the wireless activation function The overview of the wireless activation function setting is as follows Refer to each section for detail procedures...

Страница 19: ...If the hooks do not catch the wireless unit close the lid completely and open it slowly again Tool registration for the vacuum cleaner NOTE A Makita vacuum cleaner supporting the wireless activation...

Страница 20: ...forming two or more tool registra tions for one vacuum cleaner finish the tool registra tion one by one Starting the wireless activation function NOTE Finish the tool registration for the vacuum clean...

Страница 21: ...er to the table below for the meaning of the lamp status Status Wireless activation lamp Description Color On Blinking Duration Standby Blue 2 hours The wireless activation of the vacuum cleaner is av...

Страница 22: ...d then become red After that press the wireless activation button on the tool in the same way 1 1 2 2 Fig 37 1 Wireless activation button 2 Wireless activation lamp If the cancellation is performed su...

Страница 23: ...the power button on the vacuum cleaner is turned on Push the wireless activation button briefly and perform the tool registration cancellation procedures again The tool registration procedures for the...

Страница 24: ...r formed by Makita Authorized Service Centers always using Makita replacement parts Air vent cleaning The tool and its air vents have to be kept clean Regularly clean the tool s air vents or whenever...

Страница 25: ...thick ness greater than the maximum thickness as specified in SPECIFICATIONS the wires may catch on the guard leading to breaking of wires 2 6 7 4 5 5 2 2 8 10 9 3 1 Fig 40 Application 100 mm 4 model...

Страница 26: ...to persons Only use accessory or attachment for its stated purpose If you need any assistance for more details regard ing these accessories ask your local Makita Service Center Makita genuine battery...

Страница 27: ...27...

Страница 28: ...www makita com Makita Europe N V Makita Corporation 3 11 8 Sumiyoshi cho Anjo Aichi 446 8502 Japan Jan Baptist Vinkstraat 2 3070 Kortenberg Belgium 885968 225 EN 20211221...

Отзывы: