


10
Always stop tool operation and charge the battery
cartridge when you notice less tool power.
2.
Never recharge a fully charged battery cartridge.
Overcharging shortens the battery service life.
3.
Charge the battery cartridge with room
temperature at 10°C - 40°C (50°F - 104°F). Let a hot
battery cartridge cool down before charging it.
4.
Charge the battery cartridge if you do not use it for
a long period (more than six months).
FUNCTIONAL DESCRIPTION
CAUTION:
• Always be sure that the tool is switched off and the
battery cartridge is removed before adjusting or
checking function on the tool.
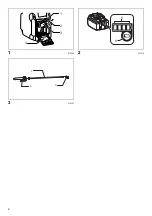
Installing or removing battery cartridge
(Fig. 1)
• Open Sprayer’s battery pack cover.
• Always switch off the tool before insertion or removal of
the battery cartridge.
• To remove the battery cartridge, withdraw it from the
tool while sliding the button on the front of the cartridge.
• To insert the battery cartridge, align the tongue on the
battery cartridge with the groove in the housing and slip
it into place. Always insert it all the way until it locks in
place with a little click. If you can see the red part on
the upper side of the button, it is not locked completely.
Insert it fully until the red part cannot be seen. If not, it
may accidentally fall out of the tool, causing injury to
you or someone around you.
• Do not use force when inserting the battery cartridge. If
the cartridge does not slide in easily, it is not being
inserted correctly.
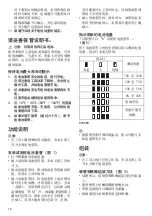
Indicating the remaining battery capacity
(Only for battery cartridges with “B” at the end of the
model number.)
(Fig. 2)
Press the check button on the battery cartridge to indicate
the remaining battery capacity. The indicator lamps light
up for few seconds.
015658
NOTE:
• Depending on the conditions of use and the ambient
temperature, the indication may differ slightly from the
actual capacity.
ASSEMBLY
CAUTION:
• Always be sure that the tool is switched off and the
battery cartridge is removed before carrying out any
work on the tool.
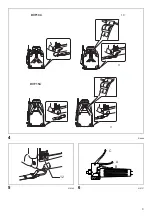
Spray pipe and nozzle assembly method
(Fig. 3)
• As shown in the diagram, assemble spray pipe and
then nozzle onto lever cock.
• Adjust direction of nozzle using nut on spray pipe.
• Firmly attach components to ensure there is no leaking.
• Select nozzle according to type of spraying to be done.
NOTE:
• All connector units use packing. Before assembly,
always check to see that the units have packing.
• Check to make sure that the spray hose is not cracked,
worn and/or damaged.
• Firmly tighten on the spray pipe to prevent liquid leaks.
• If there is a leak from a connector unit, tighten further
using a hand tool (by approximately 45 degrees).
• Do not use a spray pipe that is longer than the standard
one provided. Doing so may cause leaking from
connector units.
Back strap attaching method (Fig. 4)
Use the diagram pointers to attach the back strap at top
and bottom, making sure there are no twists in the strap.
NOTE:
• Check to make sure that back strap is securely
attached to chemical tank.
OPERATION
CAUTION:
• Before inserting the battery cartridge into the tool,
always check to see that the tool is switched off.
Spraying
CAUTION:
• To prevent sudden spraying, be sure to set the lever
cock to STOP, before turning sprayer switch ON or
OFF.
• When spray work is interrupted, be sure to turn switch
OFF, to prevent inadvertent spraying.
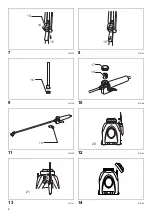
(Fig. 5)
Be sure to check the situation of surroundings before
turning sprayer switch ON.
Operate lever cock to spray.
Once spraying is complete, immediately set lever cock to
STOP, and then turn sprayer switch OFF.
How to use lever cock (Fig. 6)
1. Position “A” is the STOP position.
2. Position “B” is the spray position. Release the lever,
and it will return to position “A” and spraying will stop.
(Intermittent spraying)
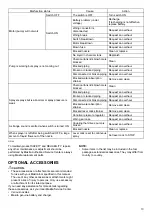
Indicator lamps
Remaining
capacity
Lighted
Off
Blinking
75% to 100%
50% to 75%
25% to 50%
0% to 25%
Charge the
battery.
The battery may
have
malfunctioned.
Содержание DVF104
Страница 2: ...2 1 012664 2 015676 3 010133 1 2 3 4 5 6 7 8 9 ...
Страница 3: ...3 4 014444 5 010143 6 010137 DVF104 DVF154 10 11 11 12 A B C ...
Страница 5: ...5 15 010145 22 ...
Страница 49: ...49 010146 S A d A S A d T Z Makita Makita 01 Q Makita S T Makita Q A e Q Makita S BC BZ O S BC S S E e BC ...
Страница 50: ...50 Q l T ...
Страница 51: ...51 ...
Страница 52: ...Makita Corporation 3 11 8 Sumiyoshi cho Anjo Aichi 446 8502 Japan 885323C372 www makita com ALA ...