13 ENGLISH
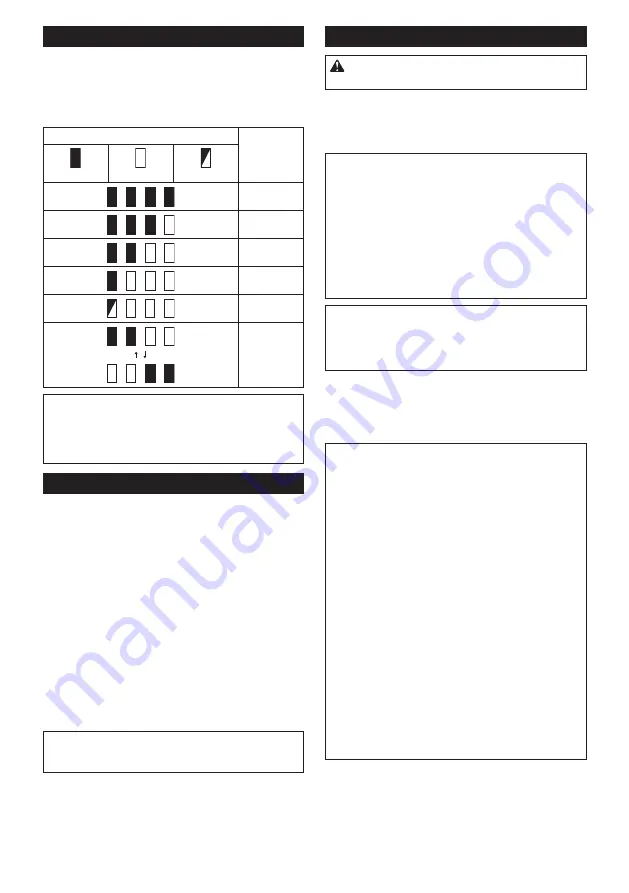
Indicating the remaining battery capacity
Only for battery cartridges with the indicator
►
Fig.4:
1.
Indicator lamps
2.
Check button
Press the check button on the battery cartridge to indi-
cate the remaining battery capacity. The indicator lamps
light up for a few seconds.
Indicator lamps
Remaining
capacity
Lighted
Off
Blinking
75% to 100%
50% to 75%
25% to 50%
0% to 25%
Charge the
battery.
The battery
may have
malfunctioned.
NOTE:
Depending on the conditions of use and the
ambient temperature, the indication may differ slightly
from the actual capacity.
NOTE:
The first (far left) indicator lamp will blink when
the battery protection system works.
Tool / battery protection system
The tool is equipped with a tool/battery protection sys-
tem. This system automatically cuts off power to the
motor to extend tool and battery life. The tool will auto-
matically stop during operation if the tool or battery is
placed under one of the following conditions:
Overload protection
When the battery is operated in a manner that causes it to
draw an abnormally high current, the tool automatically stops
and the main power lamp blinks in green. In this situation,
turn the tool off and stop the application that caused the tool
to become overloaded. Then turn the tool on to restart.
Overheat protection
When the tool or battery is overheated, the tool stops automat-
ically and the main power lamp lights up in red. In this case, let
the tool and battery cool before turning the tool on again.
NOTE:
In high temperature environment, the over-
heat protection likely to work and the tool stops
automatically.
Overdischarge protection
When the battery capacity is not enough, the tool stops
automatically and the main power lamp blinks in red. In
this case, remove the battery from the tool and charge
the battery.
Main power switch
WARNING:
Always turn off the main power
switch when not in use.
To turn on the tool, press the main power switch until
the main power lamp lights up in green. To turn off,
press the main power switch again.
►
Fig.5:
1.
Main power lamp
2.
Main power switch
NOTE:
The main power lamp blinks in green if the
switch trigger is pulled under unoperatable conditions.
The lamp blinks in one of the following conditions.
•
When you turn on the main power switch while
holding down the lock-off lever and the switch
trigger.
•
When you pull the switch trigger while the chain
brake is applied.
•
When you release the chain brake while holding
down the lock-off lever and pulling the switch
trigger.
NOTE:
This tool employs the auto power-off function.
To avoid unintentional start up, the main power switch
will automatically shut down when the switch trigger
is not pulled for a certain period after the main power
switch is turned on.
You can use the tool in the Torque Boost mode for
cutting thick branches or hard branches. To use the tool
in the Torque Boost mode, when the tool is turned off,
press the main power switch for a few seconds until the
main power lamp lights up in yellow.
NOTE:
You can use the tool in the Torque Boost
mode up to 60 seconds. Depending on the usage
conditions, this mode shifts to the normal mode in
less than 60 seconds.
NOTE:
If the main power lamp blinks in yellow when
you press the main power switch for a few seconds,
the Torque Boost mode is not available. In this case,
follow the steps below.
•
The Torque Boost mode is not available right
after the cutting operation. Wait for more than 10
seconds, and then press the main power switch
again.
•
If you use the Torque Boost mode several times,
the use of the Torque Boost mode is restricted to
protect the battery. If the Torque Boost mode is
not available after waiting for more than 10 sec-
onds, replace the battery cartridge with a fully
charged one, or recharge the battery cartridge.
NOTE:
If the main power lamp lights up in red or
blinks in red or green, refer to the instructions for tool/
battery protection system.
NOTE:
The Torque Boost mode cannot be used when
the battery cartridge BL1815N, BL1820, or BL1820B
is installed.
Содержание DUC254Z
Страница 2: ...2 Fig 1 1 2 3 4 5 6 12 13 14 7 8 10 9 11 16 17 18 15 Fig 2 1 2 3 Fig 3 1 2 Fig 4 ...
Страница 3: ...3 1 2 Fig 5 1 2 Fig 6 1 2 3 2 3 Fig 7 1 Fig 8 1 2 Fig 9 2 3 4 1 Fig 10 1 Fig 11 ...
Страница 4: ...4 1 2 Fig 12 1 Fig 13 1 2 3 Fig 14 1 Fig 15 1 2 Fig 16 1 2 Fig 17 Fig 18 Fig 19 ...
Страница 6: ...6 Fig 28 Fig 29 Fig 30 1 2 Fig 31 1 2 Fig 32 1 2 Fig 33 ...


