background image

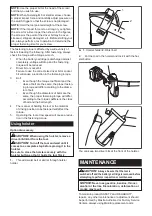
Installing hook

3

2

1

►  

1.

 Groove 

2.

 Hook 

3.

 Screw

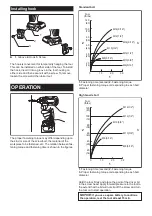
The hook is convenient for temporarily hanging the tool. 

This can be installed on either side of the tool. To install 

the hook, insert it into a groove in the tool housing on 

either side and then secure it with a screw. To remove, 

loosen the screw and then take it out.

OPERATION

The proper fastening torque may differ depending upon 

the kind or size of the screw/bolt, the material of the 

workpiece to be fastened, etc. The relation between fas

-

tening torque and fastening time is shown in the figures.

Standard bolt

N•

m

(ft•lbs)

2

1

2.0

1.0

3.0

0

100 

(72)

120 

(87)

80 

(58)

60 

(43)

40 

(29)

20 

(14)

M12

(1/2")

M14(9/16"

)

M10

(3/8")

M12

(1/2")

M14(9/16"

)

M10

(3/8")

M8(5/16"

)

M8(5/16"

)

3

1.

Fastening time (second) 

2.

 Fastening torque

3.

 Proper fastening torque corresponding to each bolt 

diameter

High tensile bolt

3

2

1

2.0

1.0

0

3.0

M10(3/8")

M12(1/2")

M12(1/2")

M8(5/16")

M8(5/16")

M10(3/8")

N•

m

(ft•lbs)

100 

(72)

120 

(87)

80 

(58)

60 

(43)

40 

(29)

20 

(14)

1.

Fastening time (second) 

2.

 Fastening torque

3.

 Proper fastening torque corresponding to each bolt 

diameter

Hold the tool firmly and place the point of the driver bit 

in the screw head. Apply forward pressure to the tool to 

the extent that the bit will not slip off the screw and turn 

the tool on to start operation.

NOTICE:


If you use a spare battery to continue 

the operation, rest the tool at least 15 min.

Содержание DT04Z

Страница 1: ...INSTRUCTION MANUAL Cordless Impact Driver DT04 IMPORTANT Read Before Using ...

Страница 2: ...not use any adapter plugs with earthed grounded power tools Unmodified plugs and matching outlets will reduce risk of electric shock 2 Avoid body contact with earthed or grounded surfaces such as pipes radiators ranges and refrigerators There is an increased risk of elec tric shock if your body is earthed or grounded 3 Do not expose power tools to rain or wet con ditions Water entering a power too...

Страница 3: ...ed Use of the power tool for operations different from those intended could result in a hazardous situation Battery tool use and care 1 Recharge only with the charger specified by the manufacturer A charger that is suitable for one type of battery pack may create a risk of fire when used with another battery pack 2 Use power tools only with specifically desig nated battery packs Use of any other b...

Страница 4: ...sing fires personal injury and damage It will also void the Makita warranty for the Makita tool and charger Tips for maintaining maximum battery life 1 Charge the battery cartridge before completely dis charged Always stop tool operation and charge the battery cartridge when you notice less tool power 2 Never recharge a fully charged battery cartridge Overcharging shortens the battery service life...

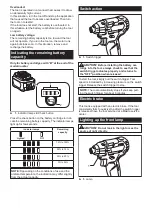
Страница 5: ...ndicator lamps light up for few seconds Indicator lamps Remaining capacity Lighted Off 75 to 100 50 to 75 25 to 50 0 to 25 NOTE Depending on the conditions of use and the ambient temperature the indication may differ slightly from the actual capacity Switch action 1 1 Switch trigger CAUTION Before installing the battery car tridge into the tool always check to see that the switch trigger actuates ...

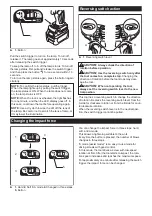
Страница 6: ...ore operation CAUTION Use the reversing switch only after the tool comes to a complete stop Changing the direction of rotation before the tool stops may dam age the tool CAUTION When not operating the tool always set the reversing switch lever to the neu tral position This tool has a reversing switch to change the direction of rotation Depress the reversing switch lever from the A side for clockwi...

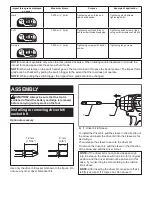
Страница 7: ...ger the impact force grade cannot be changed ASSEMBLY CAUTION Always be sure that the tool is switched off and the battery cartridge is removed before carrying out any work on the tool Installing or removing driver bit socket bit Optional accessory 12 mm 15 32 9 mm 3 8 Use only the driver bit socket bit shown in the figure Do not use any other driver bit socket bit 1 2 1 Driver bit 2 Sleeve To ins...

Страница 8: ... 2 1 2 0 1 0 3 0 0 100 72 120 87 80 58 60 43 40 29 20 14 M12 1 2 M14 9 16 M10 3 8 M12 1 2 M14 9 16 M10 3 8 M8 5 16 M8 5 16 3 1 Fastening time second 2 Fastening torque 3 Proper fastening torque corresponding to each bolt diameter High tensile bolt 3 2 1 2 0 1 0 0 3 0 M10 3 8 M12 1 2 M12 1 2 M8 5 16 M8 5 16 M10 3 8 N m ft lbs 100 72 120 87 80 58 60 43 40 29 20 14 1 Fastening time second 2 Fastening...

Страница 9: ...lt Even though the diameters of bolts are the same the proper fastening torque will differ according to the torque coefficient the class of bolt and the bolt length 4 The manner of holding the tool or the material of driving position to be fastened will affect the torque 5 Operating the tool at low speed will cause a reduc tion in the fastening torque Using holster Optional accessory CAUTION When ...

Страница 10: ...y or attachment for its stated purpose If you need any assistance for more details regard ing these accessories ask your local Makita Service Center Driver bits Socket bits Bit piece Holster Hook Plastic carrying case Makita genuine battery and charger NOTE Some items in the list may be included in the tool package as standard accessories They may differ from country to country Check out the colle...

Отзывы: