background image

22

E

D

Fuel

CAUTION:

This saw is powered by mineral-oil products (gasoline
(petrol) and oil).

Be especially careful when handling gasoline (petrol).

Avoid all flame or fire. Do not smoke (explosion hazard).

Fuel mixture

The engine of the chain saw is a high-efficiency two-stroke engine.
It runs on a mixture of gasoline and two-stroke engine oil.

The engine is designed for unleaded regular gasoline with a min.
octane value of 91 ROZ. In case no such fuel is available, you can
use fuel with a higher octane value. This will not affect the engine.

In order to obtain an optimum engine output and to protect
your health and the environment use unleaded fuel only.
Gasoline which contens alcohol should not used in
MAKITA products.

For lubricating the engine use a two-stroke engine oil (quality
grade: JASO FC or ISO EGD), which is added to the fuel. The
engine has been designed for use of MAKITA high-perform-
ance two-stroke engine oil and a mixture ratio of only 100:1 to
protect the environment. In addition, a long service life and
reliable operation with a minimum emission of exhaust gases
are ensured. MAKITA HP 100 high-performance two-stroke
engine oil is available in the following sizes:

0.5

l

order number  980 008 609

MAKITA high-performance two-stroke engine oil is available in
the following sizes to suit your individual requirements:

1

l

order number  980 008 607

100 ml

order number  980 008 606

In case MAKITA high-performance two-stroke engine oil is not
available, it is urgently recommended to use a mixture ratio of
40:1 with other two-stroke engine oils, as otherwise optimum
operation of the engine cannot be guaranteed.

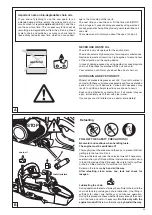
The correct mixture ratio:

50:1

when using MAKITA high-performance two-stroke en-
gine oil, i. e. mix 50 parts gasoline with 1 part oil.

100:1

when using MAKITA HP 100 high-performance two-
stroke engine oil, i. e. mix 100 parts gasoline with 1 part
oil.

40:1

when using other two-stroke engine oils, i. e. mix 40
parts gasoline with 1 part oil.

NOTE:

For preparing the fuel-oil mixture first mix the entire oil
quantity with half of the fuel required, then add the remaining
fuel. Thoroughly shake the mixture before filling it into the
chain saw tank.

It is not wise to add more engine oil than specified to
ensure safe operation. This will only result in a higher
production of combus-tion residues which will pollute
the environment and clog the exhaust channel in the
cylinder as well as the muffler. In addition, fuel con-
sumption will rise and performance will decrease.

The Storage of Fuel

Fuels have a limited storage life. Fuel and fuel mixtures age.
Therefore fuel and fuel mixtures, which have been stored
for too long, can cause starting problems. Purchase only
that amount of fuel, which will be consumed over the next
few months.

Store fuel safely in a dry place in approved containers
only.

AVOID SKIN AND EYE CONTACT

Mineral oil products degrease your skin. If your skin comes
in contact with these substances repeatedly and for an
extended period of time, it will desiccate. Various skin
deseases may result. In addition, allergic reactions are
known to occur.

Eyes can be irritated by contact with oil. If oil comes into your
eyes, immediately wash them with clear water.

If your eyes are still irritated, see a doctor immediately!

Chain oil

Use an oil with adhesive additive for lubricating the chain and
guide bar. The adhesive additive prevents the oil from being
flung off the chain too quickly.

We recommend the use of chain oil which is bio-degradable in
order to protect the environment. The use of bio-degradable oil
may even be required by local regulations.

The chain oil BIOTOP sold by MAKITA is made of special
vegetable oils and is 100% bio-degradable. BIOTOP has been
granted the "blue angel" (Blauer Umweltschutz-Engel) for
being particularly environment-friendly (RAL UZ 48).

BIOTOP chain oil is available in the following sizes:

  1 l order number  980 008 610

  5 l order number  980 008 611

Bio-degradable oil is stable only for a limited period of
time. It should be used within 2 years from the date of
manufacture (printed on the container).

1.0 Us-gal. (3.7 l)

3.2 floz.(94 cm

3

)

2.5 floz.(75 cm

3

)

1.3 floz.(38 cm

3

)

2.5 Us-gal. (9.4 l)

8.0 floz.(236 cm

3

) 6.4 floz.(189 cm

3

) 3.2 floz.(94 cm

3

)

5.0 Us-gal. (18.9 l) 16.0 floz.(473 cm

3

) 12.8 floz.(378 cm

3

) 6.4 floz.(189 cm

3

)

100:1

Gasoline

40:1

50:1

OIL

+

 other oil

MAKITA oil

MAKITA oil

OIL

50:1

HP 100

Содержание DCS510

Страница 1: ...d Safety Manual Improper use can cause serious injury The engine exhaust from this product contains chemicals known to the State of California to cause cancer birth defects or other reproductive harm Preserve this Manual carefully Owner s and Safety Manual for Gasoline Chain Saws DCS460 DCS510 ...

Страница 2: ...the nearest MAKITA Factory Service Center or service Center authorized by MAKITA Bring your sales receipts indicating date of purchase for this engine The dealer of service authorized by MAKITA will perform the necessary repairs or adjustments within a reasonable amount of time and furnish you with a copy of the repair order All parts and accessories replaced under this warranty become the propert...

Страница 3: ...ndard Institute B 175 1 2000 chain saw safety standard Canadian Standards Association Z62 1 03 chain saw safety standard Z62 3 04 chain saw kickback standard Society of Automotive Engineers SAEJ 335 Jun 95 Multiposition small engine exhaust system fire ignition suppression The Emissions Compliance Period referred to on the emission Compliance label indicates the number of operating hours for which...

Страница 4: ... for carburetor adjustment 8 Owner s and Safety Manual not shown Further symbols see page 6 Caution kickback Chain brake Fuel and oil mixture Normal Winter operation Carburetor adjustment Chain oil fill oil pump Saw chain oil adjustment screw First aid Recycling Read instruction manual and follow the warning and safety precautions Particular care and caution Forbidden Wear protective helmet eye an...

Страница 5: ...r the saw chain F Only use replacement bars and chains speci fied by the manufacturer or the equivalent Additional safety precautions The following additional safety precautions should be observed by all users of chain saws 1 Do not operate a chain saw when you are fatigued 2 Use safety footwear snug fitting clothing protective gloves and eye hearing and head protection devices 3 Use caution when ...

Страница 6: ... is 40 WARNING Prolongeduseofchainsawsexposingtheoperator to vibrations may produce Whitefinger disease Raynaud s phenomenon This phenomenon reduces the hand s ability to feel and regulate temperature produces numbness and burning sensations and may cause nerve and circulation damage and tissue necrosis All MAKITA saws are therefore provided with an antivibration system which is essential for thos...

Страница 7: ...ould be behind you fig 4 By vehicle When transporting in a vehicle keep chain and bar covered with the chain guard Properly secure your saw to prevent turnover fuel spillage and damage to the saw Make sure the saw in not exposed to heat or sparks Proper clothing Clothing must be sturdy and snug fitting but allow complete freedom of movement Avoid loose fitting jackets scarfs neckties jewelry flare...

Страница 8: ... the fuel tank while the engine is running Starting Do not drop start This method is very dangerous be cause you may lose control of the saw fig 6 WARNING Gasoline is an extremely flammable fuel Use extreme caution when handling gasoline or fuel mix Do not smoke or bring any sparks or flame near the fuel fig 5 Fueling instructions Fuel your chain saw in well ventilated areas or out doors Always sh...

Страница 9: ...ctions Always hold the saw firmly with both hands when the engine is running Place your left hand on the tubular handle and your right hand on grip and throttle lever Left handers should follow these instructions too WARNING Do not operate your chain saw in semi throttle position Cutting in this position does not permit the operator proper control of the saw or chain speed WARNING Never come too c...

Страница 10: ...tanding of the causes of these reactive forces may help you avoid loss of control The most common reactive forces are kickback pushback pull in In order to keep control of your saw always maintain a firm foothold Never work on a ladder in a tree or on any other insecure support Never use the saw above shoulder height fig 9 This reaction can occur in a fraction of a second and under some circumstan...

Страница 11: ...crease with the rate of impact The contact angle between the nose of the bar and the foreign object fig 11 Kickback is most pronounced in the upper quadrant of the bar nose MAKITA chain types are designed to reduce kickback forces The depth gauges Improper lowering of the depth gauges also increases the risk of a kickback Saw chain cutter sharpness WARNING A dull improperly sharpened chain may inc...

Страница 12: ...may also be prevented by using plastic wedges to open the kerf or cut Cutting techniques Felling Felling is cutting down a tree Before felling a tree consider carefully all conditions which may affect the direction of fall including The intended direction of the fall The neutral lean of the tree Any unusually heavy limb structure Surrounding trees and obstacles The wind direction and speed WARNING...

Страница 13: ...o the planned direction of the fall of the tree and at a 45 angle fig 19 An alternate path must also be selected Place all tools and equipment a safe distance away from the tree but not on the escape path Then determine the placement of the felling notch fig 21 The felling notch when properly placed de termines the direction in which the tree will fall It is made perpendicular to the line of fall ...

Страница 14: ...ter greater than the length of the guide bar requires use of either the sectioning or plunge cut method These methods are extremely dangerous because they involve the use of the nose of the guide bar and can result in kickback Only properly trained professionals should attempt these techniques For the sectioning method fig 24 make the first cut with the guide bar fanning in toward the hinge Then u...

Страница 15: ... ground fig 30 Always cut from the top of the limb Do not underbuck freely hanging limbs A pinch may result or the limb may fall causing loss of control If a pinch occurs stop the engine and remove the saw by lifting the limb WARNING Be extremely cautious when cutting limbs under tension The limbs could spring back toward the operator and cause loss of control of the saw or injury to the operator ...

Страница 16: ...r chains Keep the chain sharp You can spot a dull chain when easy to cut wood becomes hard to cut and burn marks appear on the wood Keep the chain at proper tension Tighten all nuts bolts and screws except the carburetor adjustment screws after each use Keep spark plug and wire connection tight and clean Store saws in a high or locked place away from children WARNING 5 Logs under strain require sp...

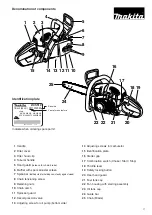
Страница 17: ...w steady against wood 8 Chain tensioning screw 9 Retaining nuts 10 Chain catch 11 Sprocket guard 12 Decompression valve 13 Adjusting screw for oil pump bottom side 14 Adjusting screws for carburetor 15 Identification plate 16 Starter grip 17 Combination switch Choke Start Stop 18 Throttle lever 19 Safety locking button 20 Rear hand guard 21 Fuel tank cap 22 Fan housing with starting assembly 23 Oi...

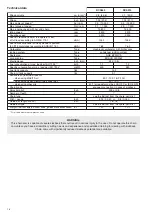
Страница 18: ...cording to ANSI B 175 1 db A 76 2 76 2 Carburetor Type diaphragm carburetor with limiter caps Ignition system Type condenser ignition system Spark plug Type NGK BPMR 7A or spark plug Type BOSCH WSR 6F Electrode gap inch mm 020 0 5 Fuel consumption at max load per ISO 7293 1 kg h 1 1 1 2 Specific consumption at max load per ISO 7293 1 g kWh 500 480 Fuel tank capacity floz 15 9 Chain oil tank capaci...

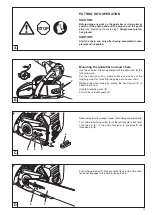
Страница 19: ...rench delivered with the chain saw for the following work Put the chain saw on a stable surface and carry out the following steps for mounting the guide bar and saw chain Release the chain brake by pulling the hand guard 1 in direction of arrow Unscrew retaining nuts 2 Pull off the sprocket guard 3 PUTTING INTO OPERATION CAUTION Before doing any work on the guide bar or chain always switch off the...

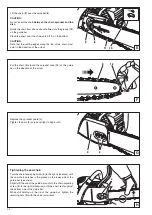
Страница 20: ...ong the top of the chain must point in the direction of the arrow Tightening the saw chain Turn the chain tensioning screw 4 to the right clockwise until the saw chain catches in the groove on the lower side of the guide bar see circle Slightly lift the end of the guide bar and turn the chain adjusting screw 4 to the right clockwise until the chain rests against the bottom side of the guide bar Wh...

Страница 21: ...gen cy IMPORTANT NEVER run the saw with the chain brake activated except for testing see Testing chain brake Doing so can very quickly cause extensive engine dama ge ALWAYS release the chain brake before starting the work Checking the chain tension The tension of the chain is correct if the chain rests against the bottom side of the guide bar and can still be easily turned by hand While doing so t...

Страница 22: ...e remaining fuel Thoroughly shake the mixture before filling it into the chain saw tank It is not wise to add more engine oil than specified to ensure safe operation This will only result in a higher production of combus tion residues which will pollute the environment and clog the exhaust channel in the cylinder as well as the muffler In addition fuel con sumption will rise and performance will d...

Страница 23: ...ain and guide bar as many such oils tend to leave sticky residues over time which can cause dam age to the oil pump or other parts The next time you use the saw fill the tank with BIOTOP chain oil again In case of damage caused by using waste oil or unappropriate chain oil the product guarantee will be null and void Your salesman will inform you about the use of chain oil chain oil fuel oil mixtur...

Страница 24: ...s does not constitute a defect Place the saw on a suitable surface To ensure troublefree operation of the oil pump the oil guide groove at the crank case 2 and the oil inlet bore in the guide bar 3 must be cleaned regularly Note After the saw has been turned off it is normal for residual chain oil to drip from the oil feed system the guide bar and the chain for a time This does not constitute a de...

Страница 25: ...ition CAUTION Do not pull the starter cable more than about 50 cm 20 out and let it back in slowly by hand Push in decompression valve 5 Move the combination switch 1 to the central ON position Pull the starter cable again quickly and firmly As soon as the engine is running grasp the rear handle the safety lock button 3 is actuated by the palm of the hand and press the throttle trigger 4 The half ...

Страница 26: ...ack on 6 Symbol on top when inserted Normal operation Symbol on top when inserted Winter operation D Checking the chain brake The chain brake must be checked before every use of the saw Start the engine as described above have a secure footing place the chain saw on the ground so that the chain and guide bar are not near anything Hold the front handle firmly with your other hand on the rear grip L...

Страница 27: ...ng insufficient fuel 1 Start engine and let it warm up 3 5 minutes 2 Set idle 3 Set highest permissible speed 4 Check acceleration 5 Check idle speed 2 Set idle Set the idle speed per the technical specifications Turning the adjusting screw S in clockwise increases the idle speed Turning it out counter clockwise lowers the idle speed The chain or blade must not move in idle 3 Set the top speed Set...

Страница 28: ... uneven sharpening of the chain Important Sharpen frequently but without removing too much metal Generally 2 or 3 strokes of the file will be enough Have the chain resharpened at a service center when you have already sharpened it yourself several times Proper sharpening CAUTION Use only chains and guide bars designed for this saw see the Extract from the spare parts list All cutters must be of th...

Страница 29: ...w teeth must be filed to the exact same shape as the used teeth including on their running surfaces File depending on chain type 10 to the guide bar A file holder makes file guidance easier It is marked for the correct sharpening angle of α 25 keep the marks parallel with the chain when filing see illustration and limits the cut depth to the correct 4 5 of the file diameter See Accessories for the...

Страница 30: ...wise until pin 3 of the chain tensioner is underneath the threaded pin 4 Remove the chain 5 and guide bar 6 NOTE Make sure there are no residues or foreign matter remaining in the oil guide groove 7 or on the chain tensioner 3 For replacing the guide bar chain and sprocket see PUTTING INTO OPERATION NOTE The chain brake is a very important safety device and like any other component subject to norm...

Страница 31: ... should be replaced at least at every second chain replacement To distribute the chain oil evenly run a new chain at half throttle for a few minutes before use New chains stretch so check the chain tension frequently see Checking the chain tension Instructions for changing the chain type Always wear protective gloves Before using a 3 8 saw chain be sure to first cut out the marked section of the c...

Страница 32: ...rty it can be washed in lukewarm water with regular dishwashing detergent Note that the fleece filter does not need to be cleaned until there is a noticeable loss of power If cleaning the filter does not bring an improvement in performance it is time to replace it Cleaning the nylon filter Use a soft brush or blow out dirt from the inside with compressed air If the filter is very dirty it can be w...

Страница 33: ... to remove the spark plug Electrode gap The electrode gap must be 020 0 5 mm Checking the ignition spark With the spark plug removed and the spark plug cap firmly seated use insulated pliers to hold the spark plug 8 against the cylinder not the spark plug hole Put combination switch 9 in the ON position Pull the starter cable hard If the function is correct an ignition spark must be visible near t...

Страница 34: ...left hand and with your right hand untwist the cable pull it tight and hold it Carefully release the cable drum The spring will wind the cable around the drum Repeat three or four times The starter grip should now be held upright on the fan housing NOTE With the cable pulled all the way out it must still be possible to turn the pulley another 1 4 turn against the return spring CAUTION Danger of in...

Страница 35: ...e the fan housing CAUTION To prevent eye injury always wear eye protec tion when cleaning the filter with compressed air The entire area 14 can now be brushed clean or cleaned with compressed air A bottle brush can come in handy for cleaning out the cylinder ribs 17 16 D Replacing cleaning the spark arrester screen The spark arrester screen should be checked and cleaned regulary Loosen the screw 1...

Страница 36: ...ry 32 Guide bar Check for damage clean oil intake bore 30 Guide bar support Clean in particular the oil guide groove 24 30 Idle speed Check chain must not run 27 Every week Fan housing Clean to maintain good cooling air flow 17 35 Cylinder area Clean to maintain good cooling air flow 35 Spark plug Check and replace if necessary 33 Muffler Check tightness of mounting Check screws 33 Spark arrester ...

Страница 37: ... by unskilled persons or inappropriate repairs Use of unsuitable spare parts or parts which are not original MAKITA parts insofar as they have caused the damage Use of unsuitable or old oil Damage related to conditions arising from lease or rent contracts Cleaning servicing and adjustment work is not covered by the guarantee All repairs covered by the guarantee must be performed by a MAKITA servic...

Страница 38: ...the spare parts list Use only original MAKITA parts For repairs and replacement of other parts see your MAKITA service center DCS460 DCS510 26 33 27 29 30 31 32 25 17 10 11 9 19 18 8 7 6 5 1 2 3 14 16 12 13 4 15 21 20 ...

Страница 39: ...el tank cap cpl 11 963 229 036 1 O Ring 29 3x3 6 mm 12 170 114 060 1 Oil tank cap cpl 13 963 225 030 1 O Ring 25x3 mm 14 965 603 021 1 Spark plug 15 108 164 020 1 Starter cable 3 5x980 mm 16 181 173 010 1 Air filter nylon 16 181 173 100 1 Air filter fleece 17 181 163 020 1 Return spring pack complete 18 181 223 310 1 Clutch drum cpl 325 7 tooth 181 223 320 1 Clutch drum cpl 3 8 7 tooth 19 927 408 ...

Отзывы: