background image

10 

1

2

3

4

5

6


014721 

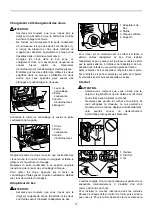
Pull the pusher from the slide door and then remove the 
stopper, sleeves and springs. 
After cleaning, install the whole parts into the slide door. 
To install them, take the following procedure. 

1. 

Install the large spring into the slide door. 

2.  Install the parts onto the pusher in the correct 

order, sleeve, small spring and then stopper. 

3.  Install the pusher with the other parts onto the 

slide door. 


NOTE: 

• 

When you pull out the pusher from the slide door, 
the parts in the slide door may bounce out. 

• 

When you install the pusher with the other parts to 
the slide door, make slight spaces between the 
pusher and sleeves. 

To maintain product SAFETY and RELIABILITY, repairs, 
any other maintenance or adjustment should be 
performed by Makita Authorized or Factory Service 
Centers, always using Makita replacement parts. 

OPTIONAL ACCESSORIES 


CAUTION: 

• 

These accessories or attachments are 
recommended for use with your Makita tool 
specified in this manual. The use of any other 
accessories or attachments might present a risk of 
injury to persons. Only use accessory or 
attachment for its stated purpose. 

If you need any assistance for more details regarding 
these accessories, ask your local Makita Service Center. 

• 

Nails 

• 

Makita genuine battery and charger 

• 

Safety goggles 


NOTE: 

• 

Some items in the list may be included in the tool 
package as standard accessories. They may differ 
from country to country. 

MAKITA LIMITED ONE YEAR WARRANTY

Warranty Policy

Every Makita tool is thoroughly inspected and tested 
before leaving the factory. It is warranted to be free of 
defects from workmanship and materials for the period 
of ONE YEAR from the date of original purchase. 
Should any trouble develop during this one year period, 
return the COMPLETE tool, freight prepaid, to one of 
Makita’s Factory or Authorized Service Centers. If 
inspection shows the trouble is caused by defective 
workmanship or material, Makita will repair (or at our 
option, replace) without charge.
This Warranty does not apply where:

IN NO EVENT SHALL MAKITA BE LIABLE FOR ANY 
INDIRECT, INCIDENTAL OR CONSEQUENTIAL 
DAMAGES FROM THE SALE OR USE OF THE 
PRODUCT. THIS DISCLAIMER APPLIES BOTH 
DURING AND AFTER THE TERM OF THIS 
WARRANTY.
MAKITA DISCLAIMS LIABILITY FOR ANY IMPLIED 
WARRANTIES, INCLUDING IMPLIED WARRANTIES 
OF "MERCHANTABILITY" AND "FITNESS FOR A 
SPECIFIC PURPOSE," AFTER THE ONE YEAR TERM 
OF THIS WARRANTY.
This Warranty gives you specific legal rights, and you 
may also have other rights which vary from state to 
state. Some states do not allow the exclusion or 
limitation of incidental or consequential damages, so 
the above limitation or exclusion may not apply to you. 
Some states do not allow limitation on how long an 
implied warranty lasts, so the above limitation may not 
apply to you.

repairs have been made or attempted by others:
repairs are required because of normal wear and 
tear:
the tool has been abused, misused or improperly 
maintained:
alterations have been made to the tool.


EN0006-1 

1. Pusher 
2. Sleeve 
3. Spring (large) 
4. Spring (small) 
5. Stopper 
6. Slide door 

Содержание DBN500Z

Страница 1: ...MANUAL MANUEL D INSTRUCTION MANUAL DE INSTRUCCIONES IMPORTANT Read Before Using IMPORTANT Lire avant usage IMPORTANTE Leer antes de usar Cordless Brad Nailer Cloueur Brad Sans Fil Clavadora Inalámbrica DBN500 014580 ...

Страница 2: ...d surfaces such as pipes radiators ranges and refrigerators There is an increased risk of electric shock if your body is earthed or grounded 6 Do not expose power tools to rain or wet conditions Water entering a power tool will increase the risk of electric shock 7 Do not abuse the cord Never use the cord for carrying pulling or unplugging the power tool Keep cord away from heat oil sharp edges or...

Страница 3: ...at is suitable for one type of battery pack may create a risk of fire when used with another battery pack 25 Use power tools only with specifically designated battery packs Use of any other battery packs may create a risk of injury and fire 26 When battery pack is not in use keep it away from other metal objects like paper clips coins keys nails screws or other small metal objects that can make a ...

Страница 4: ...uate the switch trigger and safety lever at the same time until you are prepared to fastener workpieces Allow the workpiece to depress the safety lever Never defeat its purpose by securing the safety lever back or by depressing it by hand 21 Never tamper with the safety lever Check the safety lever frequently for proper operations 22 Always remove fasteners from the tool when not in use SAVE THESE...

Страница 5: ...ol before installing or removing of the battery cartridge Hold the tool and the battery cartridge firmly when installing or removing battery cartridge Failure to hold the tool and the battery cartridge firmly may cause them to slip off your hands and result in damage to the tool and battery cartridge and a personal injury To remove the battery cartridge slide it from the tool while sliding the but...

Страница 6: ...r unmovable and let the tool cause no firing To lock the trigger set the lock button in the LOCK position Before nailing set the lock button in the FREE position When not in use always set it in the LOCK position and remove the battery cartridge from the tool Nailing mode selection 1 2 3 014618 The tool has two different nailing modes Select the desired nailing by the mode selecting button For mor...

Страница 7: ...mature wear and tear of the driver and damage of the other parts Do not use deformed connected nails Use nails specified in this manual Using nails other than those specified may cause nail jamming and breakage of the nailer 1 2 3 4 014585 Press the lock lever and open the slide door of the magazine 1 2 3 014592 Set the nail strip so that the nail tips touch the bottom of the magazine slit and sli...

Страница 8: ...repairs Before installing the battery cartridge into the tool always check to see that the switch trigger actuates properly and returns to the OFF position when released The tool must not operate only by pulling the trigger or only by placing the contact element against the work piece Driving nails CAUTION Always be sure to first place the contact element against the workpiece before pulling the t...

Страница 9: ...ving jammed nails 1 2 3 4 014591 Remove hex bolts they are securing the driver guide cover with the hex wrench Take the jammed nails from the nail guide groove that has appeared Secure the driver guide cover with hex bolts in the correct order Tighten the hex bolt A B and then C NOTE After securing the driver guide cover always make sure that the driver guide cover actuates properly If it does not...

Страница 10: ...TED ONE YEAR WARRANTY Warranty Policy Every Makita tool is thoroughly inspected and tested before leaving the factory It is warranted to be free of defects from workmanship and materials for the period of ONE YEAR from the date of original purchase Should any trouble develop during this one year period return the COMPLETE tool freight prepaid to one of Makita s Factory or Authorized Service Center...

Страница 11: ...l électrique Vous risquez de perdre la maîtrise de l outil si votre attention est détournée Sécurité en matière d électricité 4 Les fiches d outil électrique sont conçues pour s adapter parfaitement aux prises de courant Ne modifiez jamais la fiche de quelque façon que ce soit N utilisez aucun adaptateur de fiche sur les outils électriques avec mise à la terre En ne modifiant pas les fiches et en ...

Страница 12: ...ut réglage de changer un accessoire ou de ranger l outil électrique De telles mesures préventives réduisent les risques de démarrage accidentel de l outil électrique 20 Après l utilisation d un outil électrique rangez le hors de portée des enfants et ne laissez aucune personne l utiliser si elle n est pas familiarisée avec l outil électrique ou les présentes instructions d utilisation Les outils é...

Страница 13: ...ssurez vous que personne ne se trouve à proximité avant de l utiliser Ne tentez jamais de fixer des agrafes de l intérieur et de l extérieur d un mur simultanément Ils pourraient passer à travers et ou voler au hasard ce qui pourrait représenter un danger grave 12 Regardez où vous mettez les pieds et assurez vous d une prise équilibrée sur l outil Assurez vous qu il n y a personne en bas lorsque v...

Страница 14: ...e la vue 5 Ne court circuitez pas la batterie 1 Ne touchez les bornes avec aucun matériau conducteur 2 Évitez de ranger la batterie dans un conteneur avec d autres objets métalliques par exemple des clous des pièces de monnaie etc 3 Évitez d exposer la batterie à l eau ou à la pluie Un court circuit de la batterie pourrait provoquer un fort courant une surchauffe parfois des brûlures et même une p...

Страница 15: ...l est équipé d un système de protection de l outil de la batterie Ce système coupe automatiquement l alimentation du moteur pour augmenter la durée de vie de l outil et de la batterie L outil s arrête automatiquement pendant l utilisation lorsque l outil ou la batterie est dans l une des situations suivantes Dans certaines conditions les indicateurs s allument 1 014584 Protection contre la surchau...

Страница 16: ...tirés A B 1 A B 014601 Pour réduire la profondeur tournez le bouton d ajustement vers A comme sur l illustration Pour augmenter la profondeur tournez le bouton d ajustement vers B Ne tournez pas trop le bouton d ajustement car il pourrait se coincer Allumage de la lampe ATTENTION Evitez de regarder directement le faisceau lumineux ou sa source 1 2 3 014600 Pour allumer la lampe actionnez la gâchet...

Страница 17: ...pas le doigt sur la gâchette et que la batterie et les clous sont retirés avant d installer l adaptateur de bec 1 2 3 4 014586 Pour clouer sur un matériau dont la surface est facile à abîmer utilisez l adaptateur de bec Pour installer l adaptateur de bec posez le sur la plaque centrale de sorte que la partie saillante à l intérieur de l adaptateur de bec pénètre dans la fente du couvercle du guide...

Страница 18: ... réglez le bouton de verrouillage sur la position FREE Pour un clouage continu actionnez tout d abord la gâchette puis placez l élément de contact contre la pièce Pour l action suivante il n est pas nécessaire de relâcher la gâchette Pour le clouage intermittent placez l élément de contact contre la pièce puis appuyez sur la gâchette Pour l action suivante il est nécessaire de commencer par réinit...

Страница 19: ...d inspecter l appareil ou d effectuer une opération d entretien N utilisez jamais d essence de benzine de solvant d alcool ou d autres produits similaires Une décoloration une déformation ou la formation de fissures peuvent en découler Nettoyage du magasin Lorsque le poussoir du magasin ne se déplace pas aisément en présence de poussière de sable de copeaux ou d autre éléments étrangers nettoyez l...

Страница 20: ...à partir de la date de son achat initial Si un problème quelconque devait survenir au cours de cette période d un an veuillez retourner l outil COMPLET port payé à une usine ou à un centre de service après vente Makita Makita réparera l outil gratuitement ou le remplacera à sa discrétion si un défaut de fabrication ou un vice de matériau est découvert lors de l inspection Cette garantie ne s appli...

Страница 21: ...uriosos alejados mientras utiliza una herramienta eléctrica Las distracciones le pueden hacer perder el control Seguridad eléctrica 4 Las clavijas de conexión de las herramientas eléctricas deberán encajar perfectamente en la toma de corriente No modifique nunca la clavija de conexión de ninguna forma No utilice ninguna clavija adaptadora con herramientas eléctricas que tengan conexión a tierra pu...

Страница 22: ...r ajustes cambiar accesorios o guardar las herramientas eléctricas Dichas medidas de seguridad preventivas reducen el riesgo de que la herramienta se inicie accidentalmente 20 Guarde la herramienta eléctrica que no use fuera del alcance de los niños y no permita que las personas que no están familiarizadas con ella o con las instrucciones la operen Las herramientas eléctricas son peligrosas en man...

Страница 23: ...ento o tras haber finalizado la operación 11 Asegúrese que nadie está cerca antes de la operación Nunca intente la colocación de broches al mismo tiempo tanto de la parte interior como de la parte exterior de la pared Los broches podrían desgarrarse y o salir volando lo cual representa un serio peligro 12 Esté atento de pisar suelo firme y de mantener el equilibrio con la herramienta Asegúrese de ...

Страница 24: ...n agua limpia y consulte de inmediato a un médico Podría perder la visión 5 No cortocircuite el cartucho de batería 1 No toque las terminales con ningún material conductor 2 Evite guardar el cartucho de batería en un cajón junto con otros objetos metálicos tales como clavos monedas etc 3 No exponga la batería de cartucho a la lluvia o nieve Un corto circuito en la batería puede causar un flujo gra...

Страница 25: ...be a que no está siendo insertado correctamente Sistema de protección de la herramienta batería La herramienta está equipada con un sistema de protección de la herramienta batería Este sistema corta en forma automática el suministro de energía al motor para prolongar la vida útil de la herramienta y batería La herramienta se detendrá automáticamente durante el funcionamiento si la herramienta o la...

Страница 26: ...ste de la profundidad del clavado ADVERTENCIA Asegúrese siempre de que sus dedos no estén sobre el gatillo y que se hayan extraído el cartucho de batería y los clavos A B 1 A B 014601 Para lograr una profundidad más superficial gire el ajustador a una dirección A como se muestra en la figura Para lograr una profundidad mayor gire el ajustador a la dirección B No gire el ajustador demasiado pues po...

Страница 27: ...ción original hasta que la palanca de bloqueo la bloquee Para quitar los clavos presione la palanca de bloqueo y deslice la compuerta corrediza Extraiga los clavos de la ranura del cartucho Adaptador de nariz PRECAUCIÓN Asegúrese siempre de que los dedos no se ubiquen en el gatillo y que se extraiga el cartucho de batería y los clavos antes de instalar el adaptador de nariz 1 2 3 4 014586 Al clava...

Страница 28: ...lavado intermitente modo secuencial 1 2 014619 Para clavar un clavo ponga el botón de bloqueo en la posición FREE Libre Coloque el elemento de contacto contra la pieza de trabajo y luego tire del gatillo Libere el gatillo después de cada operación Clavado continuo intermitente modo continuo 1 2 014620 Cuando la herramienta se establece en el modo continuo puede operar el clavado continuo o intermi...

Страница 29: ...e han manipulado de manera brusca es posible que hayan perdido su forma o sus conectores se quiebren lo que causa una mala alimentación de los clavos Clavo Húmedo Caluroso 004311 Evite guardar clavos en un lugar húmedo o caluroso o colocarlos expuestos a la luz solar directa MANTENIMIENTO PRECAUCIÓN Asegúrese siempre de que la herramienta esté apagada y que el cartucho de batería y los clavos se h...

Страница 30: ...ía Cada herramienta Makita es inspeccionada y probada exhaustivamente antes de salir de fábrica Se garantiza que va a estar libre de defectos de mano de obra y materiales por el periodo de UN AÑO a partir de la fecha de adquisición original Si durante este periodo de un año se desarrollase algún problema retorne la herramienta COMPLETA porte pagado con antelación a una de las fábricas o centros de...

Страница 31: ...31 ...

Страница 32: ...polvos creados por el lijado aserrado esmerilado taladrado y otras actividades de la construcción contienen sustancias químicas reconocidas por el Estado de California como causantes de cáncer defectos de nacimiento y otros peligros de reproducción Algunos ejemplos de estos productos químicos son plomo de pinturas a base de plomo sílice cristalino de ladrillos y cemento y otros productos de albañi...

Отзывы: