


9
4.
Charge the battery cartridge once in every six
months if you do not use it for a long period of
time.
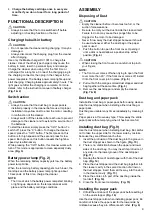
FUNCTIONAL DESCRIPTION
CAUTION:
• Always be sure that the tool is switched off before
adjusting or checking function on the tool.
Charging the built-in battery
CAUTION:
• Do not operate the cleaner during charging. It may be
damaged.
• Always disconnect the charging plug from the cleaner
after charging.
Use only the Makita charger DC1001 to charge this
cleaner. Use of the other type chargers may cause the
battery to burst, result in personal injury and damage.
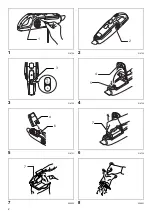
Charge the cleaner when using it for the first time or
uncharged for a long time. Connect the charging plug to
the charging connector, then plug in the charger to the
power receptacle. The battery power lamp lights up and
start charging. Charging takes approximately 3 hours. The
light goes out after the charging is complete. For more
details, refer to the instruction manual of battery charger.
(Fig. 1 & 2)
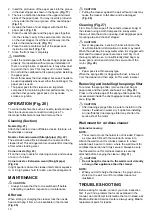
Switch action
CAUTION:
• Always be sure that the dust bag or paper pack is
installed properly in the cleaner before use. Improper
installation may allow dust to enter the motor, resulting
in malfunction of the cleaner.
• Always switch off the cleaner after each use to prevent
damage to the cleaner and to extend the service life of
the batteries.
To start the cleaner, simply press the “1/2/3” button. To
switch off, press the “0” button. To change the cleaner
speed, press the “1/2/3” button. The first press on this
button is for high speed and the second press for low
speed. Each press on this button repeats the high/low
speed cycle alternatively.
While pressing the “1/2/3” button, this cleaner works with
turbo. This mode is appropriate to clean especially dusty
area.
(Fig. 3)
Battery power lamp (Fig. 2)
When the remaining battery capacity gets low, the battery
power lamp blinks.
When the remaining battery capacity gets much lower, the
tool stops and the battery power lamp lights up about
10 seconds. At this time, charge the cleaner.
NOTE:
• The time at which the battery power lamp start blinking
or lighting up depends on the temperature at work
place and the battery cartridge conditions.
ASSEMBLY
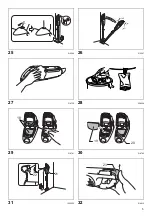
Disposing of Dust
CAUTION:
• Empty the cleaner before it becomes too full, or the
suction force weakens.
• Be sure to empty out the dust inside the cleaner itself.
Failure to do so may cause the sponge filter to be
clogged or the motor to be damaged.
• Never throw away the dust stopper because it should
be used whenever either the dust bag or the paper
pack is used.
1. Push the button to open the front cover. Opening it
until a click is heard allows a positive stop at that
position.
(Fig. 4)
CAUTION:
• When closing the front cover, be careful not to pinch
your fingers.
NOTE:
• The front cover comes off when trying to open the front
cover more than 90°. If the front cover comes off, install
it into the front cover joint in place.
(Fig. 5)
2. Pull out both the orange-colored dust stopper and dust
bag together at the same time.
(Fig. 6)
3. Remove the dust stopper and empty the cleaner.
(Fig. 7 & 8)
Dust bag and paper pack
Install either dust bag or paper pack before using cleaner.
Use the dust stopper when installing either dust bag or
paper pack.
Dust bag are usable many times repeatedly by cleaning it
out.
Paper pack is a throw-away type. Throw away the entire
paper pack without emptying when it has become full.
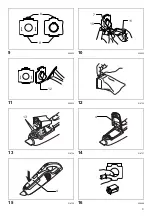
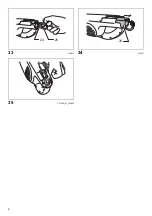
Installing dust bag (Fig. 9)
Use the dust stopper when installing dust bag. Be careful
not to take the upper side for the lower side by mistake
because they are different each other.
1. Insert the protrusion of the dust bag into the groove in
the dust stopper as shown in the figure.
(Fig. 10)
2. There is no distinction between the upper and lower
sides of the dust bag. You may insert its protrusion of
any side into the lower groove of the dust stopper.
(Fig. 11)
3. Overlap the frame of dust stopper with that of the dust
bag.
(Fig. 12)
4. Place the dust stopper and the dust bag together into
the cleaner cavity in the same direction of arrow on
the dust stopper. Insert them all the way into the slots
in the cleaner cavity.
(Fig. 13)
5. Place the entire cloth part of the dust bag inside the
tool itself.
(Fig. 14)
6. Close the front cover completely.
(Fig. 15)
Installing the paper pack
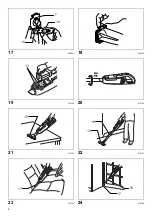
1. Unfold the entrance of the paper pack before setting it
on the dust stopper.
(Fig. 16)
Use the dust stopper also when installing paper pack. Be
careful not to take the upper side for the lower side by
mistake because they are different each other.
(Fig. 9)
Содержание CL105DWX
Страница 2: ...2 1 014724 2 014723 3 014725 4 014730 5 014731 6 014732 7 008920 8 008921 1 2 3 4 5 4 6 7 7 ...
Страница 5: ...5 25 015596 26 015597 27 014739 28 008934 29 014741 30 014742 31 1050602 32 014815 18 19 20 21 22 23 ...
Страница 6: ...6 33 014816 34 014817 35 CL105D_01_160823 24 25 26 ...
Страница 29: ...29 56 56 d 7 ...
Страница 30: ...30 ...
Страница 31: ...31 ...
Страница 32: ...Makita Corporation 3 11 8 Sumiyoshi cho Anjo Aichi 446 8502 Japan 885378C377 www makita com ALA ...