77 ENGLISH
(5).
Holes for securing the screws used to suspend
the unit
Use these holes for wall-mounting.
(6).
Dry cell cover
(7).
USB connector
(8).
SD card connector
This is not normally used; it will be used when
the functions of the Portable Battery Checker are
updated.
SDHC Logo is a trademark of SD-3C, LLC.
INSTALLATION
How to install and replace the dry
cells
CAUTION:
RISK OF EXPLOSION IF DRY
CELL IS REPLACED BY AN INCORRECT TYPE.
DISPOSE OF USED DRY CELLS ACCORDING TO
THE INSTRUCTIONS.
CAUTION:
Use new dry cells that are all
the same type.
Otherwise, electrolyte leakage or
malfunctioning may result.
CAUTION:
To push the tab of the dry cell
cover, use a slotted screwdriver or other such
tool.
You may injure yourself if you try using your
fingernail, etc., to push the tab of the dry cell cover.
NOTE:
Use alkaline dry cells. If manganese dry
cells are used, they may power the Portable Battery
Checker only for very brief periods of time. If
rechargeable cells are used, their remaining charge
will not be indicated correctly.
NOTE:
The dry cells are not included in some
countries. Prepare four 1.5V “AA” dry cells.
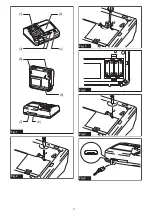
1.
Use a #1 Phillips (+) screwdriver to remove the
screw of the dry cell cover.
►
Fig.2
2.
Push the tab of the dry cell cover in the direction of
the arrow to remove the cover.
►
Fig.3
3.
Install the dry cells while ensuring that their “+”
and “–” terminals are aligned correctly.
►
Fig.4
4.
Attach the dry cell cover, and secure it using the
screw.
►
Fig.5
Supplying power using a USB
connection
This Portable Battery Checker can be operated using
power supplied by a USB connection. Supplying power
using a USB connection allows the Portable Battery
Checker to be operated without dry cells. When power
is supplied to the Portable Battery Checker using a
USB connection while dry cells are installed inside, the
power supplied using the USB connection takes priority.
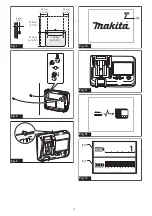
Open the USB connector cover, and connect the
Portable Battery Checker to a PC, AC adapter, etc.
using a USB cable.
►
Fig.6
NOTE:
Only connection to a USB micro type B plug
is possible.
NOTE:
The Portable Battery Checker may not operate
properly with some types of PCs or AC adapters.
Wall-mounting
CAUTION:
The total weight of the Portable
Battery Checker main unit and battery is approx.
2 kg. Reinforce the wall sufficiently if it is not
sturdy enough to support this weight.
CAUTION:
Carry out the mounting work with
the battery removed from the unit.
CAUTION:
Make sure that the screws to
secure the Portable Battery Checker are properly
fastened in the correct positions. There is a
possibility that the Portable Battery Checker will
fall off the wall when the battery is installed or
removed.
CAUTION:
If the mounting work is interrupted
or suspended at any interim point, the Portable
Battery Checker may fall off the wall. Follow the
mounting steps, and continue with the mounting
work as instructed until the work is completed.
NOTE:
Mount the Portable Battery Checker onto the
surface of a sturdy wall that has no protrusions that
could interfere with the job of mounting the Portable
Battery Checker or with the installation and removal
of the battery.
The Portable Battery Checker can be mounted on a wall
for use. To mount the unit on a wall, provide three wood
screws (6 mm x 40 mm (1/4″ x 1-9/16″) or longer) and a
screwdriver for tightening them up.
1.
Attach two of the screws horizontally at a distance
of 148 mm (5-13/16″) apart. Leave the screws with
their heads protruding by 6 mm (1/4″) or so from
the wall surface so that they will engage with the
hooks provided in the Portable Battery Checker.
Leave a larger space around the Portable Battery
Checker than the values in the figure.
►
Fig.7
2.
Mount the Portable Battery Checker so that its
hooks engage with the heads of the screws.
►
Fig.8

