P 10/13
R
epair
[3] DISASSEMBLY/ASSEMBLY
[3] -5. Armature
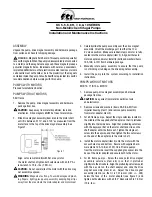
Fig. 33
Gear housing
complete
1) Remove Handles (R) and (L) and Gear housing cover section. (Figs. 6, 7 in page 4)
2) Remove Retaining ring S-8 from the shaft portion of Gear housing complete.
By tapping the end surface of Gear housing complete with plastic hammer, remove the assembly of reciprocating
mechanism (including Crank complete, Balance plate, Gear complete) from Gear housing complete. (Fig. 33)
3) Remove Gear housing complete from Motor section by unscrewing four 4x30 Tapping screws. (Fig. 34)
4) Remove Brush holder caps and Carbon brushes from Motor housing.
5) By unscrewing four 4x18 Tapping screws, Motor section can be disassembled as illustrated in Fig. 35.
Retaining ring S-8
Crank complete
Gear complete
Balance plate
Tapping screw 4x30 (4 pcs)
Motor section
Fig. 34
Fig. 35
Motor housing (R)
Armature
Yoke unit
Endbell complete
Tapping screw 4x18 (4 pcs)
DISASSEMBLING
assembly of
reciprocating mechanism
Motor housing (L)
Do the reverse of the disassembling steps.
Important:
Yoke unit is not reversible when assembled to Armature. Be sure to assemble so that the red mark of Yoke
unit is positioned on the drive-end side of Armature as illustrated to left in
Fig. 36.
Note 1: Because Armature is pulled strongly towards Yoke unit by the magnet force of Yoke unit;
1) Be sure to hold the gear portion of Armature as illustrated to left in
Fig. 37. Do not hold the Armature core
as illustrated to right or your fingers will be pinched between Yoke unit and the fan of Armature.
2) Be careful not to damage the copper wire of Armature.
ASSEMBLING
Fig. 36
Fig. 37
Your fingers can be pinched
and injured.
[Wrong]
[Correct]
[Wrong]
[Correct]
Red marking
Armature remains in
Motor section in this step.
Red marking