


11
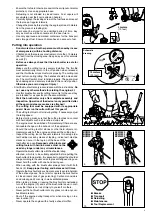
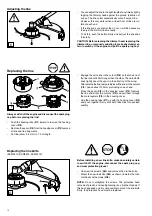
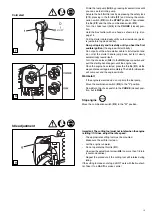
Installing the trimmer head
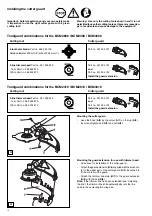
(BCM2310, BCM2610, BCM3310)
Always switch off the engine and
disconnect the spark plug cap
before mounting the trimmer head!
C
- Remove
fl
oating disc (
C/6
) and thrust washer (
C/5
).
- Insert the offset screwdriver 4 mm (
C/1
) through the wind-
ing guard and the locking disc into the opening (
C/3
) in the
angular gear (block the winding gear). If necessary turn the
mounting disc (
C/3
) slightly.
- Position the blade (
C/4
), thrust washer (
C/5
) and
fi
nally the
fl
oating disc (
C/6
) as shown.
- Screw down the locknut (
C/7
) and tighten it by turning the
combination wrench counter-clockwise.
Caution:
For safety reasons, after every 10 tool changes
the locknut (
C/7
) must be replaced with a new one. For the
order number, see the spare parts list at the end of this
manual.
- Remove Allen key and check for freedom of motion of the
cutting tool.
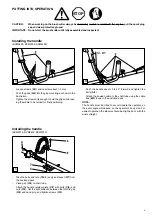
D
Mounting the 4-tooth star blade
(BCM2600, BCM3300, BCM4300)
Always switch off the engine and disconnect the spark plug
cap before mounting metal cutter blades! Wear protective
gloves!
- Place the mounting disc (
D/3
) on the shaft.
- Insert the 4 mm Allen key (
D/1
) through the winding guard
and the mounting disc (
D/3
) into the opening on the angle
gear (blocks the angle gear). If necessary turn the mounting
disc (
D/3
) slightly.
- Screw the trimmer head (
D/2
) onto the shaft by turning it
counter-clockwise.
- Now tighten the trimmer head by hand.
- Remove the Allen key and check for freedom of motion of
the trimmer head.
-
Unscrew the locknut (
C/7
) from the shaft by turning it clock-
wise. If necessary, block the angle gear (see below).
Note:
The locknut is provided with a left-hand thread!


