8
33. When use cut-off wheel, always work with the
dust collecting wheel guard required by domes-
tic regulation.
34. Cutting discs must not be subjected to any lat-
eral pressure.
35. Do not use cloth work gloves during operation.
Fibers from cloth gloves may enter the tool, which
causes tool breakage.
SAVE THESE INSTRUCTIONS.
WARNING:
DO NOT let comfort or familiarity with product
(gained from repeated use) replace strict adherence
to safety rules for the subject product. MISUSE or
failure to follow the safety rules stated in this instruc-
tion manual may cause serious personal injury.
FUNCTIONAL DESCRIPTION
CAUTION:
• Always be sure that the tool is switched off and
unplugged before adjusting or checking function on the
tool.
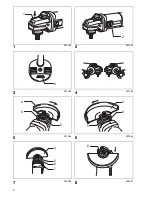
Shaft lock (Fig. 1)
CAUTION:
• Never actuate the shaft lock when the spindle is mov-
ing. The tool may be damaged.
Press the shaft lock to prevent spindle rotation when
installing or removing accessories.
Switch action (Fig. 2)
For tools with the lock-on switch
CAUTION:
• Before plugging in the tool, always check to see that
the slide switch actuates properly and returns to the
“OFF” position when the rear of the slide switch is
depressed.
To start the tool, slide the slide switch toward the “I (ON)”
position. For continuous operation, press the front of the
slide switch to lock it.
To stop the tool, press the rear of the slide switch, then
slide it toward the “O (OFF)” position.
For tools without the lock-on switch
CAUTION:
• Before plugging in the tool, always check to see that
the slide switch actuates properly and returns to the
“OFF” position when released.
To start the tool, slide the slide switch toward the “I (ON)”
position.
To stop the tool, release the slide switch toward the “O
(OFF)” position.
Speed adjusting dial (Fig. 3)
For 9561CVH, 9562CVH, 9564CV, 9565CV
The rotating speed can be changed by turning the speed
adjusting dial to a given number setting from 1 to 5.
Higher speed is obtained when the dial is turned in the
direction of number 5. And lower speed is obtained when
it is turned in the direction of number 1.
Refer to the table below for the relationship between the
number settings on the dial and the approximate rotating
speed.
010478
CAUTION:
• If the tool is operated continuously at low speeds for a
long time, the motor will get overloaded and heated up.
• The speed adjusting dial can be turned only as far as 5
and back to 1. Do not force it past 5 or 1, or the speed
adjusting function may no longer work.
The tools equipped with electronic function are easy to
operate because of the following features.
• Electronic constant speed control
Possible to get fine finish, because the rotating speed
is kept constantly even under the loaded condition.
• Soft start feature
Soft start because of suppressed starting shock.
• Overload protector
When the tool would be employed over the admissible
load, it will stop automatically to protect the motor and
wheel. When the load will come to the admissible level
again, the tool can be started automatically.
ASSEMBLY
CAUTION:
• Always be sure that the tool is switched off and
unplugged before carrying out any work on the tool.
Installing side grip (handle) (Fig. 4)
CAUTION:
• Always be sure that the side grip is installed securely
before operation.
Screw the side grip securely on the position of the tool as
shown in the figure.
Installing or removing wheel guard
(For depressed center wheel, multi disc /
abrasive cut-off wheel, diamond wheel)
For tool with locking screw type wheel guard
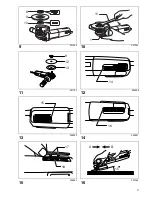
(Fig. 5 & 6)
WARNING:
• The wheel guard must be fitted on the tool so that the
closed side of the guard always points toward the oper-
ator.
• When using an abrasive cut-off / diamond wheel, be
sure to use only the special wheel guard designed for
use with cut-off wheels. (In some European countries,
when using a diamond wheel, the ordinary guard can
be used. Follow the regulations in your country.)
Mount the wheel guard with the protrusion on the wheel
guard band aligned with the notch on the bearing box.
Then rotate the wheel guard around 180 degrees clock-
wise or counterclockwise. Be sure to tighten the screw
securely.
To remove wheel guard, follow the installation procedure
in reverse.
Number min
–1
(R.P.M.)
1
2,800
2
4,000
3
6,500
4
9,000
5
12,000
Содержание 9561CH
Страница 4: ...4 17 18 19 22 23 014103 007365 010855 8 20 10 21 19 ...
Страница 86: ...86 ...
Страница 87: ...87 ...
Страница 88: ...884674G990 IDE Makita Jan BaptistVinkstraat 2 3070 Belgium Makita Corporation Anjo Aichi Japan www makita com ...

