6
FUNCTIONAL DESCRIPTION
CAUTION:
• Always be sure that the tool is switched off and
unplugged before adjusting or checking function on the
tool.
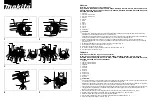
Switch action (Fig. 1)
CAUTION:
• Before plugging in the tool, always check to see the
switch trigger actuates properly and returns to the
“OFF” position when released.
To start the tool, simply pull the switch trigger. Release the
switch trigger to stop. For continuous operation, pull the
switch trigger and then push in the lock button.
To stop the tool from the locked position, pull the switch
trigger fully then release it.
ASSEMBLY
CAUTION:
• Always be sure that the tool is switched off and
unplugged before carrying out any work on the tool.
Installing or removing grinding wheel
CAUTION:
• Overtightening the wheel can cause breakage. Failure
to tighten sufficiently will cause flutter.
(Fig. 2 & 3)
Insert screwdriver into the hole in the inner flange. Grip
the hex nut with the wrench, turning in the direction of
wheel rotation to loosen the hex nut. Remove the hex nut,
outer flange and sleeve. Then install the wheel, outer
flange and hex nut. The sleeve is only used during
shipment. Discard it at this time.
Tighten the hex nut in the direction opposite of the wheel
rotation.
OPERATION
CAUTION:
• Apply light pressure on the tool. Excessive pressure on
the tool will only cause a poor finish and overloading of
the motor.
• The grinding wheel continues to rotate after the tool is
switched off.
Hanger (Fig. 4)
Continuous operation of the grinder is made easy by
using the handy hanger as shown in the figure. Simply
loop the cord over the head or shoulder, after threading it
through the eyelet on the top of the tool housing.
MAINTENANCE
CAUTION:
• Always be sure that the tool is switched off and
unplugged before attempting to perform inspection or
maintenance.
• Never use gasoline, benzine, thinner, alcohol or the
like. Discoloration, deformation or cracks may result.
Replacing carbon brushes (Fig. 5)
Remove and check the carbon brushes regularly. Replace
when they wear down to the limit mark. Keep the carbon
brushes clean and free to slip in the holders. Both carbon
brushes should be replaced at the same time. Use only
identical carbon brushes.
(Fig. 6)
Use a screwdriver to remove the brush holder caps. Take
out the worn carbon brushes, insert the new ones and
secure the brush holder caps.
To maintain product SAFETY and RELIABILITY, repairs,
any other maintenance or adjustment should be
performed by Makita Authorized Service Centers, always
using Makita replacement parts.
Содержание 9105
Страница 2: ...2 1 013342 2 013346 3 013344 4 013347 5 001145 6 013343 1 2 3 4 4 5 6 7 3 8 9 10 11 ...
Страница 21: ...21 ...
Страница 22: ...22 ...
Страница 23: ...23 ...
Страница 24: ...ALA Makita Corporation Anjo Aichi Japan 883073 373 www makita com ...


