background image


Section 2.  Installation 


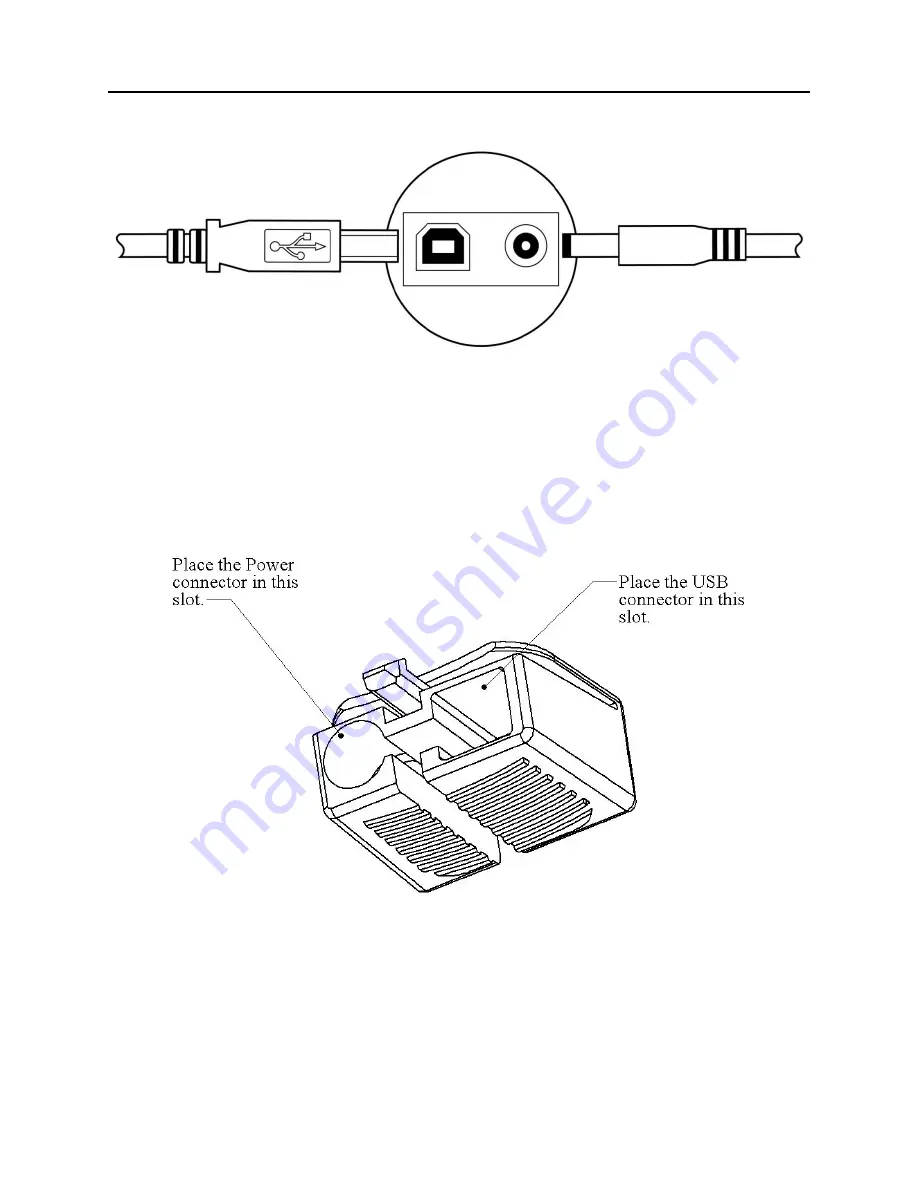
Figure 2-3.  ImageSafe Connections 


Note:

 An optional strain relief clip can be installed to securely attach the USB and power supply 

cable to the ImageSafe chassis. To install the clip insert the cables into the retaining clip 
and then plug the clip with cables into the ImageSafe. Figure 2-4 shown below indicates 
the correct location for each cable. 


Figure 2-4.  ImageSafe Cable Clip 


Содержание IMAGESAFE

Страница 1: ...ND DUAL SIDED CHECK SCANNER INSTALLATION AND OPERATION MANUAL Manual Part Number 99875472 2 FEBUARY 2010 REGISTERED TO ISO 9001 2008 1710 Apollo Court Seal Beach CA 90740 Phone 562 546 6400 Tech Suppo...

Страница 2: ...ed or transmitted in any form or by any means electronic or mechanical for any purpose without the express written permission of MagTek Inc MagTek is a registered trademark of MagTek Inc ImageSafe is...

Страница 3: ...to the warranty service location and to use the original shipping container or equivalent MagTek will return the product prepaid via a three 3 day shipping service A Return Material Authorization RMA...

Страница 4: ...atus does not exceed the Class B limits for radio noise from digital apparatus set out in the Radio Interference Regulations of the Canadian Department of Communications Le pr sent appareil num rique...

Страница 5: ...Agreement due to Licensee s failure to comply Licensee agrees to return the Software to Licensor Receipt of returned Software by the Licensor shall mark the termination LIMITED WARRANTY Licensor warra...

Страница 6: ...vi...

Страница 7: ...TORS 11 CLEANING 11 Opening the Unit 12 Cleaning Check Path and Scan Bars 13 Closing the Unit 17 SECTION 4 TROUBLESHOOTING GUIDE 19 REQUIREMENTS 19 SET UP 19 TROUBLESHOOTING 19 APPENDIX A CHECK READIN...

Страница 8: ...2 MagneSafe Reader Swipe 10 Figure 3 3 Opening the Unit 12 Figure 3 4 Cleaning Check Path and Scan Bars 13 Figure 3 5 Activating the Cleaning Swab 14 Figure 3 6 Cleaning the First Scan Bar 15 Figure...

Страница 9: ...The ImageSafe Scanner also offers an integrated MagneSafe secure card reader to secure card based payment transactions by encrypting the encoded card holder date on debit credit and gift cards The Ma...

Страница 10: ...h EXIF tags BMP Image compression CCITT G4 or JPEG Ability to capture up to four images per check SHA1 digital signature for image file authentication MagneSafe secure card reader LED indicator to pro...

Страница 11: ...0 000 passes Document Speed 10 ips Document Size 4 x 9 Maximum 3 x 2 625 Minimum Image Resolution 200 dpi MICR fonts supported E13 B CMC 7 Interface Options USB 2 0 or USB 1 1 MECHANICAL Dimensions Le...

Страница 12: ...ImageSafe 4...

Страница 13: ...e ImageSafe Scanner to a computer Failure to perform this step will prevent the ImageSafe application from installing properly Figure 2 1 ImageSafe Component Identification REQUIREMENTS The following...

Страница 14: ...e 3 On the AC power adapter connect the plug to wall outlet 4 The LED indicator on the ImageSafe Scanner should turn on to a steady green The LED indicator on the ImageSafe Scanner is located on the s...

Страница 15: ...installed to securely attach the USB and power supply cable to the ImageSafe chassis To install the clip insert the cables into the retaining clip and then plug the clip with cables into the ImageSafe...

Страница 16: ...ImageSafe 8...

Страница 17: ...2 Place the check so the leading edge is in the open slot Slide the check forward 3 When the ImageSafe Scanner detects the presence of the check the motor will turn on At this time press the check fo...

Страница 18: ...unit and toward the wide color stripe on the MagneSafe reader as indicated in Figure 3 2 2 Slide the card in one motion from the top of the unit down through the slot as indicated in the illustration...

Страница 19: ...ady to process check scan or card swipe Collected data is valid and correct BLINKING AMBER Check is being processed SOLID RED Error collecting data or data is invalid BLINKING RED Paper Jam Refer to S...

Страница 20: ...To open the check path and gain access to the Scan Bars grip the ImageSafe Scanner hold the unit as shown in Figure 3 3 Press the access latch button with your thumb and the access door will pop open...

Страница 21: ...the check path access door is open as shown in Figure 3 4 check the path for debris To clean turn the unit over and tap gently on the bottom Figure 3 4 Cleaning Check Path and Scan Bars 2 Check the s...

Страница 22: ...ars use the cleaning swab shown in Figure 3 5 Activate the swab by bending the plastic tube until you hear a snap 4 Wait until the liquid moves into the sponge tip It should be damp when touched Figur...

Страница 23: ...Section 3 Operation 15 5 When the tip of the swab is damp clean the first scan bar by wiping the swab up and down the scan bar surface as indicated in Figure 3 6 Figure 3 6 Cleaning the First Scan Bar...

Страница 24: ...ImageSafe 16 6 After cleaning the first scan bar clean the second scan bar by again wiping the swab up and down the scan bar surface as indicated in Figure 3 7 Figure 3 7 Cleaning the Second Scan Bar...

Страница 25: ...s shown in Figure 3 8 Push the rear access door closed with the right hand while holding on the opposite side with the left hand 2 The unit is properly closed when the two panels are flush and the lat...

Страница 26: ...ImageSafe 18...

Страница 27: ...r to the ImageSafe Scanner Possible causes for this problem are AC adapter connection to outlet make sure the AC adapter is securely connected to outlet on the wall or power strip AC adapter connectio...

Страница 28: ...es for this problem are Interference the ImageSafe may be too close to a monitor AC adapter or magnetic device Move the ImageSafe away from the source of interference Printing problem the check being...

Страница 29: ...by dust build up or foreign debris see Figure 4 1 for sensor location or an error occurred when the MICR card data was read To resolve the issue try reinserting the check or re swiping the card if thi...

Страница 30: ...step 09 09 Cable problem Possible causes for this problem are Loose connection the cable connector on the PC or the ImageSafe Scanner may be loose Make sure that both connectors are tightly connected...

Страница 31: ...onnected The computer is turned off Sensor board is damaged Power connection failure The ImageSafe Scanner has a problem that needs further analysis testing and possibly repair Please contact the MagT...

Страница 32: ...ImageSafe 24...

Страница 33: ...s used in the US Canada Australia United Kingdom Japan India Mexico Venezuela Colombia and the Far East The CMC 7 set is used in France Spain other Mediterranean countries and most South American coun...

Страница 34: ...nnumeric Characters CMC 7 Character MICRImage Reader Output SI A SII B SIII C SIV D SV E CHECK LAYOUTS Personal checks with MICR fields are shown in Figure A 1 Business checks are shown in Figure A 2...

Страница 35: ...the checks on the illustration and represent the 4 MICR fields 1 Transit Field The Transit field is a 9 digit field bracketed by two Transit symbols The field is subdivided as follows Digits 1 4 Feder...

Страница 36: ...r and or a transaction code Note that an On Us symbol must always appear to the right of the account number 3 Amount Field The Amount field is a 10 digit field bracketed by Amount symbols The field is...

Страница 37: ...ftware follow the steps below 1 Insert the installation software CD into your computer s CD ROM or download software directly from the MagTek website www magtek com the installation application will a...

Страница 38: ...ck the options you wish to install and press Next to proceed with the installation 3 The next step in to select the software installation location Press Browse to select a location or press Next to ex...

Страница 39: ...Appendix B Demo Software and USB Drivers 31 4 The ImageSafe software is now installed press Finish to complete the installation process...

Страница 40: ...art button Then navigate to the demo program by clicking on All Prorgams MagTek Excella STX and Excella STX Demo exe When the Demo program is selected the window below will be shown Select ImageSafe I...

Страница 41: ...________________________________________________________________ ______________________________________________________________________________ ________________________________________________________...

Отзывы: