


Repair
Revision 001
7-13
Model TE100
Electronic Small Bagging Scale
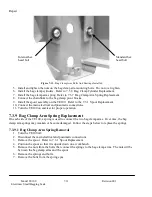
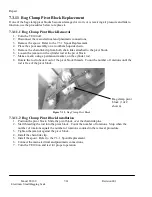
7.3.9.2 Bag Clamp Arm Spring Installation
1. Insert the bolts through the spring eyes.
2. Insert the bolts through the spring mounting bolts in the bag clamp arms.
3. Install and tighten the nuts on the bolts.
4. Install the spout. Refer to 7.3.1 Spout Replacement.
5. Connect the main electrical and pneumatic connections.
6. Turn the TE100 on and test for proper operation.
7.3.10 Bag Clamp Cylinder Replacement
If one of the bag clamp cylinders develops a leak, or is receiving air pressure and fails to function, use
the procedures below to replace it.
7.3.10.1 Bag Clamp Cylinder Removal
1. Turn the TE100 off.
2. Disconnect the main electrical and pneumatic connections.
3. Remove the spout. Refer to the 7.3.1 Spout Replacement.
4. Place the spout assembly on a workbench upside down.
5. Remove the bag clamp cylinder quick connect fittings. This is done from the outside of the
spout.
6. Loosen the jam nut on the cylinder rod at the pivot block.
7. Make a mark, using a permanent marker, on the cylinder rod.
8. Rotate the rod to back it out of the pivot block threads. Count the number of rotations until the
rod is free of the pivot block.
9. Loosen and remove the cylinder mounting bolt.
10. Remove the cylinder.
7.3.10.2 Bag Clamp Cylinder Installation
1. Make a mark on the cylinder rod of the cylinder, near the threads.
2. Make sure that there is a jam nut on the threaded end of the rod. Make sure that the jam nut is
turned all the way onto the rod.
3. Position the bag clamp cylinder with the mounting tab in the mounting bracket inside the scale
cabinet. Also, make sure that the two pneumatic ports are visible through the port holes in the
scale cabinet.
4. Install and tighten the cylinder mounting bolt.
5. Insert the tip of the rod into the pivot block.
6. Start threading the rod into the pivot block. Count the number of rotations. Stop when the
number of rotations equals the number of rotations counted in the removal procedure.
7. Tighten the jam nut against the pivot block.
8. Install the two pneumatic quick connect fittings into the ports on the cylinder. Refer to 7.3.12
Pneumatic Quick Connect Fitting Replacement
9. Install the spout. Refer to the 7.3.1 Spout Replacement.
10. Connect the main electrical and pneumatic connections.
11. Turn the TE100 on and test for proper operation.
Содержание TE100
Страница 1: ...Taylor Products Model TE100 Electronic Small Bagging Scale Operation and Maintenance Manual ...
Страница 6: ...Model TE100 Electronic Small Bagging Scale iv Revision 001 This Page Intentionally Left Blank ...
Страница 14: ...Model TE100 Electronic Small Bagging Scale xii Revision 001 This Page Intentionally Left Blank ...
Страница 58: ...Troubleshooting Model TE100 Electronic Small Bagging Scale 6 4 Revision 001 This Page Intentionally Left Blank ...
Страница 76: ...Glossary Model TE100 Electronic Small Bagging Scale Glossary 2 Revision 001 This Page Intentionally Left Blank ...
Страница 78: ...Index Model TE100 Electronic Small Bagging Scale Index 2 Revision 001 This Page Intentionally Left Blank ...
Страница 80: ...Appendix A Model TE100 Electronic Small Bagging Scale A 2 Revision 001 This Page Intentionally Left Blank ...
Страница 82: ...Appendix B Model TE100 Electronic Small Bagging Scale B 2 Revision 001 This Page Intentionally Left Blank ...
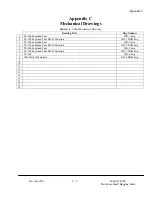
Страница 84: ...Appendix C Model TE100 Electronic Small Bagging Scale C 2 Revision 001 This Page Intentionally Left Blank ...
Страница 86: ......
Страница 88: ......
Страница 90: ......
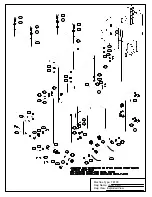
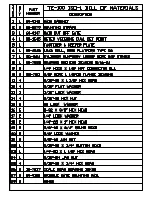
Страница 91: ...Machine Type TE100 Dwg Name ISO 4 dwg Dwg View Scale Cabinet Exploded View ...
Страница 92: ......
Страница 94: ...Appendix D Model TE100 Electronic Small Bagging Scale D 2 Revision 001 This Page Intentionally Left Blank ...
Страница 95: ...Machine Type TE100 Dwg Name ECT146ASY dwg Dwg View Controller Circuit Board ...
Страница 98: ...This Page Intentionally Left Blank ...


