background image


3.0


 Using Your Bike


3.1


Riding your bike


Before riding, make sure that you activate 

the battery by switching the key to the ON 

position. 


The LED lights located on top of the battery 

indicate its current charge level.  

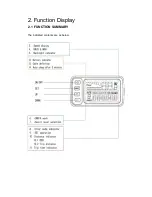
Turn on the display unit that is on the 

handlebars (see 1.3). 


Select your desired level of assistance and begin to pedal. 


You’ll find that the motor will engage as soon as you start pedaling. 

WARNING: Turning the pedals one half of a rotation will immediately engage the motor. Beware 

not to turn the pedals while the unit is powered on when not riding.  


When you use the brakes, the electronic brake sensor located on the brake levers will 

immediately cut the power to the motor for added safety. 
The left brake lever controls the front brake while the right brake lever controls the rear 

brake. 


You  can  also  use  your  bike  without  any electric assistance  by  turning  off  the battery 

(switching  the  key  to  OFF)   or  by  adjusting  the  assistance  level  on your LCD display 

to 0.  The motor will then feature zero resistance and you’ll be freewheeling. Select the 

appropriate mechanical gear by activating the 7 speed gear lever located on the right 

hand side of the handlebar.  


3.2


Adjusting the height of the seat and handlebar


The height of your seat can be adjusted:


Release or open the lever, adjust the seat height to the desired 

position 

without ever exceeding the mark carved onto the 

seat’s tube

 then close the lever returning it tightly to the locked 

position. The seat’s height should be set so that your legs can be 

extended comfortably when the corresponding pedal is in the 

lowest position. 


Содержание Premium 48V

Страница 1: ......

Страница 2: ...8 Riding Your Bike 9 Adjusting the Seat Handlebar 9 Kickstand Lights 10 Lubrication Maintenance Schedule 11 Service checklist 12 Folding your bike 13 Installing Charging the Battery 14 Battery Info S...

Страница 3: ...ctly with the throttle You will thoroughly enjoy riding this new electrically assisted folding bike Riding an e bike is the future of personal mobility allowing for fun green ecologically responsible...

Страница 4: ...XQFWLRQ LVSOD 81 7 21 6800 5 7KH LQGLFDWHG FRQWHQWV DUH DV EHORZ...

Страница 5: ...GLVSOD 7KH GLVSOD ZLOO SURYLGH SRZHU IRU WKH FRQWUROOHU OLFN 21 2 DJDLQ FDQ RSHQ WKH EDFNOLJKW LWK GLVSOD RQ SUHVV 21 2 IRU VHFRQGV WR WXUQ RII WKH SRZHU LWK WKH GLVSOD RII WKHUH LV QR EDWWHU FRQVXPSW...

Страница 6: ...DQG HQWHU LQWR WKH PRGH RI SRZHU DVVLVW ZDON 7KH H ELNH LV WUDYHOLQJ DW P K 66 67 9 6 7 21 OLFN 83 RU 2 1 WR FKDQJH WKH VWDJHV DQG RXWSXW SRZHU UDWLR WKH RXWSXW SRZHU F FOH IURP OHYHO WR OHYHO IRU WK...

Страница 7: ...HVV 6 7 IRU VHFRQGV WR HQWHU LQWR WKH WKURWWOH VSHHG VHWWLQJ LQWHUIDFH OLFN 83 RU 2 1 WR VHW WKH WKURWWOH VSHHG OLPLWHG RU QRW WKH OLPLWHG WKURWWOH VSHHG LV 03 0 03 3UHVV 6 7 IRU VHFRQGV 6 7 WR VZLWFK...

Страница 8: ...LPH LW GLVSOD V DV EHORZ 77 5 1 725 KHQ WKH EDWWHU FDSDFLW LV KLJK WKH VL EDWWHU VHJPHQWV DUH DOO OLJKW KHQ WKH EDWWHU LV ORZ WKH EDWWHU IUDPH ZLOO IODVK W LQGLFDWHV WKDW WKH EDWWHU LV VHYHUHO ORZ DQG...

Страница 9: ...safety The left brake lever controls the front brake while the right brake lever controls the rear brake You can also use your bike without any electric assistance by turning off the battery switching...

Страница 10: ...Also check the pressure of the tires to ensure they are correctly inflated Be sure to lock the folding frame and stem of your bike tightly into place before use If you ride your bike on a regular basi...

Страница 11: ...Grease Disassemble Wheel Bearings Lithium Based Grease Disassemble Headset Lithium Based Grease Disassemble Seat Post Lithium Based Grease Disassemble Note The frequency of maintenance should increas...

Страница 12: ...Check brake and gear cable adjustment Check tire wear and pressure Check wheels are true and spokes tight Check hub head set and crank bearings for looseness Check pedals are tight Check handlebars an...

Страница 13: ...down to fold them while holding the crank arm for stability 3 3Folding the frame Pull the lever outward loosening and freeing the hinge Remove the lever from its hinge by swinging it outward toward t...

Страница 14: ...as on the display unit located on the handlebars Your battery must be charged in an ambient temperature on a non flammable and dry surface and away from any sources of heat humidity or flammable mate...

Страница 15: ...d of time exceeding 2 months store it in a dry non humid area to protect the electronic components and make sure that the battery is not completely discharged Note Never store a completely discharged...

Страница 16: ...u hear a grinding or clicking noise coming from the derailleur or the gears take care to adjust and lubricate them properly before riding Carrier The maximum load allowed on the rear carrier is 50Lbs...

Страница 17: ...riginal replacement parts for all safety critical components Cleaning Always remove the battery when cleaning Use soapy water to rinse and clean with a damp sponge when necessary Do not use a high pre...

Страница 18: ...rer s warranty from the date of purchase Details regarding the warranty coverage and registration of your product can be viewed on the Magnum Bikes webpage below http www magnumbikes com warranty Than...

Отзывы: