background image

REPLACING THE WHEEL TIRE

Wheel tires must be replaced if they get worn out or 

damaged. (If it is worn out, the blade will not track 

straight on the wheels.)

Use a flat screwdriver to remove the tire from the 

groove on the wheel, then install a new tire.

Note: When replacing the tires, stretch them 

around the wheels but do not glue them on.

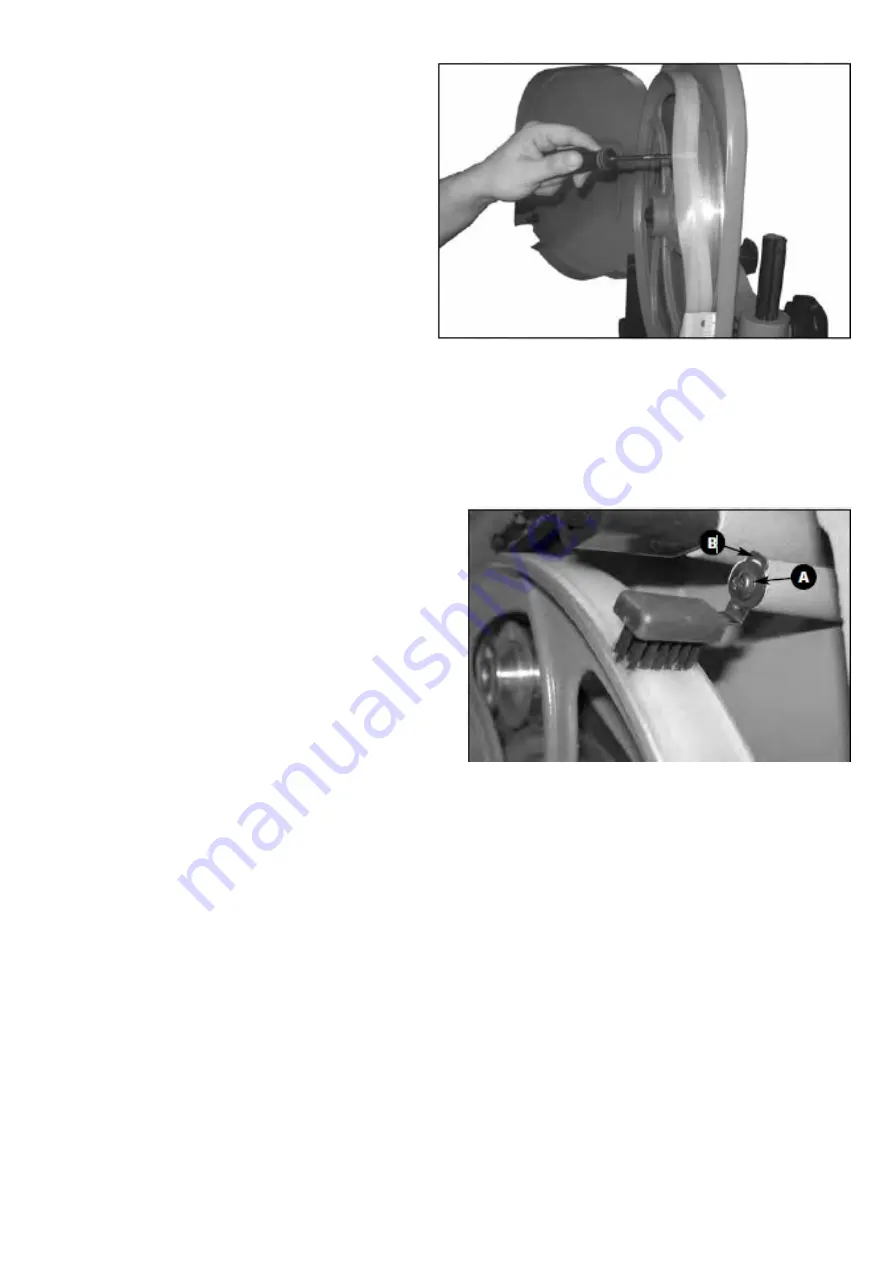
ADJUSTING/REPLACING THE LOWER WHEEL BRUSH

The lower wheel is equipped with a cleaning brush that prevents pitch and sawdust build up on the lower tire.

Any pitch and sawdust that builds up on the upper wheel tire should be removed with a stiff brush or scraped off

with a piece of wood.

Note: To avoid damaging the tire do not use a sharp knife or any kind of solvent to remove 

pitch build up.

Verify that the brush keeps the lower wheel surface clean at all

times. With use and normal wear over time, the brush hairs will

soften and will not clean the surface of the wheel as well. You

then must lower the brush slightly. Proceed as follows:

1. Loosen the Phillips head screw A.

2. Slide the brush slightly down along the mounting hole

    B of it’s mounting bracket, so that a fresh, stiffer part of

    the hairs touches the wheel tire.

3. Tighten the screw to lock the brush in position.

REPLACING LOWER WHEEL MOTOR BELT

The lower wheel is driven by one belt mounted on either of the two pulleys powered by the motor. The belt’s tension

should be verified upon reception of the machine, then every 6 months. Slightly push on the belt with your finger.

The belt must not move more than 1/8". If the belt becomes too loose due to wear or if a breakage occurs, you

must replace it.

1. Turn off power and disconnect the bandsaw from the power source to avoid unintentional start-up.

2. Open the lower wheel cover door.

3. If needed, loosen the belt, proceeding as per step 3 in section “Changing speed settings”, on page 21.

4. Remove the belt from the groove in the pulleys and install a new one.

5. Having installed a new belt, push down firmly on the motor capacitor cover to tighten the belt, then turn the ratchet lever 

    clockwise until it is tight and the motor does not move.

6. Close the lower wheel cover door.

Содержание MI-91340

Страница 1: ...MODEL NO MI 91340 OPERATING MANUAL...

Страница 2: ...LOCK KNOB UPPER BLADE GUIDE ASSEMBLY BLADE GUARD MITER GAUGE TABLE ALIGNMENT PIN DUST PORT BASE CABINET TABLE TILT LOCK KNOB LOWER WHEEL COVER DOOR ON OFF SWITCH W SAFETY KEY UPPER WHEEL COVER DOOR BL...

Страница 3: ...mm Hex socket Feeler gauge set Combination square N T U V W X Y P Q R S G D E F H I O STAND ASSEMBLY J K K M C 8 QTY 1 W A S D N A B A 1 T R O P T S U D C 4 T L O B D A E H X E H D 8 R E H S A W T A...

Страница 4: ...ermine whether or not it is time to replace the blade It is not cutting as fast It is not able to follow a cutting line as it used to REPLACING THE UPPER AND LOWER THRUST BEARINGS 1 Turn the tension k...

Страница 5: ...aring back 1 Loosen the upper thumb screw D 2 Use the micro adjust nut E to move the thrust bearing F back as far as possible behind the blade Move the lower guide blocks thrust bearing away from the...

Страница 6: ...cking properly Adjust the upper and lower blade guides and thrust bearings after each blade tension and tracking adjustment Whenever the upper blade guide and thrust bearing are adjusted the lower bla...

Страница 7: ...wer blade guide blocks and thrust bearing perform the same function as the upper blade guide blocks and thrust bearing except they do so after the blade has contacted the stock being cut 1 Repeat step...

Страница 8: ...diameter circle that can be cut is determined by the width of the blade For example a 1 4 wide blade will cut a minimum diameter of approximately 1 1 2 PERIODIC MAINTENANCE LUBRICATION Disconnect mac...

Страница 9: ...sing 8 carriage bolts C and flange nuts D then tighten using a 12 mm open wrench 3 Attach the top plate to the left and right side panels using 4 carriage bolts C and flange nuts D as shown above Note...

Страница 10: ...dust collector not included Install the dust outlet on the right side of the bandsaw as follows 1 Open the lower wheel cover door 2 Using a 10 mm wrench attach the dust port to the edge of the door as...

Страница 11: ...wrench and the two hex bolts I and J using a 12 mm open wrench and 12 mm socket wrench 8 Re install the red insert to the center of the table with the opening in the slot facing the rear of the saw K...

Страница 12: ...e the table is still at 90 to the blade If not re adjust the table stop bolt Never adjust the table angle while the bandsaw is running Turn off power first 1 Loosen the two lock knobs A 2 Tilt the tab...

Страница 13: ...he tire Nonetheless to avoid having the blade come off of the wheels on it s own during operation the front edge of the blades teeth should never be any closer than 3 mm 1 8 from the front edge of the...

Страница 14: ...e slower setting 1630 FPM 495MPM place the belt on the frontmost set of pulleys as in D 5 To set the bandsaw speed to the faster setting 2730 FPM 832MPM place the belt on the rearmost set of pulleys a...

Страница 15: ...oceed as follows 1 Loosen the Phillips head screw A 2 Slide the brush slightly down along the mounting hole B of it s mounting bracket so that a fresh stiffer part of the hairs touches the wheel tire...

Страница 16: ...PART LIST FOR MI 91340...

Страница 17: ...40 18 ADJUSTING KNOB 5 16 2 L 1 19 MI 91340 19 UPPER WHEEL SHAFT HINGE 1 20 MI 91340 20 SPRING PIN 3 30L 1 21 MI 91340 21 STEEL PIN 2 22 MI 91340 22 UPPER WHEEL SHAFT 1 23 MI 91340 23 BEARING 6202ZZ 2...

Страница 18: ...AD SCREW M4 10L 1 62 MI 91340 62 SPRING WASHER 3 16 16 63 MI 91340 63 PULLEY 7 180 168 1 64 MI 91340 64 HEX SCREW 5 16 1 1 4 4 65 MI 91340 65 C RING R34 2 66 MI 91340 66 BEARING 6204ZZ 2 67 MI 91340 6...

Страница 19: ...4 2 107 MI 91340 107 COPPER WASHER 2 108 MI 91340 108 HEX FIXTURE BOLT 2 109 MI 91340 109 FLAT WASHER 3 8 19 2T 3 110 MI 91340 110 MITER GAUGE 1 111 MI 91340 111 Y TYPE GUIDE ACCESSORY 2 112 MI 91340...

Страница 20: ...CREW 3 16 3 8 1 135 MI 91340 135 HINGE LOWER 1 136 MI 91340 136 SPRING WASHER 3 4 1 137 MI 91340 137 HEX NUT 3 4 1 138 MI 91340 138 FLAT WASHER 3 8 27 1 139 MI 91340 139 HEX SCREW 3 8 1 3 4 L 1 140 MI...

Отзывы: