background image

(E)

SQ57-Z Series, CH22 Series

3. Installation

For the installation dimensions, refer to section 7, “Dimensional Diagrams.”

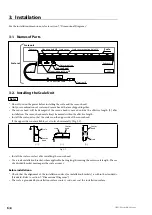
3-1.  Names of Parts

Scale unit

Scale set

CH22

SQ57

Mounting hole M6

Scale

Scale cover

End cover

End cover

Sensor head

Mounting hole M6 or M8

Scale cover mounting hole M4

Terminal A

Water-proof cap

Connection cable

Terminal B

3-2.  Installing the Scale Unit

Notes

•  Do not turn on the power before installing the scale and the sensor head.
•  Only use combinations of scales and sensor heads that are shipped together.
•  Th

  e sensor head will be damaged if the sensor head is moved outside the eff ective length (L) aft er 

installation. Th

  e sensor head must always be moved within the eff ective length.

•  Install the scale unit so that the scale is on the upper side of the sensor head.
  If the upper side is not available, set it to face horizontally. (Fig. 3-1)

(○)

(△)

(×)

Sensor
head

Scale

Scale

Scale

Sensor
head

Sensor
head

Fig. 3-1

•  Install the scale cover last aft er installing the sensor head.
•  Use a scale installation bracket, where applicable, having length covering the entire scale length. Th

 e use 

of a divided bracket may impair the scale accuracy.

Before installationn

•  Check that the alignment of the installation surface (or installation brackets) is within the standards. 

(Standard: Refer to section 7, “Dimensional Diagrams.”)

•  Th

  e scale is grounded by installation surface contact, so do not coat the installation surface.

Содержание SmartSCALE SQ57-Z Series

Страница 1: ...ure references The English version is the original manual according to the EU Machinery Directive Lesen Sie die ganze Anleitung vor dem Betrieb aufmerksam durch und folgen Sie beim Betrieb des Ger ts...

Страница 2: ...THE FOLLOWING TWO CONDITIONS 1 T H I S D E V I C E M AY N OT C AU S E H A R M F U L INTERFERENCE AND 2 THIS DEVICE MUST ACCEPT ANY INTERFERENCE RECEIVED INCLUDING INTERFERENCE THAT MAY CAUSE UNDERSIGN...

Страница 3: ...SQ57 Z Series CH22 Series J 1...

Страница 4: ...SQ57 Z Series CH22 Series 2 J...

Страница 5: ...SQ57 Z Series CH22 Series J i 1 1 1 1 1 1 2 1 1 3 1 1 4 2 1 5 3 1 6 4 2 5 3 6 3 1 6 3 2 6 3 3 14 3 4 15 3 5 16 4 16 4 1 16 4 2 16 5 17 6 18 6 1 18 6 2 19 6 3 19 6 4 20 7 21 8 22...

Страница 6: ...SQ57 Z Series CH22 Series ii J...

Страница 7: ...SQ57 Z Series CH22 Series J 1 1 1 1 SIEMENS DRIVE CLiQ SIEMENS SINUMERIK 1 2 IP67 SIEMENS DRIVE CLiQ 1 3 SQ57 Z CH22 SIEMENS DRIVE CLiQ 1 1...

Страница 8: ...ies CH22 Series 2 J 1 4 S Q 5 7 S Z Y Z SIEMENS DRIVE CLiQ S 0 005 m A 0 01 m S 1 5 1 5L 1000 m cm 6 1 C H 2 2 B Y RJ45 Z RJ45 F M12 A M F M12 E M12 S SIEMENS Motion Connect 800Plus C N 010 1 0 m 105...

Страница 9: ...al safety IEC 60664 1 2007 PWB Printed wiring board EN 61800 5 2 Ed 2 0 2016 Table D 16 Motion and position feedback sensors IEC 62061 2005 A1 2012 A2 2015 Table D 1 Failure Mode IEC 60068 2 1 IEC 600...

Страница 10: ...SQ57 Z Series CH22 Series 4 J 1 6 2006 42 EC...

Страница 11: ...SQ57 Z Series CH22 Series J 5 2 SQ57 Z 5 mT CH22 S N 45 Suzukawa Isehara shi Kanagawa 259 1146 Japan MADE IN JAPAN...

Страница 12: ...SQ57 Z Series CH22 Series 6 J 3 7 3 1 CH22 SQ57 M6 M4 M6 M8 B A 3 2 L 3 1 3 1 7...

Страница 13: ...SQ57 Z Series CH22 Series J 7 A 3 2 A M6 9 N m M8 12 5 N m M6 12 9 N m 3 2 20 cm 1 1 0 05 MG 0 1 MG 0 05 MG 0 1 MG 10 10 mm 3 3...

Страница 14: ...SQ57 Z Series CH22 Series 8 J 2 0 05 0 05 MG 0 05 MG 77 0 5 0 05 77 0 5 77 0 5 77 0 5 mm 3 4 3 M6 12 9 N m M6 12 9 N m 3 5...

Страница 15: ...SQ57 Z Series CH22 Series J 9 4 No No S N 45 Suzukawa Isehara shi Kanagawa 259 1146 Japan MADE IN JAPAN S N No 2 3 6 5 S N 3 7...

Страница 16: ...SQ57 Z Series CH22 Series 10 J 6 0 185 mm M6 25 9 N m M6 25 9 N m M6 25 9 N m M6 25 9 N m mm 3 8 7 0 185 0 065 0 085 mm 3 0 1 mm 0 185 mm 0 25 mm 0 185 mm 0 1 mm 0 25 mm 0 185 0 065 0 085 mm 3 9...

Страница 17: ...SQ57 Z Series CH22 Series J 11 SZ29 SQ57 t SZ29 t 0 05 mm 0 1 mm 0 2 mm 8 M4 6 2 7 N m M4 6 0 75 N m M4 6 2 7 N m M4 6 0 75 N m 3 10...

Страница 18: ...SQ57 Z Series CH22 Series 12 J 2 1 0 05 MG 77 0 5 0 05 mm 3 11 2 No No 3 6 3 3 7 4 A A 0 2 MG A mm 3 12...

Страница 19: ...SQ57 Z Series CH22 Series J 13 5 1 0 5 mm 9 N m 1 0 5 mm 3 13 SZ27 SZ28 SQ57 1 mm t SZ27 t SZ28 SZ27 SZ28 t 1 0 mm 0 8 mm 1 2 mm...

Страница 20: ...SQ57 Z Series CH22 Series 14 J 3 3 5 mm 1 0 N m 242 2 3 1 1 0 N m 3 14...

Страница 21: ...RX P RX N TX P RX P RX N 0 V TX N 24 V 0 V CH22 CH22 CH22 DRIVE CLiQ M12 8 DRIVE CLiQ M12 8 DRIVE CLiQ M12 8 DRIVE CLiQ RJ45 IP20 SIEMENS DRIVE CLiQ SIEMENS DRIVE CLiQ 30 CH22 XXXNSMY SQ57 CH22 XXXNSF...

Страница 22: ...SQ57 Z Series CH22 Series 16 J 3 5 SIEMENS DRIVE CLiQ SINUMERIK 4 4SP2 SINAMICS 4 4SP1 SIEMENS SINUMERIK 4 5 4 4 1 SIEMENS DRIVE CLiQ 4 1 4 2 3 4...

Страница 23: ...SQ57 Z Series CH22 Series J 17 5 SIEMENS DRIVE CLiQ 3 5 DRIVE CLiQ...

Страница 24: ...1470 1570 1670 1770 1870 1970 2070 2270 2470 2670 2870 3070 3270 3470 3670 3770 12 1 10 6 C Ni SIEMENS DRIVE CLiQ 20 C L mm 1 5 1 5L 1000 m 0 005 0 01 m DC24 V DC17 30 8 V 85 mA 24 V 2 1 W 17 V 2 3 W...

Страница 25: ...M6 12 M4 6 70 120 170 220 270 320 370 470 570 620 670 770 870 970 1070 1170 1270 2 3 3 4 4 5 5 6 7 8 8 9 10 11 12 13 14 3 4 4 5 5 6 6 7 8 9 9 10 11 12 13 14 15 1370 1470 1570 1670 1770 1870 1970 2070...

Страница 26: ...ult 22 Wrong Pos detected 21 0 20 INC Level Fault 19 0 18 Temperature Fault 17 Self Test Fault 16 Mutual Diag Fault 15 1 14 0 13 Service code 1 3 1 3 0 12 F1 11 Service code 1 2 1 2 0 10 Service code...

Страница 27: ...40 38 7 620 730 700 726 15 13 8 670 780 700 776 40 38 8 770 880 800 876 40 38 9 870 980 900 976 40 38 10 970 1080 1000 1076 40 38 11 1070 1180 1100 1176 40 38 12 1170 1280 1200 1276 40 38 13 1270 138...

Страница 28: ...SQ57 Z Series CH22 Series 22 J 8 3 2...

Страница 29: ...autions before operating installing maintaining inspecting repairing or otherwise working on this unit Warning indication meanings The following indications are used throughout this manual and their c...

Страница 30: ...it with power voltages other than those indicated Failure to observe this precaution may result in burns or electric shock Do not install with wet hands Do not perform installation work with wet hands...

Страница 31: ...n 6 3 1 Names of Parts 6 3 2 Installing the Scale Unit 6 3 3 Connection Cable Installation 14 3 4 Wiring Connections with a Controller 15 3 5 Version Numbers of a Controller 16 4 Output Signal 16 4 1...

Страница 32: ...ii E SQ57 Z Series CH22 Series...

Страница 33: ...able connector This simplifies installing the sensor head and connecting the cable Installation of a scale cover increases durability in adverse environments The connection cable is designed to allow...

Страница 34: ...B specification Y RJ45 connector made by Yamaichi Electronics Z RJ45 connector made by Yamaichi Electronics Water proof F M12 connector male made by Phoenix Contact Terminal A specification M Scale h...

Страница 35: ...ecifications Mode of operation Item High demand continuous mode Probability of dangerous failure Operating temperature 50 C PFH 38 10 9 1 h Operating temperature 25 C PFH 10 10 9 1 h Operating tempera...

Страница 36: ...ccuracy positioning Serial Number 000001 or later Authorized Representative Magnescale Europe GmbH Antoniusstrasse 14 73249 Wernau Germany Conformity Evaluation Organization Sira Certification Service...

Страница 37: ...parts of the scale and sensor head is 5 mT or less Use a clean cloth etc to wipe the surface gently when cleaning it Do not use any organic solvents other than alcohol Even when using alcohol to clea...

Страница 38: ...fective length L after installation The sensor head must always be moved within the effective length Install the scale unit so that the scale is on the upper side of the sensor head If the upper side...

Страница 39: ...to device power supply cables Be sure to keep the connection cable 20 cm or more away from power supply cables In the event that the device power supply cable and the connection cable cross each other...

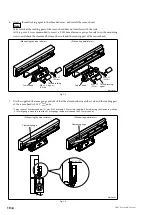
Страница 40: ...bracket Scale bracket Sensor head bracket Sensor head bracket Sensor head bracket Sensor head bracket When using the stop surfaces When using parallel pins Unit mm Fig 3 4 3 Bring the scale into cont...

Страница 41: ...ached to the scale to make sure that the serial No matches that of the sensor head S N 45 Suzukawa Isehara shi Kanagawa 259 1146 Japan MADE IN JAPAN S N Sensor head Label Scale Serial No Sensor head S...

Страница 42: ...Ntm M6 25 9 Ntm Sensor head Sensor head Thread locking agent Thread locking agent When using the stop surfaces When using parallel pins Unit mm Fig 3 8 7 Use the supplied clearance gauge and check th...

Страница 43: ...pacer for adjusting the clearancee t 0 05 mm 0 1 mm 0 2 mm 8 After installing the sensor head apply a thread locking agent to the threaded areas and install the scale cover Scale Scale cover Scale cov...

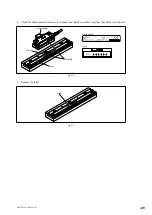
Страница 44: ...racket and then secure in place 0 05 MG 77 0 5 0 05 or less Sensor head bracket Sensor head bracket Scale bracket Unit mm Fig 3 11 2 Check the label attached to the scale to make sure that the serial...

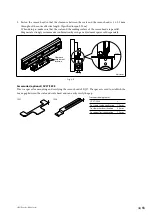
Страница 45: ...trongly recommends confirmation by using an adjustment spacer sold separately 1 0 5 Clearance adjustment location Unit mm Fig 3 13 Accessories optional SZ27 SZ28 This is a spacer for mounting and veri...

Страница 46: ...f cap hex socket head opposite side 5 mm Use a tightening torque of 1 0 N m for the connector that is used for the connection with the sensor head Apply a thread locking agent to the threaded area of...

Страница 47: ...P RX P RX N TX P RX P RX N 0V TX N 24V 0V 3 1 6 2 B DRIVE CLiQ connector RJ45 IP20 preassembled 30 m 30 m 30 m CH22 XXXNSMY SQ57 CH22 XXXNSFY XXXNSEY or Extension connection cables CH22 XXXNSMF SQ57...

Страница 48: ...ns operate normally with the software above However when using the online diagnosis function the following software version is required SINUMERIK software version 4 5 or later Our dedicated online dia...

Страница 49: ...Series CH22 Series 5 Power Supply The power is supplied from the controller that supports the SIEMENS DRIVE CLiQ See Section 3 5 Version Numbers of a Controller Only a model that supports DRIVE CLiQ i...

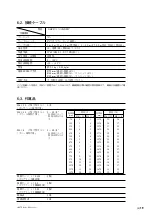
Страница 50: ...ected Maximun power consumption 2 1 W max When 17 V is supplied 2 3 W max When 30 8 V is supplied Inrush current 2 A max When the power supply rise time is 10 ms Maximum response speed 200 m min Maxim...

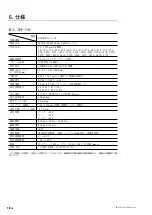
Страница 51: ...uest the latest specifications from your nearest sales representative 6 3 Accessories M6 25 Hex socket head cap screws For Sensor head installation 2 M6 12 Hex socket head cap screws For scale install...

Страница 52: ...osition data valid 1 invalid 0 23 Hardware Fault Hardware system fault 22 Wrong Pos detected FS position fault 21 Reserved Normally 0 20 INC Level Fault Incremental sensor fault 19 Reserved Normally 0...

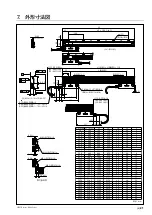
Страница 53: ...ted bending without conduit L Effective length L1 Overall length L2 L3 L4 L5 n 70 180 100 176 40 38 2 120 230 200 226 15 13 3 170 280 200 276 40 38 3 220 330 300 326 15 13 4 270 380 300 376 40 38 4 32...

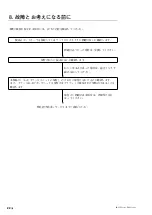
Страница 54: ...ed Check whether any of the mounting screws are loose If any loose screws are found tighten them up again with a proper tightening torque Check that this product is installed in accordance with the in...

Страница 55: ...triebnahme Installation Wartung Inspektion oder Reparatur dieses Ger tes oder der Durchf hrung anderer Arbeiten durch Bedeutung der Warnhinweise Bei der Durchsicht dieses Handbuchs werden Sie auf die...

Страница 56: ...s besteht die Gefahr von Feuer und elektrischem Schlag Die Installation nicht mit nassen H nden vornehmen F hren Sie Installationsarbeiten auf keinen Fall mit nassen H nden aus Bei Missachtung besteht...

Страница 57: ...3 1 Bezeichnung der Teile 6 3 2 Montage der Ma stabseinheit 6 3 3 Installation des Verbindungskabels 14 3 4 Verdrahtung mit einem Steuerger t 15 3 5 Versionsnummern des Steuerger tes 16 4 Ausgangssign...

Страница 58: ...ii G SQ57 Z Series CH22 Series...

Страница 59: ...s Anschlie en des Kabels Die Installation einer Ma stabsabdeckung erh ht die Haltbarkeit in ung nstigen Umgebungen Das Verbindungskabel ist so ausgelegt dass der Anschluss an beide Enden des Lesekopfe...

Страница 60: ...Anschluss B Y RJ45 Anschluss von Yamaichi Electronics Z RJ45 Anschluss von Yamaichi Electronics Wasserabweisend F M12 Anschluss Stecker von Phoenix Contact Spezifikation f r Anschluss A M Ma stabskopf...

Страница 61: ...und erfordert keinen regelm igen Austausch von Bauteilen Functional safety specifications englische version Mode of operation Item High demand continuous mode Probability of dangerous failure Operatin...

Страница 62: ...nenrichtlinie Magnescale ist ein sicherheitsorientiertes Produkt das den Vorgaben der Maschinenrichtlinie 2006 42 EC entspricht Der Inhalt der diesbez glichen Konformit tserkl rung ist der englischen...

Страница 63: ...getrieben werden ist sicherzustellen dass die magnetische Flussdichte an den Au enteilen von Ma stab und Lesekopf 5 mT oder weniger betr gt Verwenden Sie zum Reinigen ein sauberes Tuch um Staub oder S...

Страница 64: ...L bewegt wird Der Lesekopf darf immer nur innerhalb der effektiven L nge bewegt werden Installieren Sie die Ma stabseinheit so dass sich der Ma stab auf der Oberseite des Lesekopfes befindet Ist die...

Страница 65: ...der Ger te entlang bzw parallel zu ihnen gef hrt werden Achten Sie darauf dass das Verbindungskabel mindestens 20 cm von Stromversorgungskabeln entfernt gehalten wird F r den Fall dass sich das Stromv...

Страница 66: ...7 0 5 77 0 5 77 0 5 77 0 5 Lesekopfhalter Lesekopfhalter Bei Verwendung der Anschlagfl chen Bei Verwendung von Zylinderstiften Einheit mm Abb 3 4 3 Bringen Sie den Ma stab mit den Anschlagfl chen in K...

Страница 67: ...chte Etikett um sicherzustellen dass die Seriennummer mit der des Lesekopfes bereinstimmt S N 45 Suzukawa Isehara shi Kanagawa 259 1146 Japan MADE IN JAPAN S N Lesekopf Etikett Ma stab Serien Nr Lesek...

Страница 68: ...Ntm Lesekopf Lesekopf Gewindesicherungsmittel Gewindesicherungsmittel Bei Verwendung der Anschlagfl chen Bei Verwendung von Zylinderstiften Einheit mm Abb 3 8 7 Verwenden Sie die mitgelieferte F hlerl...

Страница 69: ...ds t 0 05 mm 0 1 mm 0 2 mm 8 TragenSienachdemInstallierendesLesekopfeseinGewindesicherungsmittelaufdieGewindebereiche auf und installieren Sie die Ma stabsabdeckung Ma stab Ma stabsabdeckung Ma stabsa...

Страница 70: ...Position 0 05 oder weniger Lesekopfhalter Lesekopfhalter Ma stabshalter 0 05 MG 77 0 5 Einheit mm Abb 3 11 2 berpr fen Sie das am Ma stab angebrachte Etikett und stellen Sie sicher dass die Seriennumm...

Страница 71: ...eine berpr fung mithilfe einer getrennt erh ltlichen Abstandslehre 1 0 5 Spieleinstellposition Einheit mm Abb 3 13 Zubeh r optional SZ27 SZ28 Dies ist ein Distanzst ck zum Montieren und Verifizieren...

Страница 72: ...des Innensechskants der wasserdichten Kappe 5 mm Verwenden Sie f r den Anschluss der Verbindung am Lesekopf das Anzugsmoment von 1 0 N m Um zu verhindern dass sich die Verbindung l st tragen Sie am Ge...

Страница 73: ...8 7 6 3 4 1 5 TX P RX P RX N 0V TX N 24 V A TX N 24 V TX P RX P RX N TX P RX P RX N 0V TX N 24 V 0 V 3 1 6 2 B CH22 30 m 30 m 30 m CH22 XXXNSMY SQ57 CH22 XXXNSFY XXXNSEY oder Verl ngerungskabel CH22 X...

Страница 74: ...ts arbeiten normal mit der obigen Software Wenn Sie jedoch die Online Diagnosefunktion verwenden ist die folgende Software Version erforderlich SINUMERIK Software Version 4 5 oder neuere Version Unser...

Страница 75: ...versorgung Die Stromversorgung erfolgt ber das Steuerger t mit Unterst tzung des SIEMENS DRIVE CLiQ Siehe Abschnitt 3 5 Versionsnummern des Steuerger tes Es kann nur ein Modell verwendet werden das ei...

Страница 76: ...ngsaufnahme 2 1 W oder weniger Bei 17 V Versorgung 2 3 W oder weniger Bei 30 8 V Versorgung Einschaltstromsto 2 A oder weniger wenn die Stromversorgungs Anstiegszeit 10 ms betr gt Maximale Ansprechges...

Страница 77: ...ei der Auslegung von Maschinen die neuesten Spezifikationen von Ihrem Magnescale Co Ltd Vertreter 6 3 Zubeh r M6 25 Innensechskantschraube F r Lesekopf Installation 2 M6 12 Innensechskantschraube F r...

Страница 78: ...ardware Fault Fehler in elektrischen Schaltungen 22 Wrong Pos detected berm ig gro er Fehler in der Positionsinformation 21 Reserviert Normal 0 20 INC Level Fault Fehler des Inkrementalsensors 19 Rese...

Страница 79: ...18 12 5 0 5 0 5 0 5 L5 L4 L3 111 18 18 I6 8 L Effektive L nge L1 Gesamtl nge L2 L3 L4 L5 n 70 180 100 176 40 38 2 120 230 200 226 15 13 3 170 280 200 276 40 38 3 220 330 300 326 15 13 4 270 380 300 37...

Страница 80: ...gendwelche der Befestigungsschrauben locker sind Falls lockere Schrauben vorgefunden werden ziehen Sie sie wieder mit dem korrekten Anzugsmoment fest Stellen Sie sicher dass dieses Produkt gem den Anw...

Страница 81: ...ent l usage des acqu reurs de l quipement d crit dans ce manuel Magnescale Co Ltd interdit formellement la copie de quelque partie que ce soit de ce manuel ou son emploi pour tout autre but que des op...

Страница 82: ......

Страница 83: ...1 SQ57 Z Series CH22 Series...

Страница 84: ...For foreign customers Note This product or technology may be restricted by the government in your country Please make sure that end use end user and country of destination of this product do not viola...

Отзывы: