Magnavox MRD-250 Скачать руководство пользователя страница 5

Introduction  5

Welcome!

We hope you enjoy your complete DVD Home Cinema
System. This seven-piece, 200-watt system creates dynamic
sound quality and realism found only in cinemas. Features of
the DVD Home Cinema System include:

Surround Sound options

Night Mode: Reduces the range between high and low vol-
umes during Disc playback.

Parental Controls: Sets a rating level so your children can-
not watch a DVD that has a rating higher than the level
you set.

Sleep Timer: Turns the DVD Receiver to Standby Mode
(Off) at a preset time.

Package Contents

Remote Control and two (2) AA batteries

Audio and Video (Composite) cables

Five speakers, including speaker wires

Subwoofer, including connection cable and power cable

AM loop antenna and FM wire antenna

Owner’s manual, Quick-Use Guide and product registra-
tion materials

Environmental Information

All unnecessary packaging has been omitted. We have tried to
make the packaging easy to separate into three materials:
cardboard (box), polystyrene foam (buffer) and polyethylene
(bags, protective foam sheet).
Your system consists of materials which can be recycled and
reused if disassembled by a specialized company. Please
observe the local regulations regarding the disposal of packag-
ing materials, exhausted batteries and old equipment.

Playable Discs

This DVD Home Cinema System will play:

Digital Video Discs (DVDs)

Video Compact Discs (VCDs) or Super Video CDs

All finalized Audio CDs

MP3 files on Compact Disc Recordable (CD-R) or
Compact Disc Rewritable (CD-RW).

Region Codes

DVDs must be labeled for 

ALL

regions or for 

Region 1

in

order to play on the DVD Receiver of this Home Cinema
System. You cannot play Discs that are labeled for other
regions. The region code for the DVD Receiver is 1 (one).
Look for the correct region symbol on your DVDs.
The number inside the globe refers to a region of the world.
Region 1 represents the United States of America, Canada,
upper regions of North America, Bermuda, the U.S. Virgin
Islands, and small regions near Australia.

Color Systems

Different color systems are available throughout the world.
DVD makers record DVDs in a certain color system. The
color system of the DVD may appear on the DVD or its case.
The most common color systems are NTSC, PAL, and
SECAM. NTSC is used primarily in the United States and
North America.
This DVD Receiver is compatible with both NTSC and PAL.
Follow the steps on page 26 to set the DVD Receiver to
NTSC or PAL. Choose a setting that matches the color sys-
tem of your TV and your DVDs.

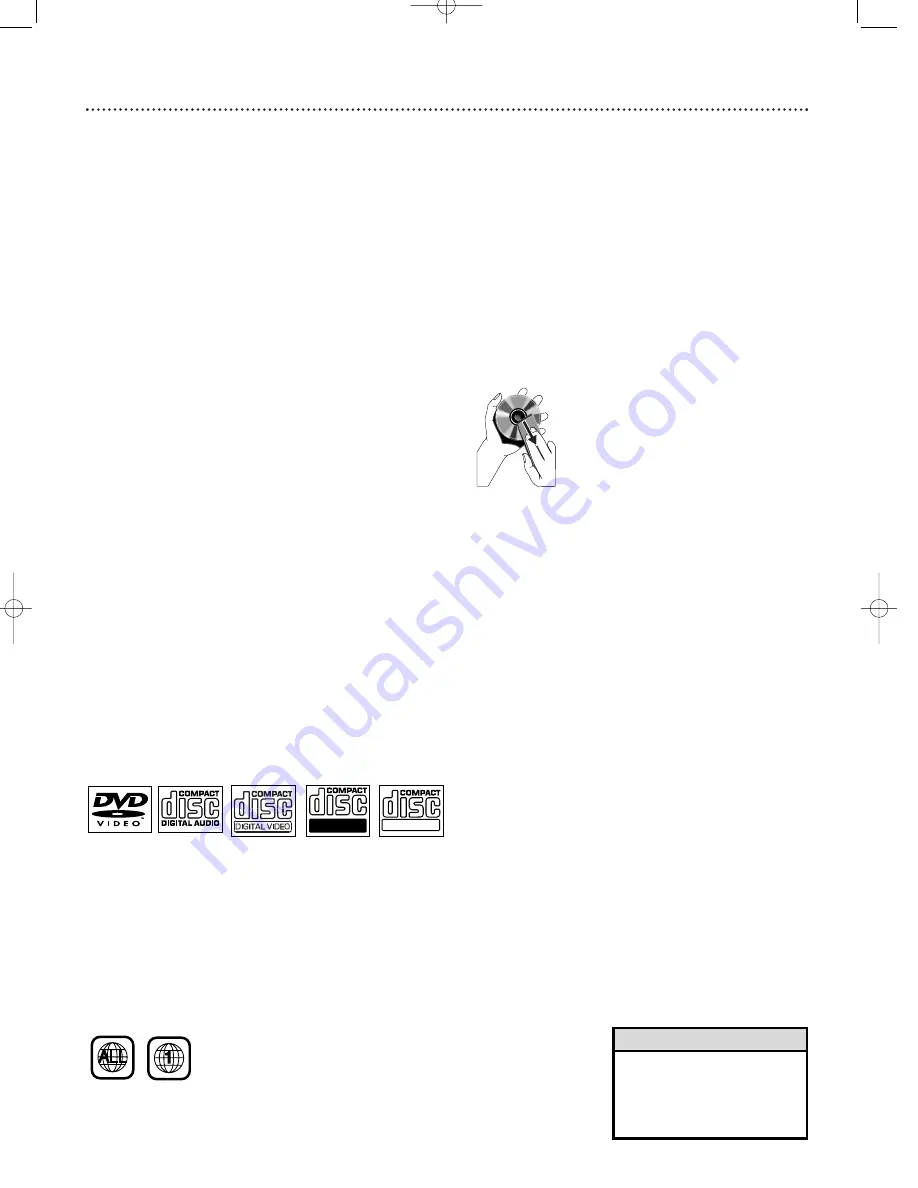
Maintenance and Cleaning

Clean Discs with a cleaning cloth, wiping from the center
to the edge in a straight line. Do not wipe the Disc in a
circular motion.

Do not use solvents such as benzine, thinner, commercial-
ly-available cleaners, or anti-static spray intended for ana-
log discs.

If the DVD Receiver cannot read Discs correctly, use an
accessory cleaning CD/DVD to clean the lens. Other
cleaning methods may destroy the lens. Always keep the
tray closed to avoid dust on the lens.

The lens may cloud over if you suddenly move the DVD
Receiver from cold to warm room conditions. If lens
clouding occurs, you may not be able to play a Disc. Leave
the power on for about one hour with no Disc in the unit
until playback is possible.

Do not expose the receiver, batteries, or discs to humidi-
ty, rain, sand, or excessive heat (from devices or direct
sunlight).  Always keep the disc tray closed to avoid get-
ting dust on the lens.

• If you are having trouble playing

a certain Disc, remove the Disc
and try a different one.
Improperly formatted Discs will
not play on this DVD Receiver.

Helpful Hint

Recordable

ReWritable

mrd250book  2/14/03  10:49 AM  Page 5

Содержание MRD-250

Страница 1: ...navox Representatives can help you get the most from your new product by explaining Hookups First Time Setup and Feature Operation Do not attempt to return this product to the store For fast help call...

Страница 2: ...ce J Blanford President and Chief Executive Officer P S Remember to get the most from your MAGNAVOX product you must return your Warranty Registration Card within 10 days So please mail it to us right...

Страница 3: ...32 CD Features Programming 33 Playback Control PBC Audio Channels 34 Audio and Surround Sound Options Sound Option 35 MP3 Features 36 Tuner Features 37 FM Reception Sleep Timer 38 Additional Informati...

Страница 4: ...ight Protection This product incorporates copyright protection technology that is protected by method claims of certain U S patents and other intellectual property rights owned by Macrovision Corporat...

Страница 5: ...iver is 1 one Look for the correct region symbol on your DVDs The number inside the globe refers to a region of the world Region 1 represents the United States of America Canada upper regions of North...

Страница 6: ...available on the DVD TITLE Button Press to display the Title menu if it is available on the disc Details are on page 30 SLOW MEM Button Press to watch a disc at a slower speed In Tuner mode press to s...

Страница 7: ...utton Press to program tracks in DVD CD mode and radio stations in TUNER mode Details are on page 33 ANGLE Button Press to select a different camera angle Details are on page 21 GOTO Button Press to s...

Страница 8: ...cur rent activity of the DVD Receiver appears here Headphones Connect headphones not supplied here SELECT Button Use to select the speaker channel to make adjustments Details are on page 35 STOP 7 7...

Страница 9: ...on other audio equipment Details are on page 15 AUDIO IN TV AUX Connect these jacks to the red and white Audio Out jacks of a TV or VCR This lets you hear TV or VCR sound through the DVD Receiver when...

Страница 10: ...ur Quick Use Guide or on page 14 Battery Installation 1 Remove the battery compartment lid by pressing in the tab then lifting off the lid 2 Place the batteries in the battery compartment matching the...

Страница 11: ...t the supplied red and white audio cables to the DVD Receiver s red white right left TV AUDIO IN jacks and to the TV S right left AUDIO OUT jacks Match the cable colors to the jack colors 3 Connect th...

Страница 12: ...IN jacks and to the TV S right left AUDIO OUT jacks Match the cable colors to the jack colors 3 Connect the power cords of the DVD Receiver and TV to a power outlet 4 Turn on the TV and set it to the...

Страница 13: ...Turn on the TV and set it to the correct S Video In chan nel Go to the lowest TV channel and change channels down until you find the S Video In channel It is not channel 3 or 4 as it might be when usi...

Страница 14: ...jack on the DVD Receiver Then connect the other end of the cable to the AUDIO INPUT jack on the Subwoofer Connect the Subwoofer s power cord to the Subwoofer and to a power outlet when connections ar...

Страница 15: ...tails 1 Connect the DVD Receiver to a TV as shown on pages 11 13 or in your separate Quick Use Guide Make only one video con nection whichever fits your TV 2 Connect the DVD Receiver s AUDIO OUT jacks...

Страница 16: ...L R jacks on the VCR or cable satellite box 2 Select AUX mode to listen to the VCR or cable satellite playback on the surround sound speakers Connecting a VCR for Recording DVDs To view DVD playback w...

Страница 17: ...s are numbered press a Number button to select an item Or press 98 to select an item then press OK 8 To stop playback at any time press STOP C DVD Disc Menus DVD Disc Menus vary among DVDs The DVD Dis...

Страница 18: ...e Disc as usual Resume is not available on all Discs Helpful Hints Pausing Playback 1 Press PLAY PAUSE Bk during playback to freeze the picture and mute the sound 2 Press PLAY PAUSE Bk to resume regul...

Страница 19: ...e settings Even if a feature is set in the System Menu it will not be available if the cur rent Disc does not include that feature Details are on pages 20 29 1 Press SETUP The System Menu appears on t...

Страница 20: ...cture to be trimmed or formatted to fit your TV screen This setting is possible only if the DVD is recorded in pan scan or regular for mat Check the Disc case for details Select 4 3 LB letterbox if yo...

Страница 21: ...ETUP PAGE GENERAL PAGE TV DISPLAY ANGLE MARK ON OFF ANGLE MARK OSD LANG SCR SAVER MAIN PAGE ON OFF VIDEO OUT OSD Language Select your preferred On Screen Display OSD Language by using the OSD LANG men...

Страница 22: ...l be selected press OK 3 Press 9 to select VIDEO OUT Then Press 4 Press 8 or 9 to select S VIDEO or CR CB Y Select S VIDEO if you have used an S VIDEO cable to make the connection This is the default...

Страница 23: ...SAVER ANGLE MARK OSD LANG SCR SAVER MAIN PAGE ON OFF VIDEO OUT SOURCE SLEEP VOL MUTE SELECT DISPLAY MENU SET UP PREV PLAY PAUSE NEXT REW STOP FF TITLE ANGLE ZOOM GOTO LANGUAGE SUBTITLE N P DIM REPEAT...

Страница 24: ...ment using the Digital connections you will need to change the DVD Player s Digital Output set ting The information in step 4 will help you make your choice 1 Press SETUP 2 Press 9 to select AUDIO SET...

Страница 25: ...ly compress the dynamic range The loudest levels are softened and the quietest levels are raised Choose 7 8 1 8 to partially compress the volume range Choose OFF to leave the volume range uncompressed...

Страница 26: ...E SETUP AUDIO SUBTITLE DISC MENU PARENTAL MULTI NTSC PAL PASSWORD DEFAULTS 1 5 2 4 SOURCE SLEEP VOL MUTE SELECT DISPLAY MENU SET UP PREV PLAY PAUSE NEXT REW STOP FF TITLE ANGLE ZOOM GOTO LANGUAGE SUBT...

Страница 27: ...the rating level and you have not already set a personal pass word use the default password of 3308 Parental Control Ratings The rating numbers compare to standard U S movie ratings as follows 1 G Gen...

Страница 28: ...the old password 1 Press SETUP 2 Press 9 to select PREFERENCES Then press OK 3 Press 9 to select PASSWORD Then press 4 CHANGE will be selected press OK 5 Enter the old password and the new password t...

Страница 29: ...ET UP PREV PLAY PAUSE NEXT REW STOP FF TITLE ANGLE ZOOM GOTO LANGUAGE SUBTITLE N P DIM REPEAT A B SHUFFLE PROGRAM DISC SKIP DISC NO SLOW MEM CD MODE ST MONO LISTENING AUDIO OPEN CLOSE OK 1 2 3 4 5 6 7...

Страница 30: ...DVDs contain scenes that were recorded at different angles or per spectives Use the Angle feature in the Menu Bar to view DVD playback from a different angle Multiple angles must be available on the...

Страница 31: ...ress 9 8 to move down up left or right through the enlarged picture GoTo Use the GOTO feature to skip to a desired Title or Chapter 1 Press GOTO to display the current Title Chapter and Time 2 Press o...

Страница 32: ...the current chapter or track Press again to repeat the entire title DVD or disc VCD or CD Press REPEAT a third time to repeat all discs CD mode only 2 Press REPEAT until REPEAT OFF is displayed to tur...

Страница 33: ...yback of all CDs in the disc tray 1 Shuffle You can play all tracks on a single CD in random order This is only avail able in CD mode 2 Press SHUFFLE turn the Shuffle feature on and off Playback must...

Страница 34: ...with different audio tracks on different channels You can select the desired audio channel 1 Press AUDIO to select the audio channel Audio 1 Audio 2 Audio 1 vocal or Audio 2 vocal PREV PLAY PAUSE NEX...

Страница 35: ...ch matches your needs 1 Press LISTENING to select the desired listening mode For DVDs select Dobly Digital Dolby Pro Logic or Stereo For VCDs MP 3 CDs or normal CDs select Dolby Pro Logic or Stereo Do...

Страница 36: ...or playback You also can use the Number buttons to select a Track directly 3 Press PLAY PAUSE Bk or OK to confirm your selection and begin playback 4 Or if an MP3 menu or file list does not appear you...

Страница 37: ...4 Press and hold H or G until the frequency indicator station number starts to change then release The next radio station will tune automatically 5 To tune to a weak station press H or G briefly and r...

Страница 38: ...r you have set it press SLEEP once To change the Sleep Timer press SLEEP again while the Sleep Timer minutes appear The next Sleep Timer option will appear on the display panel To cancel the Sleep Tim...

Страница 39: ...d as such and are usually red and white Check the speaker connections Make sure cables are connected firmly to all equipment Details are on page 14 Choose the correct Audio Video In or Auxiliary chann...

Страница 40: ...ord Generally the higher the bit rate or the higher the recording speed the better the sound quali ty However higher bit rates use more space on a Disc For example an MP3 music file recorded at 32 kbp...

Страница 41: ...6 kHz Digital Output SPDIF Coaxial Optical LASER Type Semiconductor laser GaAIAs Wavelength 650 nm Output Power 7 mW Beam Divergence 60 degree MISCELLANEOUS Power Supply Rating 120 V 60 Hz Power Consu...

Страница 42: ...on 7 Open 0 Button 8 Open Close Button 6 Optical Jack 40 OSD Language 21 Package Contents 5 Pan Scan 40 Parental Controls 28 Password Play Pause 38 Button 6 Playable Discs 5 Playback 18 Play Pause 38...

Страница 43: ...oduct is officially distributed by Magnavox In countries where Magnavox does not distribute the product the local Magnavox service organi zation will attempt to provide a replacement product although...

Отзывы: