background image

CONTINUOUS TRENCHING WITH SPACED
BELLHOLES

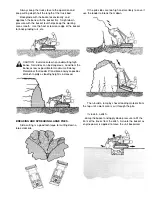
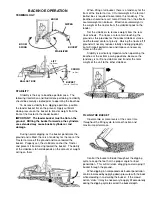
Begin by digging the trench to the desired grade.

Progress along the trench to the bellhole locations and
dig as much of the bellhole as possible without moving
the backhoe from the trench line setting.

Move to the side as previously described and

complete the bellhole.  Realign the backhoe with the
trench, and proceed trenching to the next bellhole.

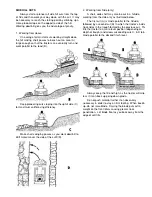
When finishing straight walls or bellholes in sandy

soil, use a platform under the rear of tracks and the
stabilizers.  The platform distributes the load over a larger
area and lessens the possibility of a cave-in.  The
platform also tends to keep the unit from creeping
rearward if hard digging is encountered.

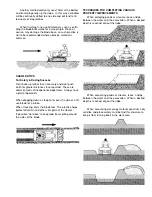
DIGGING STRAIGHT WALL SHALLOW BASEMENTS

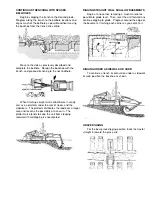
Begin at one corner, removing a much material as

possible to grade level.  Then, reset the unit forward and
continue digging to grade.  Progress around the edge of
the basement, finishing each corner as you come to it.

DIGGING UNDER A SIDEWALK OR CURB

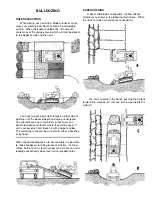
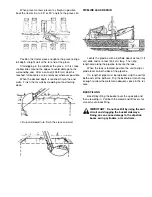
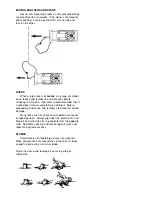
To continue a trench or excavation under a sidewalk

or curb, position the backhoe as shown.

GRAVE DIGGING

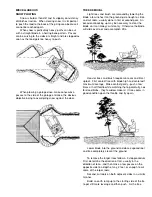
For the best grave digging position, back the tractor

straight in toward the grave site.

Содержание MH4800

Страница 1: ...Operator Technical Manual C F Struck Corporation Cedarburg WI 53012 M A G N A T R A C MH7000 MH4800 Compact Crawlers MH4800 MH7000...

Страница 2: ...pera tion safety basic mechanical construction and proper maintenance All the information you need is in the following Operator Manual Take time NOW before you start to operate your Magnatrac to go ov...

Страница 3: ...ce because your tractor is working in a relatively clean environment like grass 4 Grease is good Consistent lubrication of all moving joints will greatly extend the life of your equipment with one exc...

Страница 4: ...rols must be applied with controlled force never in a snapping action SUMMARY Your crawler should always be operated with forethought rather than in a series of sudden and potentially damaging starts...

Страница 5: ...chments in certain industrial type applications may affect Warranty cover age D RETURNS AND REFUNDS In the event of defective materials or workmanship the purchaser agrees to allow C F Struck Corp the...

Страница 6: ...Periodic Service Chart 14 7 SERVICE 16 Engine 16 Starter 16 Battery 16 441 Interlock Switches 17 Safety Circuit Test 18 Seat Weight Adjustment 18 Drive Chain Tensioning 19 Parking Emergency Brake 20 T...

Страница 7: ...forward travel Record your Crawler serial model numbers in the spaces below You need this information when you order parts or require technical support Crawler Records Model ___ ___ ___ ___ __ ___ ___...

Страница 8: ..._ ___ ___ __ ___ ___ ___ ___ ___ ___ ___ __ __ ___ ___ _ ___ ___ ___ ___ __ ___ ___ ___ ___ ___ ___ ___ __ ___ __ Date Service Work ___ ___ _ __ ____ ___ ___ ___ __ __ ___ ___ ____ ___ ___ ___ ___ _ _...

Страница 9: ...its equipment Drive at safe speeds at all times especially on rough ground and hillsides Carry the Bucket or Blade as low as possible at all times especially when you work on a hillside or back up a s...

Страница 10: ...asses Do not run Engine while working on the Crawler Be careful when handling any type of fuel Do not smoke while filling the fuel tank or working on the fuel system Check for faulty wiring or loose c...

Страница 11: ...d body away from pinholes and nozzles which eject fluids under high pressure Use a piece of cardboard or paper to search for leaks Do not use your hand If ANY fluid is injected into the skin it must b...

Страница 12: ...CK CONTROL C RIGHT TRACK CONTROL D BRAKE LOCK RELEASE HANDLE E CHOKE CONTROL F HAND THROTTLE CONTROL G FOOT THROTTLE CONTROL H LIGHT SWITCH I SEAT SAFETY SWITCH J IGNITION SWITCH K OVERDRIVE ACCESSORY...

Страница 13: ...To move straight rearward pull both Left and Right Track Controls rearward 3 To turn right push forward on Left Track Control 4 To turn left push forward on Right Track Control 5 To counter rotate Tr...

Страница 14: ...of Control Valves is located to the operator s right These valves are used to control all attachments on your tractor Your particular tractor will contain from one to five of these valves based on the...

Страница 15: ...your Meter is recording only actual running hours N TEMPERATURE GAUGE This gauge records the hydraulic oil temperature just as it enters the Traction Drive Pump Monitor this temperature so that it doe...

Страница 16: ...ess and condition BATTERY COMPARTMENT Remove trash Check cables for tightness and corrosion FUEL TANK Check fuel level HYDRAULIC SYSTEM Check for leaking lines and connections Check for bent or kinked...

Страница 17: ...e stop before attempting to restart the Engine If the starter is engaged while the flywheel is rotating the starter pinion and flywheel ring gear may clash resulting in damage to the starter If the st...

Страница 18: ...ground 2 Allow Right and Left Track Controls to go to neutral 3 Push forward on Brake and lift lock handle to engage parking brake 4 Run Engine at half speed 2 minutes without load 5 Move Throttle Co...

Страница 19: ...Store fuel drums on their sides with plugs up IMPORTANT Keep all dirt scale water or other foreign matter out of fuel LUBRICANTS ENGINE OIL Check enclosed Engine Owner s Manual and closely follow the...

Страница 20: ...ocedures Drive Chain Tension Maintain chain tension in drive train Check Service section of this manual for complete Drive Chain Tensioning procedures Fittings Hoses Check hydraulic fittings and hydra...

Страница 21: ...inches to get oil to flow completely to drain opening Fuel Filter Replace with new 535 Fuel Filter at this time Fuel Tank Remove and drain tank of any water or sediment...

Страница 22: ...othes When you work around batteries protect eyes and face from battery fluid and explosion Antidotes for Sulfuric Acid EXTERNAL 1 Flush skin well with water 2 Flush eyes for 15 minutes 3 Get medical...

Страница 23: ...inuity tester attached to the terminals of the Switch should have its light on at this time B With the 505 Treadle released and allowed to rise to the height permitted by the two restraining Cap Screw...

Страница 24: ...connected TESTING SAFETY CIRCUIT Conduct the following tests to check proper functioning of Safety Circuit related switches A Following recommended safe starting procedures and with operator seated bu...

Страница 25: ...t and operate Crawler Check Drive Chain adjustment and readjust if necessary Tighten 1090 Drive Chain 80 roller chain by increasing the center distance between the movable 214 Rear Axle and the fixed...

Страница 26: ...er lose Engine or drive system power the Brake can be activated instantly to hold the Crawler safely in position DISK BRAKE ADJUSTMENT CAUTION Read the following Disk Brake and Disk Puck instructions...

Страница 27: ...steps detailed above Check with factory Service Department with any questions you may have regarding when and how to replace Brake Pucks brake linings or other brake related parts TRACK MAINTENANCE Be...

Страница 28: ...eir respective Inner Outer Sprockets To ease Track rotation insert a 5 8 diameter x 24 long Lever Rod between two Track Plates and fully engage the Rod s end on the bottom of the tube of the 1228 Fron...

Страница 29: ...ainst Front Idler s Outer Sprocket Using a Lever Rod on the Rear Drive rotate the Track forward while working the Track s Inner Chain up over the Front Idler s Outer Sprocket NOTE The above step is pr...

Страница 30: ...ide of Track secure with 236 Washer followed by 1 2 Nut fine thread By rotating each 1030 Rod clockwise draw the 1 2 Nut 236 Washer on each Rod s end against its respective 233 or 234 Spring such that...

Страница 31: ...lish this loosen the 1 2 Nut and 1 2 Lock Washer on the end of the 1030 Rod holding the 233 Spring yellow and fine tune the overall length of the 233 Spring using the procedure described above Don t c...

Страница 32: ...side face of each Track Plate and held in position with 3 8x1 Carriage Bolts and 3 8 Flange Lock Nuts NOTE The Carriage Bolts are inserted into the 3 8 square holes in top outside face of each Grouser...

Страница 33: ...ecuring the 1382 Pump mount to the engine while maintaining belt tension NOTE Do not use a pry bar or leverage device to tighten the belt as over tightening could result in bearing damage to the pump...

Страница 34: ...ot properly located in the operator s seat Do Not Bypass this safety feature Tractor drive and or attachments behave erratically Verify hydraulic fluid level is within the required operating range Low...

Страница 35: ...Check track sprockets for heavily worn teeth that would allow the sprocket to jump inside the tracks Verify there the tracks are tensioned Excessively loose tracks can result in the drive sprocket ju...

Страница 36: ...utlines safe and efficient work procedures for a compact crawler tractor equipped with standard attachments loaders backhoes blades etc Each crawler operator encounters dramatically different working...

Страница 37: ...will hit bottom when the wheels on either end are driven over a drop off In most cases this will stop vehicle motion and give immediate warning A tracked Vehicle however will continue on without any w...

Страница 38: ...AIN Vehicle stability on a hill for example is determined not only by the general slope of the hill but also by terrain conditions rocks ditches logs drop offs etc and by the nature of the hill surfac...

Страница 39: ...SMALLER OBSTACLES WILL CAUSE A TRACKED VEHICLE TO TIP OVER SAFETY WANING OBSTACLES SOME OF WHICH MIGHT BE DRIVEN OVER SAFELY WHILE ON LEVEL TERRAIN CAN CAUSE A HAZARD WHILE OPERATING ON SLOPES DROPOFF...

Страница 40: ...d and loose gravel can also be dangerous It is possible to slide into a tree or rock or to slide off the edge of a cliff SAFETY WARNING REGARD ALL OPERATIONS ON SLOPING TERRAIN AS HAZARDOUS PARKING TH...

Страница 41: ...rry the load without spillage fully roll the bucket back after filling and before moving the unit NOTE Do not attempt to lift bucket loads in excess of loader capacity PEELING AND SCRAPING USe down pr...

Страница 42: ...the load keep the bucket as low as possible to resist tipping in case a track drops in a rut DUMPING THE BUCKET Lift the bucket high enough to clear the side of the vehicle Move unit in as close to th...

Страница 43: ...PILE Initially approach the stockpile with the bucket approximately to feet 609 6 mm off of the ground Lower the bucket to ground level when the stockpile height has been reduced so the bucket will br...

Страница 44: ...e banks as low as possible for maximum efficiency Remember that loader lift and break away capacities diminish rapidly as loading height is increased BREAKING AND SPREADING LARGE PILES Side cutting is...

Страница 45: ...where they will be used If soil is excessively hard loosen it with a ripper or plow The remaining ramp can be cut out with either a backhoe or by hand When regular loading tools are not available it...

Страница 46: ...material over the side of the cut 9 D 2 Working from Side only A short wide shelf may also be cut in a hillside working from the side only as illustrated below The first cut A is made parallel to the...

Страница 47: ...plow or rip the area prior to dozing BACKFILLING Angling blade bulldozers are excellent for backfilling ditches as they can drift material into the trench while maintaining forward motion With straig...

Страница 48: ...erators Always have a plan of operation When dropping down a steep hill or over the side of a fill use blade for a brake When traveling carry the blade low This practice helps protect drivetrain and o...

Страница 49: ...ght can balance Effective counterweight is the weight of the tractor from the stabilizer pads to the loader Set the stabilizers to remove weight from the rear track wheels The tracks are to remain tou...

Страница 50: ...ucket is empty the dipstick and bucket are in position to resume digging upon return to the trench IMPORTANT Avoid constant jarring or hammering type contact between the spoil pile and the loaded buck...

Страница 51: ...trench SIDE SLOPE EXCAVATING OR TRENCHING Dig with the backhoe uphill whenever possible Level the backhoe on slopes with the stabilizers to di plumb trenches or use the backhoe or loader to cut a lev...

Страница 52: ...s and the stabilizers The platform distributes the load over a larger area and lessens the possibility of a cave in The platform also tends to keep the unit from creeping rearward if hard digging is e...

Страница 53: ...the close end wall PIPELINE LEAK REPAIR Locate the pipeline with a bellhole about six feet 182 cm wide and tenn feet 304 cm long Then dig lengthwise along the pipeline to locate the leak When the leak...

Страница 54: ...l backing up may be necessary to clear the blade so it can always cut cleanly Otherwise the blade will slide over root and accomplish little Heavier trees and brush require more car and time to uproot...

Страница 55: ...a time Track spinning is wasted effort TRANSPLANTING When transplanting trees of suitable size place bucket under the dirt ball and lift it to a new site securing the trunk to the bucket When the tree...

Страница 56: ...k doesn t move something is holding it Before proceeding find cause and remedy it to prevent machine damage Many rocks such as shale and sandstone are found in tipped position Always dig under the out...

Страница 57: ...224 Pull brake 4 225A Brake body 225B Brake lever 225C Brake jam nut 225D Brake adjuster pin 225L Brake Assembly left 246 Evener rod 247 Pull 249 Support 219 rod 279 Grommet 404 Pull 405 Bar 428 Sprin...

Страница 58: ...35 Washer 236 Washer 239 Bushing oilite 240 O ring 241 Washer 242 Washer 243 Bearing 252 Bearing 262 Tube 276 Key woodruff 436 Shaft 524 Motor 525 Torque Arm 526 Bushing 704 Washer 705 Washer thick 70...

Страница 59: ...ssembly 232 Shim 243 Bearing Assembly 243A Bearing Shell 243B Bearing 246 Evener rod 251 Cotter Pin 252 Bearing Assembly 252A Bearing Shell 252B Bearing 526 Bushing 714 Key 715 Disk Drive 716 Washer 1...

Страница 60: ...9 inch optional 1390 Wire black 1467 Wire blue 1468 Wire black 1469 Wire black A B C D E F G H I J 1 2 3 4 5 6 7 8 441 441 441 475 445 487 447 444 442 Starter Solenoid 1390 yellow Only if HC74 install...

Страница 61: ...p fuse 1408 Wire white 1409 Wire black 1410 Wire red 1411 Wire black 1413 Wire grey 1414 Wire blue 1416 Wire white A B C D E F G H I J 1 2 3 4 5 6 7 8 441 441 441 475 487 486 447 447 1358 1357 1389 13...

Страница 62: ...X 35 812 Hose 1 2 X 47 840 Motor optional PTO70 860 Valve optional HC74 1032 Hose 1 2 X 41 1041 Valve attachments 1163 Valve tracks 1170 Hose 1 2 X 50 1171 Hose 1 2 X 25 1238 Hose 1 2 X 30 1239 Hose...

Страница 63: ...alve optional HC74 1032 Hose 1 2 X 41 2 1041 Valve attachments 1163 Valve tracks 1170 Hose 1 2 X 50 1171 Hose 1 2 X 25 1238 Hose 1 2 X 30 1239 Hose 1 2 X 25 1472 Hose 1 X 9 soft 1473 Hose 5 8 X 18 sof...

Страница 64: ...1163 Valve tracks 1170 Hose 1 2 X 50 1171 Hose 1 2 X 25 1238 Hose 1 2 X 30 1239 Hose 1 2 X 25 1472 Hose 1 X 9 soft 1496 Hose 1 2 X 34 1497 Hose 1 2 X 21 1525 Hose 1 2 X 25 1526 Hose 1 2 X 38 Not show...

Страница 65: ...31 1035 Hose 1041 Valve attachments 1042 Radiator 1107 Check Valve 1238 Hose 1 2 X 33 1239 Hose 1 2 X 28 1355 Pump tracks 1387 Hose 3 4 X 37 1388 Hose 1 1 4 X 19 soft 1417 Hose 1 2 X 62 1 2 1418 Hose...

Страница 66: ...X 33 1239 Hose 1 2 X 28 1355 Pump tracks 1417 Hose 1 2 X 62 1 2 1479 Hose 1 X 8 1 2 soft 1480 Hose 1 X 16 1 2 soft 1481 Hose 1 1 4 X 8 soft 1482 Hose 1 2 X 11 1483 Hose 1 2 X 44 1484 Hose 1 2 X 28 14...

Страница 67: ...6 Hour meter 487 Oil temp gauge 539 Pedal brake 616 Cap breather 859 Handle HC74 optional 1018 Valve cover 1029 Tank fuel 1041 Valve attachment 1081 Cap fuel 1358 Ignition switch 1373 Throttle foot 14...

Страница 68: ...eadle 506 Spring 933 Seat 933D Spacer 933B Seat Glide 1105 Z Bracket 1159 Seat Pan A B C D E F G H I J 1 2 3 4 5 6 7 8 933 1105 933B 502 505 503 1159 933D 504 504 502 506 506 441 503 505 The seat syst...

Страница 69: ...13 Parts Identified 432 Terminal Cover 1357 Battery 1370 Hood 1371 Mount Headlights 1377 Dash 1378 Air Box 1389 Headlight A B C D E F G H I J 1 2 3 4 5 6 7 8 1371 1389 1357 1378 1370 1377 432 1357 13...

Страница 70: ...55B Filter canister hydraulic 799 Hose 1 2 X 74 860 Valve HC74 1364 latch hood 1366 Filter fuel 1367 Filter engine oil 1376 Mount grill 1480 Hose 1 X 16 1 2 soft 2459 Pump attachment A B C D E F G H I...

Страница 71: ...68 Petcock fuel 441 Interlock switch brake 475 Sender oil temp 1355 Pump track 1356 Hub pump mount 1366 Filter fuel 1480 Hose 1 X 16 1 2 soft A B C D E F G H I J 1 2 3 4 5 6 7 8 1355 1356 441 475 1366...

Страница 72: ...spacer tubes during removal 4 Loosen but not remove the four bolts securing the 1382 Pump Mount to the Engine 5 To replace the belt Slide the 1382 Pump mount to the left until belt tension is relieved...

Страница 73: ...t 246 Evener Rod 249 Support 404 Pull Assembly 405 Bar 412 Hose 1 2 X 21 1 4 434 Clamp hose 439 Hose 1 2 X 24 1 4 2 491 Hose 1 2 X 20 1 4 520 Hose case drain 521 Hose case drain 523 Fitting 524 Motor...

Страница 74: ...Axle Idler 215 Axle Idler Sprocket 234 Spring Black 236 Washer 242 Washer 728 Snap Ring 878 Lynch Pin 1030 Tension Rod 1228 Idler Sprocket 2061 Zerk A B C D E F G H I J 1 2 3 4 5 6 7 8 2061 1228 1030...

Страница 75: ...xle 234 Spring outer black 236 Washer 242 Washer 262 Tube 705 Washer 728 Snap Ring 1030 Tension Rod 1218 Idler 1228 Idler Sprocket 2061 Zerk A B C D E F G H I J 1 2 3 4 5 6 7 8 1228 234 1030 215 1218...

Страница 76: ...873 Roll Pin 925 Track Heavy Duty 1030 Tension Rod 1038R Mud Scraper optional 1211 Axle Support 1218 Idler 1219 Rear Drive 1220 Guard spring 1221 Guard 1228 Idler Sprocket 2061 Zerk A B C D E F G H I...

Страница 77: ...13 axle idler 214 Rear Axle 227 Knurled Washer 232 Shim 242 Washer 722 Guard 1090 Chain 80 1211 Axle support 1218 Idler 1219 Rear Drive 1221 Guard A B C D E F G H I J 1 2 3 4 5 6 7 8 722 1219 1218 122...

Страница 78: ...Rocker Assembly Right 223 Shaft 224 Pull brake 225R Brake Caliper Right 243 Bearing 252 Bearing 524 Track Motor 525 Torque Arm 528 Fitting 715 Disk Drive 722 Guard 873 Roll Pin A B C D E F G H I J 1 2...

Страница 79: ...ed 115 Brace right 202R Motor Box Right 223 Shaft 225R Brake Caliper right 252 Bearing 521 Hose 1 4 524 Motor 525 Torque Arm 536 Chain 50 715 Disk Drive A B C D E F G H I J 1 2 3 4 5 6 7 8 115 524 521...

Страница 80: ...Motor Box Right 214 Axle rear drive 223 Shaft 225R Brake Caliper right 232 Shims 243A Bearing Shells 243B Bearing 436 Shaft 715 Disk Drive 1211 Axle Support A B C D E F G H I J 1 2 3 4 5 6 7 8 715 22...

Страница 81: ...Part Photo MH 25 Parts Identified 202R Motor Box right 223 Shaft 243 Bearing 252 Bearing 715 Disk Drive 722 Guard 1219 Rear Drive A B C D E F G H I J 1 2 3 4 5 6 7 8 202R 722 1219 223 252 715 225R 243...

Страница 82: ...s Identified 202R Motor Box right 223 Shaft 225R Brake Caliper Right 252A Bearing Shells 252B Bearing 536 Chain 50 715 Disk Drive 716 Washer A B C D E F G H I J 1 2 3 4 5 6 7 8 223 536 252B 715 716 22...

Страница 83: ...dentified 243 Bearing 436 Shaft 722 Guard 723 Washer 724 Primary Drive 872 Roll Pin 1090 Chain 80 1218 Idler 1219 Rear Drive 1221 Guard A B C D E F G H I J 1 2 3 4 5 6 7 8 1221 1219 1090 724 436 722 2...

Страница 84: ...ed 214 Rear Axle 232 Shim 243A Bearing Shell 243B Bearing 436 Shaft 724 Primary Drive 872 Roll Pin 1210 Lower Frame 1211 Axle Support 1219 Rear Drive A B C D E F G H I J 1 2 3 4 5 6 7 8 1219 724 243A...

Страница 85: ...14 Rear Axle 232 Shim 242 Washer 704 Washer 722 Guard 724 Primary Drive 727 Snap Ring 1211 Axle Support 1218 Idler 1219 Rear Drive 1221 Guard 2061 Zerk A B C D E F G H I J 1 2 3 4 5 6 7 8 722 1219 724...

Страница 86: ...rt Photo MH 30 Parts Identified 213 Axle idler 244 Spring Pin 1090 Chain 80 1210 Lower Frame 1219 Rear Drive A B C D E F G H I J 1 2 3 4 5 6 7 8 1219 1090 213 244 1210 Shown with 1212 Mud Guard remove...

Отзывы: