Magma 7 Slot Series Скачать руководство пользователя страница 30

M A G M A  

22               Chapter 2     Installation Guide 

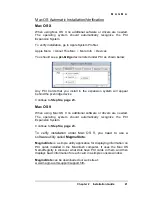
Launch the MagmaSlots application by double-clicking its icon.  It is 
recommended that you launch MagmaSlots from a location on your 
desktop.  

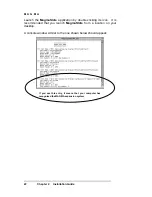
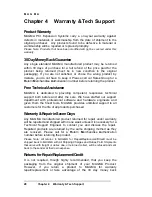
A console window similar to the one shown below should appear:  


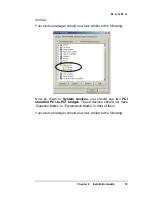
If you see this entry, it means that your computer has 
recognized the MAGMA expansion system.   

Содержание 7 Slot Series

Страница 1: ...PRELIMINARY PCI Expansion System User s Manual 64 bit 66MHz 7 Slot Series 9918 Via Pasar San Diego CA 92126 Phone 858 530 2511 Fax 858 530 2733 www magma com sales magma com support magma com...

Страница 2: ...echanical optical or otherwise in whole or in part without prior written consent from MAGMA Limitation of Liability Information presented by MAGMA in this manual is believed to be accurate and reliabl...

Страница 3: ...ttach PCI Expansion and Power Cable s 5 PCI Expansion Cable Connection Diagram 5 Step Three Recheck Installation 6 Step Four Power Up 6 Step Five Install Software Driver Verify Installation 7 Windows...

Страница 4: ...stance 28 Warranty Repair in Seven Days 28 Returns for Repair Replacement Credit 28 Out of Warranty Repair 29 Advanced Replacement Service 29 Contacting Technical Support 30 Frequently Asked Questions...

Страница 5: ...cing any electrical component NOTE An amplifying or explanatory comment related to procedural steps or text CAUTION Used to indicate and prevent the following procedure or step from causing damage to...

Страница 6: ...removing components Unplug the power cord before removing the cover The cover can only be opened by persons having appropriate technical training and experience necessary to be aware of hazards to wh...

Страница 7: ...ting this type of cable press in on the locking tabs before disconnecting the cable As you pull connectors apart keep them evenly aligned to avoid bending any connector pins Also before connecting a c...

Страница 8: ...terial until you are ready to install the component in a computer Just before unwrapping the anti static packaging be sure you are at an ESD workstation or grounded When transporting a sensitive compo...

Страница 9: ...ull duplex S MTBF 60 000 hours S Operating Environment 0 to 50 C Operating Temperature 20 to 60 C Storage Temperature 5 to 85 Relative Humidity Non condensing S Supported Operating Systems Windows XP...

Страница 10: ...ing a cable backwards Be careful when routing signal cables to your devices Avoid sharp bends or folds in the signal cable Provide enough slack to allow easy device placement Beware of sources of scuf...

Страница 11: ...d in a separate box within the larger box that the expansion system is shipped in ToolsRequiredforInstallation In order to complete the installation of the PCI expansion system you will need the follo...

Страница 12: ...removing the enclosure cover Turning the system power off at the power on off switch does not remove power to components High voltage is still present CAUTION Before touching anything inside the encl...

Страница 13: ...following the diagrams shown below PCI Expansion Cable Connection Diagram PCI Host Interface Expansion System L0 L0 Rx0 Rx0 Tx0 Tx0 L1 L1 Rx0 Rx0 Tx0 Tx0 CAUTION All cables attached to the expansion...

Страница 14: ...you are in NOTE For systems that have a 300W redundant power supplies a red push button is provided on the back of the enclosure to silence the audible alarm in the event of a power supply failure Yo...

Страница 15: ...e seating properly and connected to the correct port before powering up again WARNING The expansion system will not work properly or may not be recognized by the host computer unless all LEDs on the H...

Страница 16: ...t time you boot your computer with the PCI Expansion System installed Insert the CDROM that was included with your expansion system into the CDROM drive of your computer Choose Install the software au...

Страница 17: ...river and display the following dialog The following dialog should appear Click Finish Now you should see a yellow call out box appear in the lower right hand corner of your screen that reads Your new...

Страница 18: ...stalled on Go to Start Control Panel System use Classic View Hardware Device Manager Choose View devices by connection locate the PCI Bus that the expansion system is connected to Your Device Manager...

Страница 19: ...fication The following dialog will appear the first time you boot your computer with the PCI Expansion System installed Click Next The following dialog will appear Choose Search for a suitable driver...

Страница 20: ...s included with your expansion system into the CDROM drive of your computer Make sure CD ROM drives is checked then click Next Your computer should automatically find the appropriate driver and displa...

Страница 21: ...expansion system bridge devices You can verify this by going to the Device Manager to see the bridges that you have just installed Go to Start Settings Control Panel System Hardware Device Manager Ch...

Страница 22: ...own menu click OK After restarting your computer should automatically find the next PCI bridge device It may not be obvious to you that your computer found any new hardware but you can verify that the...

Страница 23: ...M A G M A Chapter 2 Installation Guide 15 PCI device installation is now complete Continue to Step Six page 23...

Страница 24: ...he Windows ME operating system However you should follow the installation instructions below carefully The following dialog will appear the first time you boot your computer with the PCI Expansion Sys...

Страница 25: ...M A G M A Chapter 2 Installation Guide 17 Choose Automatic search for a better driver Recommended then click Next The following dialog will appear again Click Finish The following dialog will appear...

Страница 26: ...al Click Finish Even though Windows ME was unable to locate the software for the last device installed Everything should still work properly To verify installation go to Device Manager Start Settings...

Страница 27: ...r should now look similar to the following Now go down to System devices you should see two PCI standard PCI to PCI bridges These devices should not have Question Marks or Exclamation Marks in front o...

Страница 28: ...M A G M A 20 Chapter 2 Installation Guide PCI device installation is now complete Continue to Step Six page 23...

Страница 29: ...he pci bridge device Continue to Step Six page 23 Mac OS 9 When using Mac OS 9 no additional software or drivers are needed The operating system should automatically recognize the PCI Expansion System...

Страница 30: ...lication by double clicking its icon It is recommended that you launch MagmaSlots from a location on your desktop A console window similar to the one shown below should appear If you see this entry it...

Страница 31: ...Slot 64 bit 66MHz expansion system should begin with the slot farthest away from the installed daughter card labeled SLOT 4 Install PCI cards following PCI card manufacturer s recommendations CAUTION...

Страница 32: ...cation Revision 2 0 compliant or better Compliance in your system motherboard PCI cards and console firmware or BIOS is your best assurance that everything will install and operate smoothly Not all PC...

Страница 33: ...ut Down and Reboot your system several times during PCI device installation Please be patient each Shut Down and Reboot does serve a purpose and is required for correct installation If you Shut Down a...

Страница 34: ...up and running If you are having trouble with the system turn off the host computer and the expansion system then check that all cards are seated in the slot properly and all cables are connected sec...

Страница 35: ...he key point in the following figure of the 7 Slot Topology is the connecting cables between the Host Interface and the Expansion Backplane is actually a PCI bus itself In general we do not know what...

Страница 36: ...fter the sale We have staffed our support department with professional software and hardware engineers and given them the finest tools MAGMA provides unlimited support to all customers for the life of...

Страница 37: ...needed this will be applied to the repair of the product Once evaluation has been completed a Customer Support Representative will contact you with any options you may have and to authorize the repair...

Страница 38: ...ed for return and restocking if the Advanced Replacement is less than 90 days from date of replacement unit shipment ContactingTechnicalSupport For a quick response send an email to support magma com...

Страница 39: ...packaging from the original shipment of your MAGMA product However if you return a product to MAGMA for warranty repair replacement or take advantage of the 30 day money back guarantee you will need...

Страница 40: ...eceived including interference that may cause undesired operation Changes or modifications not expressly approved by the party responsible for compliance could void the user s authority to operate the...

Страница 41: ...3 3 1995 Voltage Fluctuations Not Applicable for units under 75 Watts EN 50024 1998 Immunity ITE Requirements EN 61000 4 2 Electrostatic Discharge ESD Immunity Supersedes IEC 801 2 EN 61000 4 3 Forme...

Страница 42: ...Manual P N 09 09905 01 A...

Отзывы: