background image

Paradox Magellan Systems


13

Zone Programming

Magellan supports up to 16 wireless zones where each zone can 
be configured with a different zone definition and option. Each 
zone can also have a voice label recorded for it. Magellan’s 
zones can be programmed using section programming or 
through the Installer menu.

See Quick Setup on page 4 for more information on zone 
programming using the Installer menu.

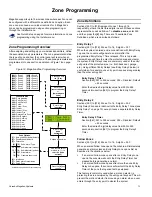
Zone Programming Overview

After assigning and setting up your wireless transmitters, define 
the associated zone's parameters. The zone parameters define 
the type of zone and how the control panel will react when an 
alarm condition occurs on that zone. These zone parameters are 
programmed into one section as detailed in Figure 16 on page 
13.

Figure 16: Magellan Zone Programming Overview

Zone Definitions

Sections [001] to [016] represent zones 1 through 16 
respectively, where the first three digits in each of these sections 
represents the zone's definition. To 

disable a zone

, enter 000 

and then press the 

[#]

 key. There are 15 available Zone 

Definitions, which are described as follows:

Entry Delay 1

Sections [001] to [016]: Zones 1 to 16, 3-digit # = 001

When the system is armed and a zone defined with Entry Delay 
1 opens, the console will generate an alarm after the 
programmed Entry Delay 1 Timer elapses. This is to provide 
users with enough time to enter the protected area and disarm 
the system. Entry Delay zones are commonly used at the entry/
exit points of the protected area (i.e. front/back door, garage, 
etc.). Using different Entry Delays (see Entry Delay 2 below) is 
useful when, for example, one entry point requires a longer delay 
than the other entry point.

Entry Delay 1 Timer

Section [060]: 001 to 255 seconds; 000 = Disabled; Default 

= 45 seconds

Enter the desired 3-digit delay value from 000 to 255 
seconds into section [060] to program the Entry Delay 1 
Timer.

Entry Delay 2

Sections [001] to [016]: Zones 1 to 16, 3-digit # = 002

Entry Delay 2 zones are identical to the Entry Delay 1 zones (see 
Entry Delay 1 on page 13), except it uses a separate Entry Delay 
Timer.

Entry Delay 2 Timer

Section [061]: 001 to 255 seconds; 000 = Disabled; Default 

= 45 seconds

Enter the desired 3-digit delay value from 000 to 255 
seconds into section [061] to program the Entry Delay 2 
Timer.

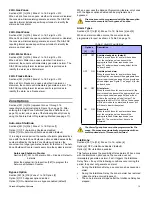
Follow Zones

Sections [001] to [016]: Zones 1 to 16, 3-digit # = 003

When an armed Follow zone opens, the console will immediately 
generate an alarm unless an Entry Delay zone opens first as 
described in the situations below:

If an armed Follow zone opens after an Entry Delay zone 
opens, the console waits until the Entry Delay Timer has 
elapsed before generating an alarm.

If an armed Follow zone opens after more than one Entry 
Delay zone opens, the console will wait until the Entry Delay 
Timer of the zone that opened first has elapsed.

This feature is commonly used when a motion detector is 
protecting the area occupied by the entry point keypad. This will 
prevent the motion detector from causing an alarm when a user 
enters through the entry point to disarm the system.

Press and hold 

the 

[0]

 key

Enter your 

[

INSTALLER CODE

]

or

[

MAINTENANCE

CODE

]

Enter 3-digit 

[

SECTION

]

[001]

 = Zone 1

[002]

 = Zone 2

[003]

 = Zone 3

[004]

 = Zone 4

[005]

 = Zone 5

[006]

 = Zone 6

[007]

 = Zone 7

[008]

 = Zone 8

[009]

 = Zone 9

[010]

 = Zone 10

[011]

 = Zone 11

[012]

 = Zone 12

[013]

 = Zone 13

[014]

 = Zone 14

[015]

 = Zone 15

[016]

 = Zone 16

Zone Definition

000

 = Zone disabled

001

 = Entry Delay 1

002

 = Entry Delay 2

003

 = Follow

004

 = Follow / Stay

005

 = Instant

006

 = Instant / Stay

007

 = Instant Fire

008

 = Delayed Fire Zone

009

 = 24hr Burglary

010

 = 24hr Hold-up

011

 = 24hr Buzzer

012

 = 24hr Gas

013

 = 24hr Heat

014

 = 24hr Water

015

 = 24hr Freeze

Zone Options

*

[1]

 = Auto-zone Shutdown (default)

[2]

 = Zone Bypass (default)

[3]

 = Future use

[6]

 = Intellizone

[7]

 = Delay alarm transmission

[8]

 = Force Zone

[4]

[5]

Zone Alarm Type

OFF OFF Audible alarm (steady)

OFF ON Audible alarm (pulsed)

ON OFF Silent alarm

ON

ON Generate report only

Enter 3-digit 

[

ZONE

DEFINITION

]

Use feature select 

method (p. 11) to 

select the 

[

ZONE

OPTIONS

]

Press the 

[#]

 key 

to save

Keypad beeps twice

* Available through Section Programming only.

Содержание MG-6060

Страница 1: ...All In One Wireless Security System V1 0 Model MG 6060 Reference and Installation Manual...

Страница 2: ......

Страница 3: ...es to Stay Arming 20 Regular Arming Switches to Force Arming 20 Stay Arming Switches to Force Arming 20 Timed Auto Arming 20 No Movement Auto Arming 20 Auto Arming Options 20 One Touch Arming 21 Exit...

Страница 4: ...2 Reference Installation Manual Panel Answer Options 33 Panel Identifier 33 PC Password 33 PC Telephone Number 33 Call Back Feature 33 Appendix 1 Ademco Contact ID Report Code List 34 Index 37...

Страница 5: ...you read this entire manual before you begin installation Conventions Specifications Power input AC 9Vac 1A 9VA transformer or 16 5Vac 20VA transformer or DC 12Vdc to 18Vdc power supply Current consu...

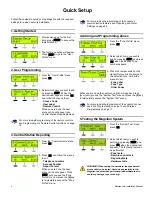
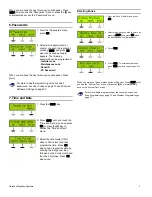
Страница 6: ...immediately access the Zone Profile menu For more in depth programming of the console s communication features see Reporting and Dialer Settings on page 24 4 Adding and Programming Zones 1 From the Zo...

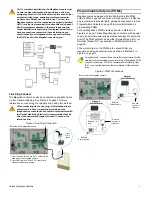
Страница 7: ...y 2 Press NEXT until you reach the Time and Date menu and press OK or press the 3 key to access the Time and Date menu 3 Select the time format 12Hr clock or 24Hr clock and then program the time Press...

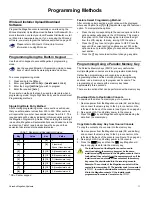
Страница 8: ...to a telephone line by connecting the telephone company s wires directly to Magellan s dialer or by connecting a standard 4 pin RJ 11 cable between the LINE plug of the console to a standard telephone...

Страница 9: ...lug Connection Programmable Outputs PGMs Magellan comes equipped with two 50mA solid state PGM outputs When a specific event occurs in the system a PGM can be programmed to activate lights garage door...

Страница 10: ...Software for Windows WinLoad allows for remote or on site uploading and downloading using most standard modems It also allows for advanced printing of reports and supports several languages simultaneo...

Страница 11: ...lation near or in the path of strong RF fields i e neon lights computers and on or near metal objects circuit breakers boxes air conditioners and heater ducts since they may cause interference and red...

Страница 12: ...with Magellan are two plastic feet as well as two rubber stops The plastic feet raise the Magellan console to a slight angle for easy viewing while the rubber stops prevent the console from sliding wh...

Страница 13: ...ection s options are set When the options are set press the key to save and advance to the next section Press the key twice to exit without changing any data Programming Using a Paradox Memory Key The...

Страница 14: ...to program all features options and commands except for the console s communication settings sections 100 to 154 as well as any user code The Maintenance code can be 4 or 6 digits in length see User C...

Страница 15: ...16 3 digit 002 Entry Delay 2 zones are identical to the Entry Delay 1 zones see Entry Delay 1 on page 13 except it uses a separate Entry Delay Timer Entry Delay 2 Timer Section 061 001 to 255 seconds...

Страница 16: ...d bell siren output signal as shown in Figure 17 on page 14 Figure 17 Bell Siren Output during a Fire Alarm Delayed Fire Zones Sections 001 to 016 Zones 1 to 16 3 digit 008 When a Delayed 24Hr Fire Zo...

Страница 17: ...Option 2 OFF Bypass option disabled Option 2 ON Selected zone is bypass enabled default When a user uses the Bypass Programming feature only zones with the Bypass option enabled can be programmed as b...

Страница 18: ...breached Fire zones cannot be programmed with the Force Zone option because the console will not bypass a Fire zone when the system is being Force armed Stay Delay Zones Section 094 Options 1 Option 1...

Страница 19: ...e pushbutton is pressed Magellan will in turn become a doorbell and play a predetermined tone see Wireless Doorbell Tones on page 17 Please refer to the appropriate Magellan Wireless Door Contact Inst...

Страница 20: ...rogrammed to perform up to 5 different actions Each digit in sections 161 to 176 represents a button or combination of buttons see Table 4 on page 18 To program a remote control s buttons 1 Access the...

Страница 21: ...de 5 Future use D Turn FM radio ON OFF 6 Future use E FM radio memory scan 7 Future use F Paramedic alarm Inset 1 Removing the Battery Inset 2 Inserting the New Battery Step 1 Step 2 WARNING Damage to...

Страница 22: ...g report code programmed in section 124 Example To automatically arm the system everyday at 6 15PM enable section 092 option 1 to activate Timed Auto arming and then key in 18 15 into section 085 Auto...

Страница 23: ...the system is armed with a remote control Exit Delay Termination Section 093 Option 6 Option 6 OFF Exit delay termination feature disabled Option 6 ON Exit delay termination feature enabled default Wh...

Страница 24: ...ypassed zone When option 5 is OFF the Tamper Recognition feature page 22 will follow the zone s bypass definition This means the console will ignore any tampers that occur on a bypassed zone Check in...

Страница 25: ...econds See Table 7 on page 23 for the appropriate panic alarm keys Whether these panic alarms will generate a silent or audible alarm is determined by section 091 options 4 to 6 see Panic Alarm Types...

Страница 26: ...s Section 125 One touch Arming The system was armed using a One touch Arming feature see page 21 Remote Arming The system was armed using the WinLoad software Future use Future use Disarming Report Co...

Страница 27: ...d or battery voltage is d less than or equal to 6 9V Timer Loss The console has detected a loss in time or clock failure Section 150 Future use Fail To Communicate The Magellan console has failed all...

Страница 28: ...e Installer menu Refer to the Magellan Quick Setup Guide for more information to play a pre recorded message to an external telephone or cellular telephone Please note the following when programming a...

Страница 29: ...ndard messages and report codes Event Call Direction Section 100 Options 1 to 3 Arming Disarming Option 1 ON Call CSTN 1 Option 2 ON Call CSTN 2 Option 3 ON Call Pager telephone number Section 100 Opt...

Страница 30: ...an console switches from tone DTMF dialing to pulse dialing on the fifth attempt to report events to the Central Monitoring Station The console continues to use pulse dialing until it establishes comm...

Страница 31: ...tion 149 after the Power Failure Report Delay period has elapsed Disarm Reporting Options Section 093 Option 5 Option 5 OFF Always Report Disarming Option 5 ON Report Disarming only after Alarm Defaul...

Страница 32: ...programmed period elapses see PGM Delay on page 30 If using the PGM Delay sections 087 and 089 can be used as a second PGM Activation Event For the Event List see the PGM Table in the Magellan Program...

Страница 33: ...ngs Time Section 096 Option 5 Option 5 OFF Daylight savings time disabled default Option 5 ON Daylight savings time enabled With section 096 option 5 ON Magellan adjusts the system s clock time for da...

Страница 34: ...lan console has failed to contact the monitoring station Fail to Communicate with Voice Reporting The Magellan console has failed to contact telephone number programmed for Voice reporting Fail to Com...

Страница 35: ...le will answer the call You must wait at least 10 seconds before attempting the second call or Magellan will think it is the same call Panel Identifier Section 108 4 digit Hexa decimal number from 000...

Страница 36: ...rigeration 27 153 Loss of heat 28 CID Reporting Code Programming Value 154 Water leakage 29 155 Foil break 2A 156 Day trouble 2B 157 Low bottled gas level 2C 158 High temperature 2D 159 Low temperatur...

Страница 37: ...nance alert 7A Open Close 400 400 Open Close 7B 401 Open Close by user 7C 402 Group open close 7D 403 Automatic open close 7E 406 Cancel 7F 407 Remote arm disarm 80 CID Reporting Code Programming Valu...

Страница 38: ...trigger test BD 602 Periodic test report BE 603 Periodic RF transmission BF 604 Fire test C0 605 Status report to follow C1 606 Listen in to follow C2 607 Walk test mode C3 608 Periodic test system t...

Страница 39: ...131 to 134 24 135 to 138 24 139 24 140 12 24 25 141 to 144 25 145 to 148 25 149 25 150 25 151 25 153 25 154 12 25 155 25 156 25 161 to 176 18 180 31 181 12 182 12 187 14 190 14 200 12 201 31 24Hr zon...

Страница 40: ...Key 9 10 PGMs 7 Telephone Line 6 UIP 256 8 WinLoad 8 X10 9 Console account number 26 Console audible trouble warning 31 Console tamper supervision 31 Console telephone numbers 25 Contact ID 27 Cut of...

Страница 41: ...rings 33 O Options zone Alarm types 15 Auto zone Shutdown 15 Bypass option 15 Delay before Alarm Report Code Transmission 16 Force Zones 16 Intellizone 15 Overview zone programming 13 P Pack backup ba...

Страница 42: ...es Follow Stay Zones 14 Instant Stay Zones 14 Supervision Check in 22 Console tamper 31 Wireless transmitters 22 Supervision Bypass options 22 Switch to Pulse dialing 28 System master code 12 System m...

Страница 43: ...come hardwire 16 Wirless doorbell tones 17 X X10 connections 9 X10 PGM option 30 Z Zone alarm report codes 24 Zone alarm restore report codes 24 Zone definitions 24Hr Burglary Zones 14 24Hr Buzzer Zon...

Страница 44: ...42 Reference Installation Manual...

Страница 45: ...ediate disconnection of terminal equipment Standard jacks shall be so arranged that if plug connected thereto is withdrawn no interference to operation of equipment at customer s premises which remain...

Страница 46: ......

Страница 47: ......

Страница 48: ...780 Industriel Blvd Saint Eustache Quebec J7R 5V3 CANADA Tel 450 491 7444 Fax 450 491 7313 www paradox ca Printed in Canada 09 2004 MAGELLAN EI01...

Отзывы: