Mag-ic Probe V4.0 Скачать руководство пользователя страница 4

You can test that the probe is working by
clicking on the OK button and then clicking
on CONNECT button.
You should see some data messages from
the probe appear in the window.

One problem with Mac OSX is that it does not easily list the available serial ports to the user or
applications the way that Windows does. To identify the correct serial port in Mac, the easiest way is to
follow the below procedure.
Download a small free application from 

or 

Run this application and in the top menu Bar, click on Connection/Options

http://download.cnet.com/CoolTerm/3000-2383_4-

10915190.html 

http://freeware.the-meiers.org/

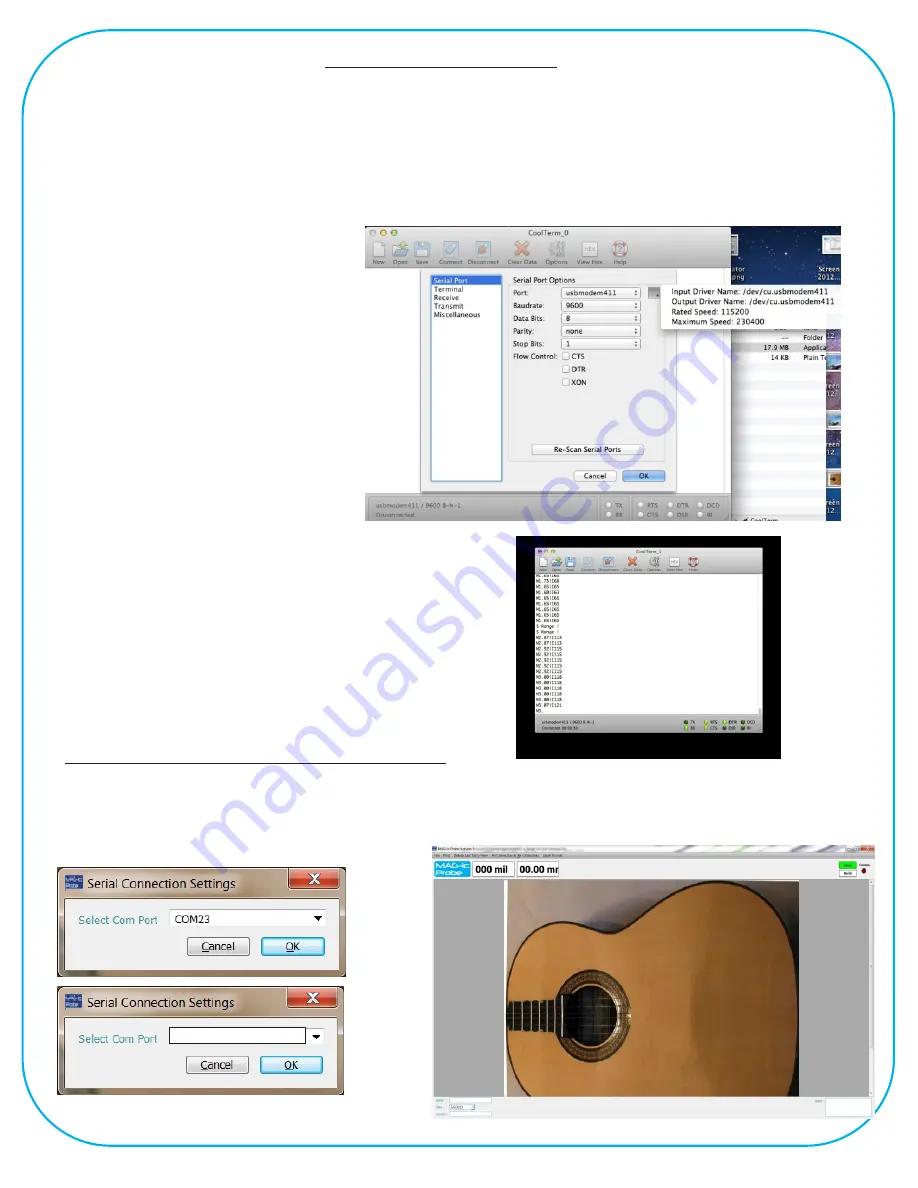
Click on the <Port> button to see the
available ports. The Serial port should 
be identified as something like 
USBmodem or USBSerial etc. Pick 
this option and then click on the small 
box to the right of this line. This box 
will provide the full detail of the Port
Name.
In this example it is Usbmodem411 but
each computer will be different.
The full name is


/dev/cu.usbmodem411.

Make a note of this full name as you 
will need it in the MAG-ic probe 
Software.

MAC Serial Connection

Connecting to MAG-ic Probe Software

 /dev/cu.usbmodem411

Start the MAG-ic Probe Software and click on the PortSelection and Calibration menu and select 
Serial Port. In the Settings box, either select the correct Com Port from the drop-down box or manually 
type in the Com Port information from above. If connection is successful, a green light should turn on 
in the top right corner.

Содержание V4.0

Страница 1: ...lds are strong at the magnet surface and deteriorate rapidly in a non linear manner as distance increases Ÿ Magnetic fields will vary with changing temperatures Ÿ Magnetic and most other sensors are unstable and vary their output with changing temperatures Ÿ Friction may cause the inner magnet to not be centered on the probe tip when moving the probe across the measured object Considering the abov...

Страница 2: ...be engaged by pressing FUNCTION 1 Firstly the initial calibration procedure will compensate for differences between your shop environment and the factory environment where MAG ic Probe was calibrated The problem is that after this calibration your hand may heat the probe causing a small drift in value This is the reason for the 2nd calibration as described above To assist in this 2nd calibration t...

Страница 3: ...rts currently installed on your pc Look for the USB Serial Port COM and note the port number If you double click this line you should see a similar properties window as below right In the above example COM 3 is the port that will be used when we connect to the MAG ic Probe Software If a driver is not automatically installed Please return to the website and click on Document and Driver Downloads Do...

Страница 4: ...utton to see the available ports The Serial port should be identified as something like USBmodem or USBSerial etc Pick this option and then click on the small box to the right of this line This box will provide the full detail of the Port Name In this example it is Usbmodem411 but each computer will be different The full name is dev cu usbmodem411 Make a note of this full name as you will need it ...

Страница 5: ...ssful you will be prompted to re attach the magnet and press function key This completes the initial calibration and MAG ic Probe is ready to perform your measurements The display should read 0 00 when the magnet is attached to the probe If the advanced calibration is required perform it now see Advanced Calibration HOLD Function MAG ic Probe features a HOLD mode to assist you in obtaining accurat...

Страница 6: ...uring instrument you want to equalize the 2 instruments by adding or subtracting a value The OFFSET value is set in mils 1 1000th inch Please remember to set the offset back to zero when completed for normal measures Press 2 for OFFSET followed by either 2 for negative decrement or 4 for positive increment Re Calibration Press 4 for Re calibration This will restart the complete initial calibration...

Страница 7: ...unit when not in use to conserve battery life Ÿ Take care of the magnets they are fragile and will shatter or splinter if allowed to snap onto each other or metal objects Ÿ Ensure your instrument does not contain any metallic objects to which the internal magnets can be attracted Removing a magnet from a finished instrument can be difficult Ÿ Do not drag the probe across finished surfaces Either l...

Страница 8: ......

Отзывы: