Mag-ic Probe V4.0 Скачать руководство пользователя страница 3

MAG-ic Probe V4 uses a common USB driver for communication with your computer. This driver 
should be automatically installed by most Windows operating systems. When first connecting MAG-ic 
probe to your computer USB port, be aware of on-screen messages to indicate if the driver has been 
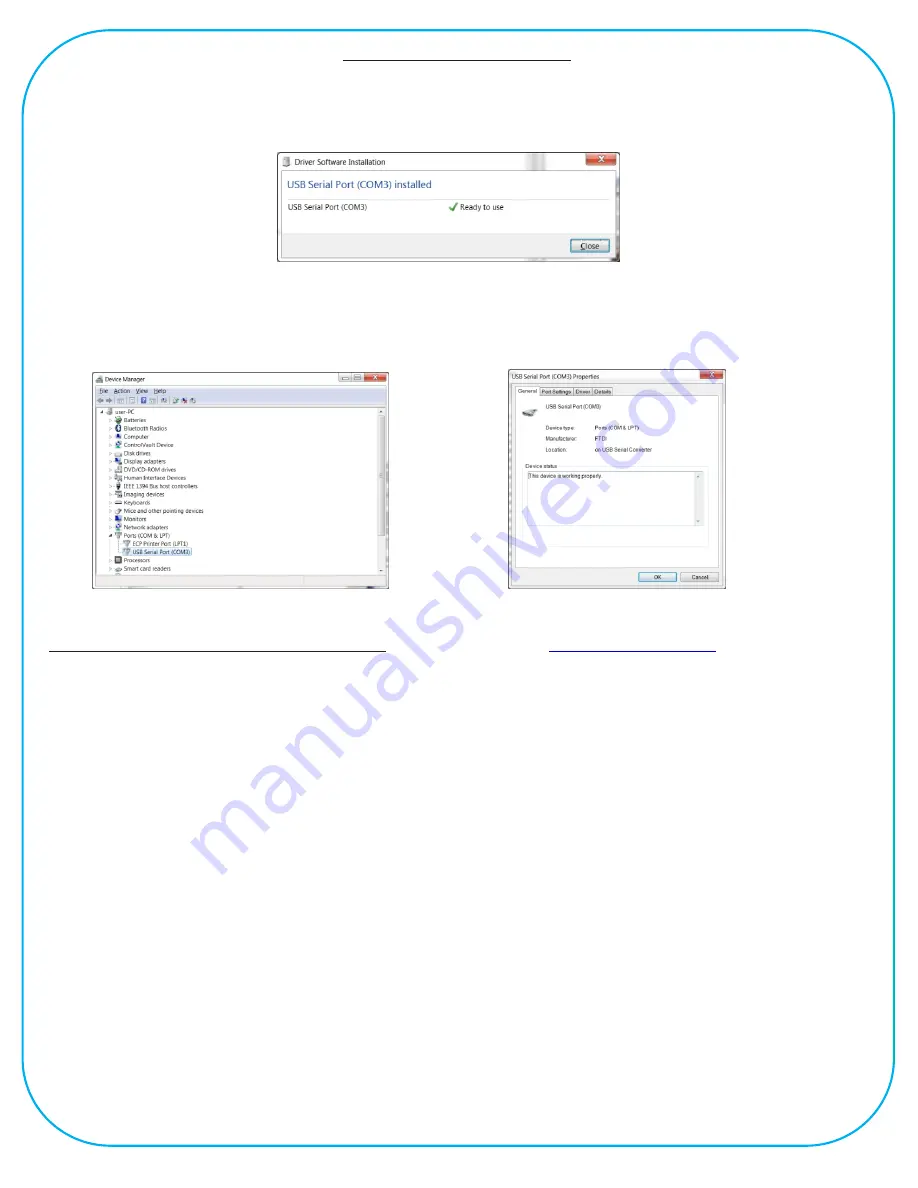
successfully installed. You may see a message as follows -

The COM PORT # is the information you need for the MAG-ic Probe Software. If you do not see the 
above message, open the Control Panel and then click on Device Manager. In the Device Manager 
window, click on the small triangle next to Ports (COM & LPT). This will list the ports currently installed 
on your pc. Look for the USB Serial Port (COM #) and note the port number. If you double click this 
line, you should see a similar properties window as below right.

In the above example, COM 3 is the port that will be used when we connect to the MAG-ic Probe 
Software.

If a driver is not automatically installed.

Please return to the 

 website and click 

on 

Document and Driver Downloads.

Download the driver files for your operating system and also download the correct Driver Installation 
Instruction Manual on this page.

Follow the instructions in the manual on how to get your driver working.
Once you have the driver properly installed, check back in your

 Device Manager 

and take note of the


COM PORT # 

so that you can use that # in the MAG-ic Probe Software.

www.magicprobe.net

USB Serial Connection

Содержание V4.0

Страница 1: ...lds are strong at the magnet surface and deteriorate rapidly in a non linear manner as distance increases Ÿ Magnetic fields will vary with changing temperatures Ÿ Magnetic and most other sensors are unstable and vary their output with changing temperatures Ÿ Friction may cause the inner magnet to not be centered on the probe tip when moving the probe across the measured object Considering the abov...

Страница 2: ...be engaged by pressing FUNCTION 1 Firstly the initial calibration procedure will compensate for differences between your shop environment and the factory environment where MAG ic Probe was calibrated The problem is that after this calibration your hand may heat the probe causing a small drift in value This is the reason for the 2nd calibration as described above To assist in this 2nd calibration t...

Страница 3: ...rts currently installed on your pc Look for the USB Serial Port COM and note the port number If you double click this line you should see a similar properties window as below right In the above example COM 3 is the port that will be used when we connect to the MAG ic Probe Software If a driver is not automatically installed Please return to the website and click on Document and Driver Downloads Do...

Страница 4: ...utton to see the available ports The Serial port should be identified as something like USBmodem or USBSerial etc Pick this option and then click on the small box to the right of this line This box will provide the full detail of the Port Name In this example it is Usbmodem411 but each computer will be different The full name is dev cu usbmodem411 Make a note of this full name as you will need it ...

Страница 5: ...ssful you will be prompted to re attach the magnet and press function key This completes the initial calibration and MAG ic Probe is ready to perform your measurements The display should read 0 00 when the magnet is attached to the probe If the advanced calibration is required perform it now see Advanced Calibration HOLD Function MAG ic Probe features a HOLD mode to assist you in obtaining accurat...

Страница 6: ...uring instrument you want to equalize the 2 instruments by adding or subtracting a value The OFFSET value is set in mils 1 1000th inch Please remember to set the offset back to zero when completed for normal measures Press 2 for OFFSET followed by either 2 for negative decrement or 4 for positive increment Re Calibration Press 4 for Re calibration This will restart the complete initial calibration...

Страница 7: ...unit when not in use to conserve battery life Ÿ Take care of the magnets they are fragile and will shatter or splinter if allowed to snap onto each other or metal objects Ÿ Ensure your instrument does not contain any metallic objects to which the internal magnets can be attracted Removing a magnet from a finished instrument can be difficult Ÿ Do not drag the probe across finished surfaces Either l...

Страница 8: ......

Отзывы: