background image


madVR Envy 

 JVC Setup Guide 

Copyright © madVR Labs, LLC. All rights reserved. 


Important note 1

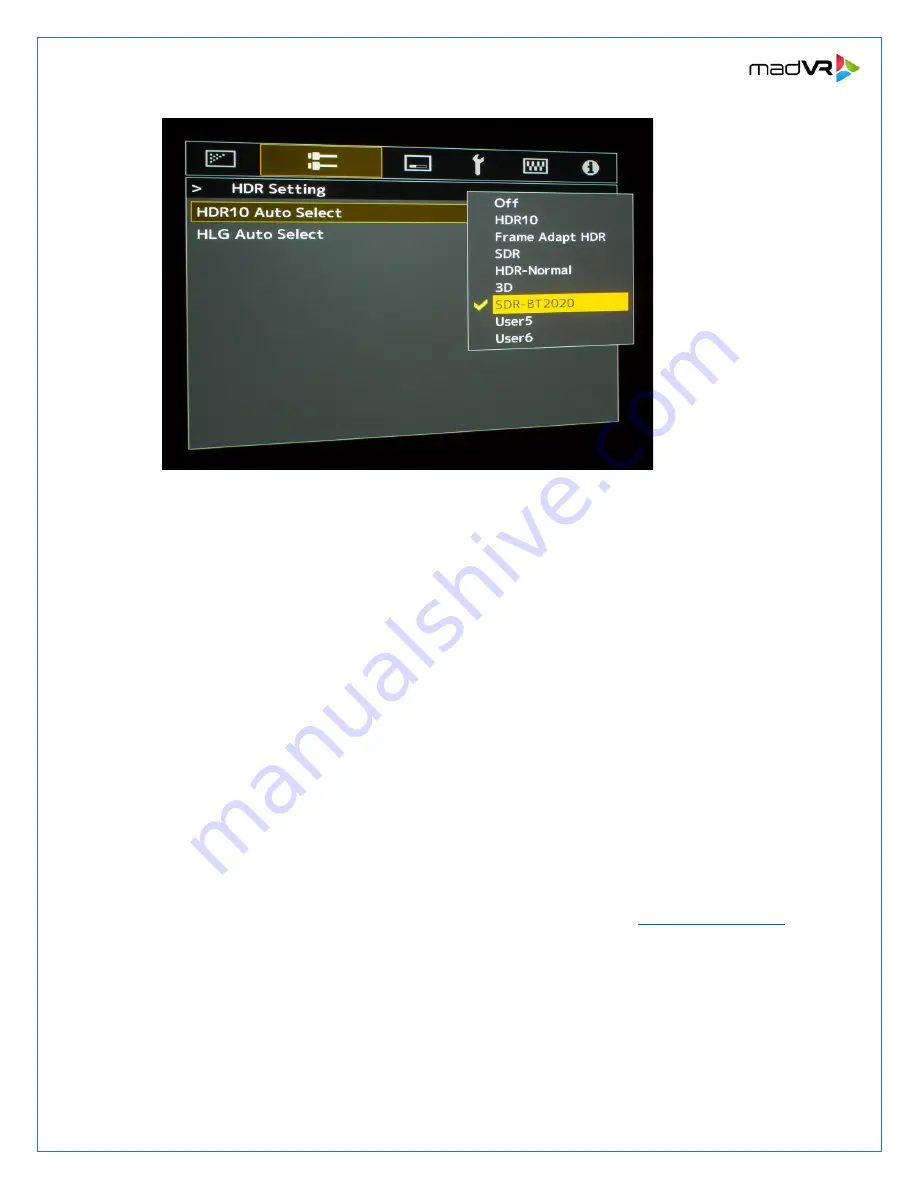
: To prevent the JVC from applying its own HDR tone mapping on top of the 

Envy’s tone mapping (which would look quite bad), make sure that you do not select HDR10, 

Frame Adapt HDR or HDR-Normal.  
 

Important note 2

In the Envy’s “Display Calibration” menu,

 shown in Appendix A, the HDR Flag 

must be set to “On.”  This is what triggers the JVC to use the Picture Mode that we created in 

the previous steps whenever it is receiving tone mapped HDR from the Envy. 
 

8.


Next, we select the Anamorphic mode and Aspect setting. Below is an example of an Installation 

Mode setting you can use. Note that the “2.35:1” label shown here is nothing more than the 

name assigned to this Installation Mode in this example. Please set these menu options as 
follows: 


A.


Always set the 

Anamorphic

 option to 

Off

, even if you have an anamorphic lens (in which 

case you will configure the Envy settings to use its AI-based anamorphic stretch instead). 
 

B.


Aspect should be set to 

Auto

.  Regardless of the Aspect Ratio of the Screen or content, the 

Envy can be configured to optimize the picture size with the use of its Profile system, along 
with its Black Bar Detection and Management options. For more information see the 
Introduction to Profiles guide and the Scope Screen Setup guide at 

www.madvrenvy.com


Содержание Envy

Страница 1: ...madVR Envy JVC Setup Guide Copyright madVR Labs LLC All rights reserved madVR Envy JVC Setup Guide www madvrenvy com Revision 1 01...

Страница 2: ...h the Envy Please note that although there is a more recent Firmware v3 50 we do not recommend updating to this version One of the major changes with v3 50 is the addition of the Theater Optimizer Alo...

Страница 3: ...owever there have been cases where the JVC selects the wrong levels when set to Auto Therefore we find it is generally best to force it to video levels so you do not need to worry about it being wrong...

Страница 4: ...se with SDR content from the Envy This small increase in the Dark Level setting can improve shadow detail If you are using calibration software to calibrate the JVC through the Envy there is no need t...

Страница 5: ...amic tone mapping is 2 4 when not performing a 3D LUT Important If you set the Gamma to something other than 2 4 be sure to change the Transfer Function setting in the Envy s Display Calibration menu...

Страница 6: ...re up to the user depending on overall brightness available and user preferences 7 Next we configure the JVC to select the Picture Mode we want it to use when it detects the HDR Flag This is done usin...

Страница 7: ...and Aspect setting Below is an example of an Installation Mode setting you can use Note that the 2 35 1 label shown here is nothing more than the name assigned to this Installation Mode in this examp...

Страница 8: ...ff the screen this is not needed Otherwise this setting may help you get closer to the D65 target color temperature You can input the Screen No code for the screen being used here JVC provides codes i...

Страница 9: ...VR Envy JVC Setup Guide Copyright madVR Labs LLC All rights reserved This concludes the setup of the JVC projector Be sure to review the Envy Quick Start Guide as well for how to set up the Envy in ge...

Страница 10: ...ing the tone mapping because normally the HDR flag would cause the display to engage its own tone mapping However in the case with the JVC we have set it up in step 4 to not process HDR when it sees t...

Страница 11: ...the peak luminance measure to render dark scenes according to director s intent and to render bright scenes accurately as well Therefore the most critical HDR setting in the Envy is the peak luminance...

Страница 12: ...de B While playing the 4K HDR movie check the Envy Incoming Signal Information to make sure the Transfer Function shows HDR If not Envy is not receiving HDR from the source player This could be caused...

Отзывы: